Beeswax wraps

New Zealand made beeswax wraps

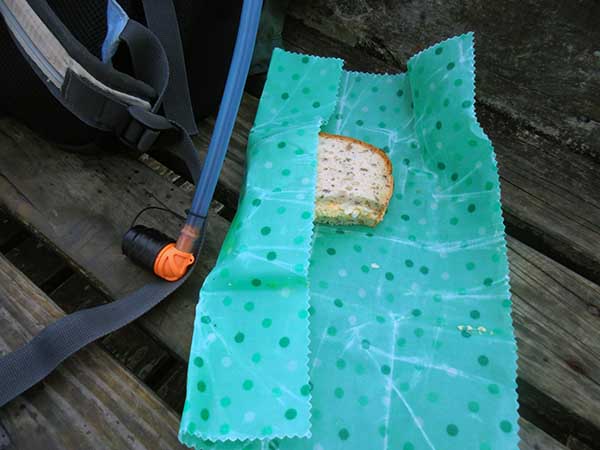
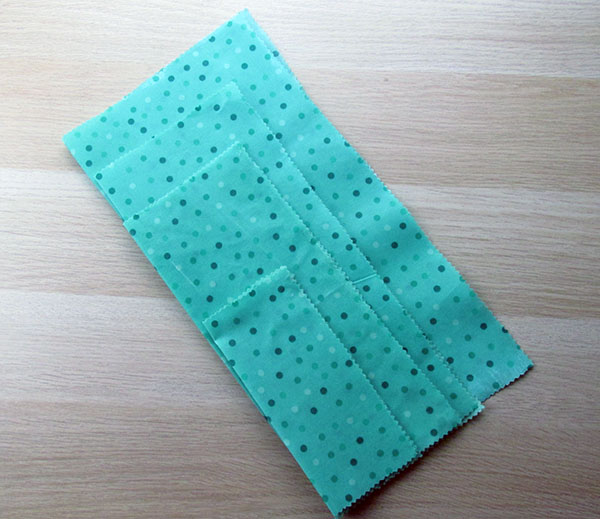
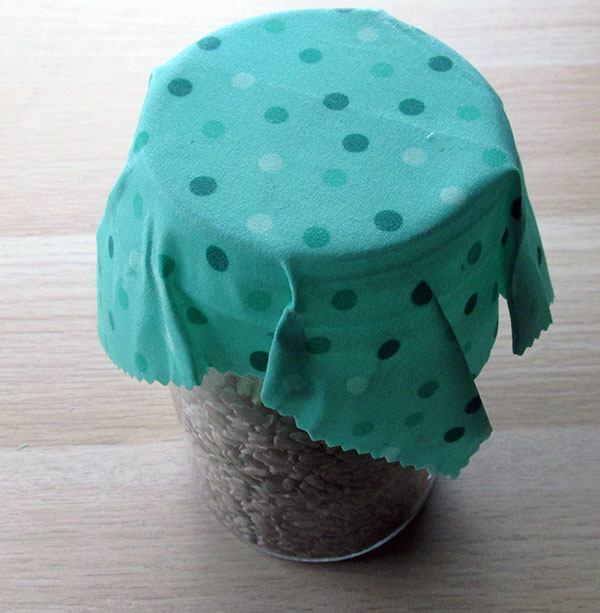
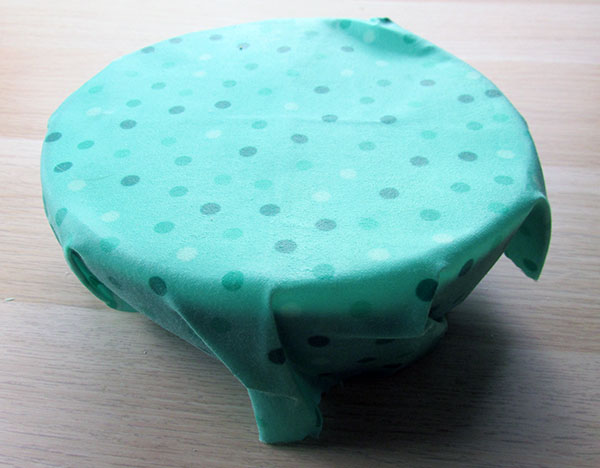
Each food wrap is made in New Zealand from cotton and local beeswax. They are a reusable and eco-friendly alternative to plastic food wrap. These wraps are an excellent leftover preserver keeping food fresher for longer. The beeswax coating allows food to breathe while staying covered; leftovers will last longer and not get sweaty. 

These wraps are reusable and easy to clean. Wrap, rinse and then repeat, each wrap will last up to 12 months.   They are ideal for school lunchboxes, wrapping snacks and covering bowls.

How many would you need?   

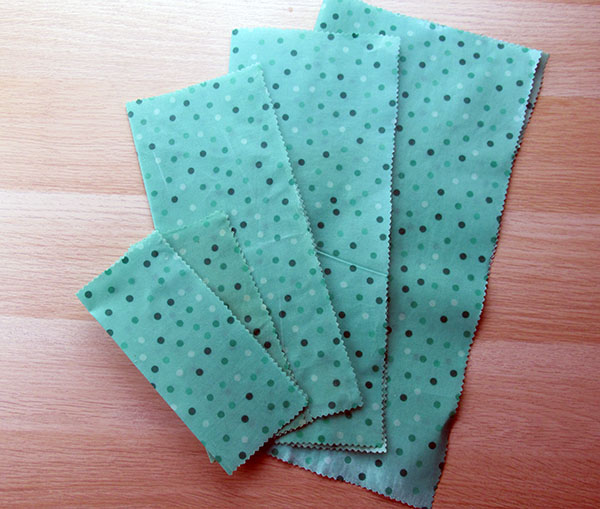
It all depends we find that the packets below usually work out best.     

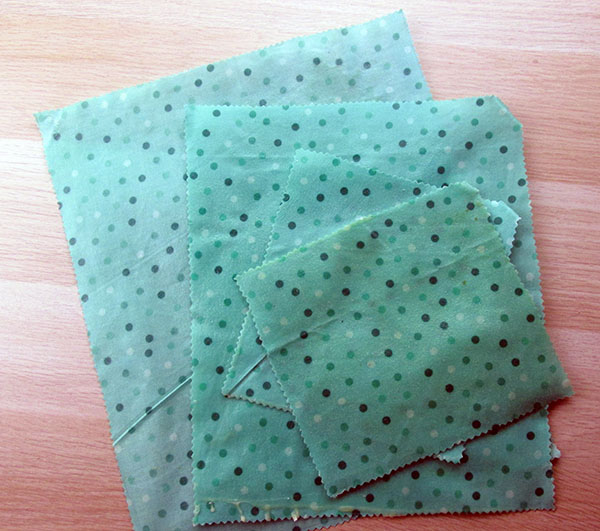
  • Just the two of us – pack of 3 wraps – this includes two wraps that are large enough to cover sandwiches and a wrap large enough to cover a bowl or plate with leftovers. Only $25 NZD 
  • It’s a family affair – pack of 5 wraps – this includes three wraps that are large enough to cover sandwiches and two wraps large enough to cover a bowl or plate with leftovers. Only $40 NZD 
  • It’s a wrap – pack of 8 wraps – this includes four wraps that are large enough to cover sandwiches, two wraps large enough to cover a bowl or plate with leftovers and two small wraps that will take care of snacks or jars. Only $60 NZD 
  • Extra large wraps are $16 each 

Just the two of us – pack of 3 wraps

This includes two wraps that are large enough to cover sandwiches and a wrap large enough to cover a bowl or plate with leftovers.

NZ$25.00

Just the two of us – pack of 3 wraps

This includes two wraps that are large enough to cover sandwiches and a wrap large enough to cover a bowl or plate with leftovers.

NZ$25.00

Just the two of us – pack of 3 wraps

This includes two wraps that are large enough to cover sandwiches and a wrap large enough to cover a bowl or plate with leftovers.

NZ$25.00

Just the two of us – pack of 3 wraps

This includes two wraps that are large enough to cover sandwiches and a wrap large enough to cover a bowl or plate with leftovers.

NZ$25.00

Why switch over to beeswax food wraps?   

Plastic food wrap is made from a variety of plastics including PVC (polyvinyl chloride) yep, that’s right craft glue, and food wrap comes from the same place.   Plastic food wrap is a single use product which like most things ends up either in a landfill or worse in the oceans causing harm to the environment.   

Beeswax food wraps are an environmentally friendly alternative that can be used over and over again and don’t damage the environment when we create them.   

Where ever possible we source organic cotton, we don’t want to support farming that uses harsh pesticides.    Our beeswax is from New Zealand bees.  Beeswax is naturally anti-bacterial and water repellent. Beeswax is a natural by-product of honey production.  Tree resin is also water resistant and has antibacterial properties.  Jojoba oil has anti-fungal properties and helps the wrap last longer.   

All of these ingredients help to keep your food fresh and the environment as clean as your conscience.   

How does it work?   

The beeswax on the wrap, when warmed with your hands, can be shaped around a dish or food, the beeswax becomes tacky which gives you a great seal.    


String shopping bags

String shopping bags

String Bags are ideal for all of your shopping and loose veggies.  The soft handle makes them a practical, ideal for your morning trip to the Farmers’ Market. 

Reusable String Carry Bags are a great alternative for single use plastic bags and perfect for fruit and veggies.

Simply fill these lightweight expanding reusable bags with goodies from the supermarket. Keep them along with your reusable grocery bags when shopping for fresh produce. Perfect to take to the supermarket and the local farmers market and they work well for other uses around the kitchen and home.

These sturdy bags expand and allow you to carry up to 10kg.

Care: Gentle machine wash and line dry.

String shopping bags

String Bags are ideal for all of your shopping and loose veggies. The soft handle makes them a practical, ideal for your morning trip to the Farmers’ Market.

NZ$5.00

String shopping bags – 5 pack

String Bags are ideal for all of your shopping and loose veggies. The soft handle makes them a practical, ideal for your morning trip to the Farmers’ Market. This pack of 5 bags are ideal for your weekly shopping. 🛍

NZ$20.00


Biscotti

First time for everything

I was unfortunate when I went to Italy, I didn’t get to enjoy a coffee with a Biscotti. Having a nut allergy means missing out on many experiences. I was happy to enjoy the coffee without the almond based treat at the time, but I don’t like to miss out things forever.

What is it?

Biscotti are the Italian almond biscuits you often find served with coffee. The biscotti is a twice baked, oblong, crunchy biscuit perfect for dipping into a hot drink. The traditional recipe uses flour, sugar, eggs, pine nuts and almonds, so basically all the things we don’t or can’t eat. I could give up and say it’s too hard to even try to eat biscotti, but I love a challenge.

Think I made it better

Creating a recipe that aims to deliver the same texture and flavours of the original recipe isn’t always easy. When you add the complication of you have never tasted the original recipe things can get interesting. This recipe was challenging but also exciting. I wanted to get the texture right while keeping the protein and fat content reasonably high. I used a mix of protein powder and oat flour to replace the wheat flour and used coconut milk and maple syrup to replace the sugar. I used blueberries to replace the almond that you would usually find scattered through a biscotti. Each biscuit is crunchy, filling and goes well with a nice mid-morning cup of coffee. 

Biscotti recipe

Biscotti ingredients

Ingredient

  • 4 scoops protein powder
  • 1 cup oat flour
  • 1/2 cup maple syrup
  • 1/4 tsp. salt
  • 1 cup coconut milk
  • 1 egg
  • 1 tsp. vanilla bean paste
  • 2 tsp. ground cinnamon
  • 1 tsp. ginger
  • 1/2 cup blueberries
Biscotti ready to eat

Biscotti 

  • Servings: 12
  • Rating: ★★★★★
  • Print

This biscotti recipe is grain and sugar free and jam packed in with protein.


Credit: Cath @ easycleaneats

Ingredients

  • 4 scoops protein powder
  • 1 cup oat flour
  • 1/2 cup maple syrup
  • 1/4 tsp. salt
  • 1 cup coconut milk
  • 1 egg
  • 1 tsp. vanilla bean paste
  • 2 tsp. ground cinnamon
  • 1 tsp. ginger
  • 1/2 cup blueberries

Directions

  1. Preheat the oven to 180 degrees C/ 350 degrees F
  2. Grease a cake pan and dust it with protein powder
  3. In a bowl, mix all of the dry ingredients
  4. In another bowl, whisk together the coconut milk, maple syrup, and vanilla bean paste.
  5. Mix the wet and dry ingredients together then fold in the blueberries
  6. Pour the batter into the cake pan
  7. Bake for 30 minutes
  8. Remove from the oven and allow the cake to cool completelyRemove from the oven and allow the cake to cool completely
  9. Cut the cake into 12 slices
  10. Line a large baking tray with baking paper or a silicone liner. 
  11. Place the biscotti slices on the baking tray.
  12. Bake the slices for 20 minutes on each side until they are golden brown.

Nutrition

Per Serving: 178 calories; 5 g fat; 23.6 g carbohydrates; 11 g protein

Equipment

  • Cake pan
  • Mixing bowl
  • Whisk
  • Spatula
  • Cooling rack
  • Baking tray 
  • Baking paper or a silicone liner
  • Measuring cups

Nutritional disclaimer

Nutrition information is provided as an estimate based on the ingredients used and available in my area (New Zealand). The nutritional information is here to help you understand the recipe; I use MyFitnessPal to generate my estimates. For more accurate nutritional information, please use a nutritional calculator with the ingredients in your area.


Chicken cranberry salad

What a week

It has been a busy week. With the world going insane we had to cancel our holiday plans and opt for a staycation in Auckland. Basically, that meant we hadn’t done any food shopping so our meal options were somewhat limited. I had no intention of going near a supermarket and dealing with the insane humans buying toilet paper. A quick raid of the fridge, I discovered some sour cream that was on its way out, so I wanted to come up with a way to use it up. Some pre-cooked chicken out of the freezer and we were in business.

Chicken cranberry salad

Salad with dressing

Over the last year, there has been a shift in how the family feel about salads. I now have a list of five salads that everyone is on board with eating. The common feature of the salads that everyone likes is a creaming dressing or sauce. With creamy dressings seem to be the ones that are most loved around here so this salad is a winner. The simple combination of mayo, sour cream and lemon juice give the rest of the salad a nice coating without overpowering the other favours.

Chicken cranberry salad recipe

Chicken cranberry salad ingredients

Ingredients

  • 1/2  cup  easy mayo
  • 1/4  cup  sour cream
  • 1  tsp.  lemon juice
  • 1  tbsp.  parsley
  • 3  cups chicken, cooked and chopped
  • 1/4  cup  celery, finely chopped
  • 1/4  cup  apple, finely chopped
  • 1/3  cup  dried cranberries
  • 1/3  cup  sunflower seeds, toasted
  • Salt and pepper to taste
In a large bowl add the easy mayo
Sour cream
Lemon juice
Parsley
Whisk together
Add the chicken, apple and celery.
Mix well
Add the cranberries and sunflower seeds
Mix well
Serve chilled on a bed of lettuce

Chicken cranberry salad

  • Servings: 6
  • Rating: ★★★★★
  • Print

It has been a busy week and still far too warm to be spending hours in the kitchen making meals. I had some sour cream in the fridge that was on its way out so I wanted to come up with a way to use it up.'


Credit: Cath @ easycleaneats

Ingredients

  • 1/2 cup easy mayo
  • 1/4 cup sour cream
  • 1 tsp. lemon juice
  • 1 tbsp. parsley
  • 3 cups chicken, cooked and chopped
  • 1/4 cup celery, finely chopped
  • 1/4 cup apple, finely chopped
  • 1/3 cup dried cranberries
  • 1/3 cup sunflower seeds, toasted
  • Salt and pepper to taste

Directions

  1. In a large bowl, whisk the mayo, sour cream, lemon juice and parsley.
  2. Add remaining ingredients and stir until combined.
  3. Add salt and pepper to taste.
  4. Serve chilled on a bed of lettuce.

Nutrition

Per Serving: 299 calories; 24 g fat; 10 g carbohydrates; 19 g protein.

Equipment

  • Large mixing bowl
  • Whisk
  • Spatula
  • Measuring cups
  • Measuring spoons

Nutritional disclaimer

Nutrition information is provided as an estimate based on the ingredients used and available in my area (New Zealand). The nutritional information is here to help you understand the recipe; I use MyFitnessPal to generate my estimates. For more accurate nutritional information, please use a nutritional calculator with the ingredients in your area.


Reuben slaw

I don’t want it hot

I’m a fan of the Reuben Sandwich, I love the flavours and would happily fall off the no grain wagon to snarf a grilled Reuben Sandwich. As I try my best not to fall off the wagon coming up with alternatives seems like the best approach. Sometimes it is too warm for a Reuben roast or a Reuben casserole; sometimes I want all the excellent flavour without spending hours in the kitchen or turning on the oven. Enter the Reuben slaw. This slaw brings together the peppery pastrami, creamy mayo and crisp cabbage with some mellow Swiss cheese. A few minutes of chopping and you have a perfect meaty bowl of slaw.

Reuben slaw

Ingredients

  • 450g pastrami, finely sliced
  • 300g Swiss cheese, finely sliced
  • 1/2 head cabbage, finely sliced
  • 1/4 cup easy mayo

Reuben slaw

  • Servings: 8
  • Rating: ★★★★★
  • Print


Credit: Cath @ easycleaneats

Ingredients

  • 450g pastrami, finely sliced
  • 300g Swiss cheese, finely sliced
  • 1/2 head cabbage, finely sliced
  • 1/4 cup easy mayo

Directions

  1. Mix together all ingredients in a bowl.
  2. Chill for 2 hours before serving.

Nutrition

Per Serving: 254 calories; 18 g fat; 2 g carbohydrates; 16 g protein

Equipment

  • Large mixing bowl
  • Whisk
  • Spatula
  • Measuring cups
  • Measuring spoons

Nutritional disclaimer

Nutrition information is provided as an estimate based on the ingredients used and available in my area (New Zealand). The nutritional information is here to help you understand the recipe; I use MyFitnessPal to generate my estimates. For more accurate nutritional information, please use a nutritional calculator with the ingredients in your area.


A pepper

Working with peppers

Working with peppers doesn’t have to be difficult, and you don’t need to spend your time scraping seeds from the inside of the peppers.  Here is the best method I have found for preparing peppers 

Equipment  

A pepper
A pepper
  • A chopping board
  • A sharp knife 
  • A pepper 

What to do 

Firstly, cut off the top of the pepper
Firstly, cut off the top of the pepper

Firstly, cut off the top of the pepper, I recommend you slice about 1-2 cm below the stalk of the pepper. 

Put the top of the pepper to one side.
Put the top of the pepper to one side. 

Put the top of the pepper to one side. 

Using your fingers pull out the clump of seeds out of the centre of the pepper.

Using your fingers pull out the clump of seeds out of the centre of the pepper. 

Take the top of the pepper and push out the stem using your thumbs, this way you don’t waste any of the pepper. 

Pepper cut in half
Pepper cut in half

Slice as you wish 

Slice as you wish
Slice as you wish 

Strips, cubes, finely diced, rings 


One tray steak fajitas

Simple meals don’t have to be boring  

I have been on a mission to make simple and tasty meals. I aim to create recipes that can be prepared and cooked quickly on a busy weeknight. We all struggle to make healthy and delicious meals while keeping on top of everything else in life. So this recipe is designed to be healthy, delicious and easy to make. You can cook this meal on a single tray in the oven. The preparation takes no more than 20 minutes and is portioned to feed four adults.  

One tray steak fajitas ready to eat

Taking a break from tacos  

This recipe was born from a need to take a little break from tacos. Don’t get me wrong; I have nothing against tacos, I love them, but we have been eating a lot of tacos recently so I thought a little change would do us some good. Still wanting something Mexican and fresh, I thought fajitas would be a good option. The best part of this recipe is eating the rainbow; the mix of peppers always looks fantastic. I’m always happy when I can find a way to get a big portion of veggies with dinner. These steak fajitas are an excellent option for an easy weeknight meal and just as easy to make as tacos.   

One tray steak fajitas video

One tray steak fajitas  

One tray steak fajitas  ingredients
One tray steak fajitas  ingredients

Ingredients   

  • 450g steaks  
  • 2 tsp chilli powder  
  • 1 tsp ground cumin  
  • 1 tsp garlic powder  
  • 1 tsp paprika  
  • 1/2 tsp salt  
  • 1/4 tsp black pepper  
  • 1/4 cup olive oil  
  • 1 tsp minced garlic  
  • 1 onion, thinly sliced   
  • 1 red pepper, thinly sliced  
  • 1 yellow pepper, thinly sliced  
  • 1 green pepper, thinly sliced  
In a bowl mix together the peppers.
Add the onions to the bowl.
Add the steak to the bowl.
Mix well
Mix well
Ready to spread out on the baking tray
Transfer the ingredients to the baking tray.
Spread the ingredients out
Sprinkle over the seasoning and mix well
Bake
Bake
One tray steak fajitas ready to eat

One tray steak fajitas

  • Servings: 6
  • Rating: ★★★★★
  • Print

This one tray meal a great option for busy week nights or an action packed weekend.


Credit: Cath @ easycleaneats

Ingredients

  • 450g steaks  
  • 2 tsp chilli powder  
  • 1 tsp ground cumin  
  • 1 tsp garlic powder  
  • 1 tsp paprika  
  • 1/2 tsp salt  
  • 1/4 tsp black pepper  
  • 1/4 cup olive oil  
  • 1 tsp minced garlic  
  • 1 onion, thinly sliced   
  • 1 red pepper, thinly sliced  
  • 1 yellow pepper, thinly sliced  
  • 1 green pepper, thinly sliced  

Directions

  1. Preheat the oven to 200 degrees C/ 400 degrees F.   
  2. In a bowl, combine the chilli, cumin, garlic powder, paprika, salt and pepper to make a fajita seasoning.   
  3. In a large bowl, mix together the steak, onions and peppers with the olive oil.   
  4. Sprinkle with the minced garlic and mix again.  
  5. Spread the meat and vegetables out on a baking tray lined with baking paper or a silicone liner.
  6. Sprinkle the fajita seasoning over the meat and vegetables.  
  7. Cover the tray with foil.  
  8. Bake for 20 minutes with the foil on the tray, remove the foil and bake for another 5 minutes.  Bake for 20 minutes with the foil on the tray, remove the foil and bake for another 5 minutes.  
  9. Remove the tray from the oven and let the meat rest for 5 minutes before slicing.  
  10. Serve.  

Nutrition

Per Serving: 266 calories; 19 g fat; 7 g carbohydrates; 16 g protein

Equipment  

  • Knife  
  • Chopping board  
  • Baking tray  
  • Baking paper or a silicone liner
  • Aluminium foil
  • Mixing bowl
  • Measuring cups
  • Measuring spoons
  • Scales

Nutritional disclaimer

Nutrition information is provided as an estimate based on the ingredients used and available in my area (New Zealand). The nutritional information is here to help you understand the recipe; I use MyFitnessPal to generate my estimates. For more accurate nutritional information, please use a nutritional calculator with the ingredients in your area.


Gingernut cookies

Gingernut cookies ready to eat
Gingernut cookies

Weekend tradition

Saturday morning, a not so small child stumbles out of bed into the living room as is offered a cup of tea. His response isn’t ‘yes please’ or ‘no thank you’ his answer is ‘gingernut?’. He likes to sit down with a nice cup of team and a gingernut to dunk in his brew. I thought I would have a go at creating a slightly healthier version of the gingernut and put it to the little dunker for testing.

As these things go, this recipe was pretty easy to develop. I knew the challenge would be getting the amount of crunch right. Too much crunch and we could be looking for replacement teeth, not enough crunch and you have a terrible cookie with no structural integrity for dunking. The key to a good gingernut is how long you bake it for. The trick with this recipe is to remove the cookies from the oven on time and then let them sit on the hot baking tray to become crisper and develop the right amount of crunch. If you leave them in the oven too long, you will be looking for new teeth.

Gingernut cookies

Gingernut cookies ingredients

Ingredients

  • 200g seed butter
  • 3 tsp. Ground ginger
  • 1 egg
  • 100g coconut sugar
Into a food processor place, the coconut sugar and ginger.
Blend until thoroughly combined.
 Add the seed or nut butter
Add the seed or nut butter
mix until thoroughly combined, it will start to clump together.
Mix until thoroughly combined, it will start to clump together.
Add the egg.
Add the egg.
Mix again until the mixture starts to form a ball
Use an ice cream scoop to portion out the cookie dough.
Place each portion onto the lined baking tray.
Make sure there is space between each portion so that the cookies have space to spread.
Use the back of a spoon to press down the pieces slightly.
Fresh and crunchy cookies

Gingernut cookies

  • Servings: 10
  • Rating: ★★★★★
  • Print

This recipe is my take on the traditional gingernut, it is gluten-free but still has all the flavour and crunch.


Credit: Cath @ easycleaneats

Ingredients

  • 200g seed butter
  • 3 tsp. Ground ginger
  • 1 egg
  • 100g coconut sugar

Directions

  1. Pre-heat oven to 200 degrees c 392 degrees f
  2. Have a baking tray ready with baking paper on it
  3. Into a food processor place, the coconut sugar and ginger blend until thoroughly combined
  4. Add the seed or nut butter and mix until thoroughly combined, it will start to clump together.
  5. Add the egg and mix again until the mixture starts to form a ball if it doesn’t form a ball don’t worry when everything is thoroughly combined stop the processor.
  6. Use an ice cream scoop to portion out the cookie dough, place each portion onto the lined baking tray, and make sure there is space between each portion so that the cookies have space to spread.
  7. Use the back of a spoon to press down the pieces slightly.
  8. Bake the cookies for 15 minutes or until they are golden brown.
  9. Remove the cookies from the oven, let them cool, and crisp up.
  10. When the cookies are hard, move the cookies to a container, they will keep for about a week.

Nutrition

Per Serving: 161 calories; 10 g fat; 15 g carbohydrates; 4 g protein.

Equipment 

  • Food processor 
  • Ice cream scoop 
  • Baking tray
  • Baking paper/ silicone liner
  • Spoon 
  • Measuring spoons
  • Scales

Nutritional disclaimer

Nutrition information is provided as an estimate based on the ingredients used and available in my area (New Zealand). The nutritional information is here to help you understand the recipe; I use MyFitnessPal to generate my estimates. For more accurate nutritional information, please use a nutritional calculator with the ingredients in your area.


Lemon chicken burgers

New freezer favourite

In the last half of 2019, we had a hectic time, the only night on the workweek we had a home with no classes or chores to do. The mass amount of activity and varied nutritional needs meant I needed to get creative to keep everyone happy. I made a few staples to have in the freezer that could be taken out in the morning or thawed in the afternoon to prepare for a quick and healthy meal. These burgers have been one of the firm favourites for weeknight dinners after Brazilian Jiu-Jitsu, and they are also a firm favourite on the weekends. The kids like to have them as a burger with a bun, I love them with a lettuce bun or chopped up in a burger salad.

Lemon chicken burger in a lettuce bun.
Lemon chicken burgers

A moment of pride

When I was working on the recipe for these burgers, it was a weekend, and I was playing around to try to make the raw mixture smell right. As I was there playing in the kitchen getting ready to fry up the first burger when the youngest member of the clan arrived home from a birthday party. He arrived home clutching a bag from MacDonald’s with the chicken nuggets and chips he got from the party but couldn’t eat. As is the way he stood in the kitchen nattering to us about the movie he saw, what he did, what his friends said and what he said. When Liam took a breath, I managed to ask if he wanted any dinner with us. He said he wasn’t hungry when he was. He would eat the nuggets and chips when he was. Not long after I was building lettuce bun burgers for Jaime and myself when Jaime pops into the kitchen asking if I could make another burger for Liam. Apparently, he liked the smell of the burgers; they smelled a lot better than his chicken nuggets. The bag from MacDonald’s was put to one side while he demolished a homemade chicken burger. I was so proud. 

Sadly the chicken nuggets were eaten for lunch the next day along with the chips, but I still hold on to the fact that when offered, he picked my burger over MacDonald’s.

Lemon chicken burgers

Lemon chicken burger ingredients

Ingredients 

  • 500g chicken mince
  • 2 spring onions, finely chopped
  • 1 garlic clove, minced
  • 1/2 lemon, juiced and zested
  • 1/2 cup parmesan cheese, grated
  • 1 egg
  • 1 tbsp. olive oil
  • Salt and pepper
Add the chicken mince to a large bowl.
Add the egg, garlic and cheese to the mince.
Add the spring onions and lemon to the bowl.
Mix the ingredients together with your hands.
Well mixed burger mix.
Use a measuring cup to portion out the burgers.
Shape the meat into burger patties.
Cook the burgers over a medium heat.
Serve in a lettuce bun.
With cheese and caramelised onions.
Lemon burger in a lettuce bun.
Enjoy!

Lemon chicken burgers

  • Servings: 8
  • Rating: ★★★★★
  • Print

Not long ago if I had suggested we have a salad for dinner, that suggestion would have been met with grumbles, groans and complaints. Thankfully that is no longer the case. The first time I made this salad for dinner, I did get the grumbles and groans, then the kids tried some.


Credit: Cath @ easycleaneats

Ingredients

  • 500g chicken mince
  • 2 spring onions, finely chopped
  • 1 garlic clove, minced
  • 1/2 lemon, juiced and zested
  • 1/2 cup parmesan cheese, grated
  • 1 egg
  • 1 tbsp. olive oil
  • Salt and pepper

Directions

  1. In a large bowl mix together all the ingredients.
  2. Use your hands to get an even mix.
  3. Divide the mix into six portions and shape into burgers try the burgers over medium heat for 6 minutes on each side.

Nutrition

Per Serving: 189 calories; 11 g fat; 2 g carbohydrates; 14 g protein.

Equipment

  • Chopping board
  • Knife
  • Zester
  • Fork
  • Frying pan
  • Spatula
  • Mixing bowl
  • Measuring cups
  • Measuring spoons
  • Scales

Nutritional disclaimer

Nutrition information is provided as an estimate based on the ingredients used and available in my area (New Zealand). The nutritional information is here to help you understand the recipe; I use MyFitnessPal to generate my estimates. For more accurate nutritional information, please use a nutritional calculator with the ingredients in your area.


Workout Wednesday 29 January

Count down and keep moving

While I am on the road to recovery, am trying to keep as active as possible. Spending time on the airdyne will only get me so far so, am trying to do a heavily modified strength and conditioning programme to keep me in the best shape possible over the next few months. Working out around an injury is possible and beneficial as long as you are sensible about it. The workouts I am doing are modified to account for my inability to weight bear on my left leg. All of the weights I’m using have been dialled back, so I reduce the risk of additional injuries. All lower body exercises focus on movement, flexibility and not losing what I have in the way of muscle. Upper body I have fewer limitations but still need to modify exercises to make sure I am not putting additional strain on my lower body.

I aim to get in some kind of movement every day.

Chunky knee on the mend

Showing signs of wear and tear

While my capacity is improving weekly from working out, I’m starting to feel the strain of being stuck on crutches for so long. Over the long weekend, I pushed myself a bit more than I should have, lots of time on my feet (or foot and crutches), and a monster mooch around in Whangarei left me feeling exhausted. I am starting to feel the extra strain on my right foot, Achillies tendon as well as my hands, not surprising after six weeks on crutches. While I am on the final countdown to my next appointment with the surgeon, I am trying to take it easy and do a lot more stretching and massage.

Moderating intensity

To keep my workouts from becoming boring, I change things up daily, some days, I push for more intensity in my workouts and other days, I aim for more endurance. This week my workout is more of an endurance workout with slightly higher weights. My endurance workouts in the Auckland humidity are not easy, but they are worth the effort.

Workout of the week

This workout was as follows

  • 5 minutes warm-up @ 15 per cent of max RPM.
  • 40 minutes working @ 60 – 70 per cent of max heart rate.
  • 5 minutes cool down @ 10 per cent of max RPM.

Core work

  • Straight leg situps – 40 reps with a kettlebell
  • Single leg raises – 40 reps per leg
  • Kettlebell kayaks – 40 reps with @ 30 per cent of 2RM
  • Kettlebell bench press – 40 reps @ 30 per cent of 2RM
  • Kettlebell overhead tricep extension – 40 reps @ 30 per cent of 2RM
  • Dying bug – 40 reps

Post-workout stretches and recovery

  • Right leg hamstring stretch.
  • Right leg quad stretch.
  • Achilles stretch right and left leg.
  • Skateboard rolls with left leg

Disclaimer

I share my workouts to show what I do, not to tell you what to do. I post my workouts with a percentage of my max rather than stating what weights or speeds I use. Everyone is different and has different levels of fitness and capability. Your body is yours alone if you want to start working out, I recommend spending some time with a personal trainer who can put you on the right path. When working out with weights, remember your 1 rep max is yours alone, finding the weights that are right for you is important. If you decide to try out a workout, find out what weights you should be using first.