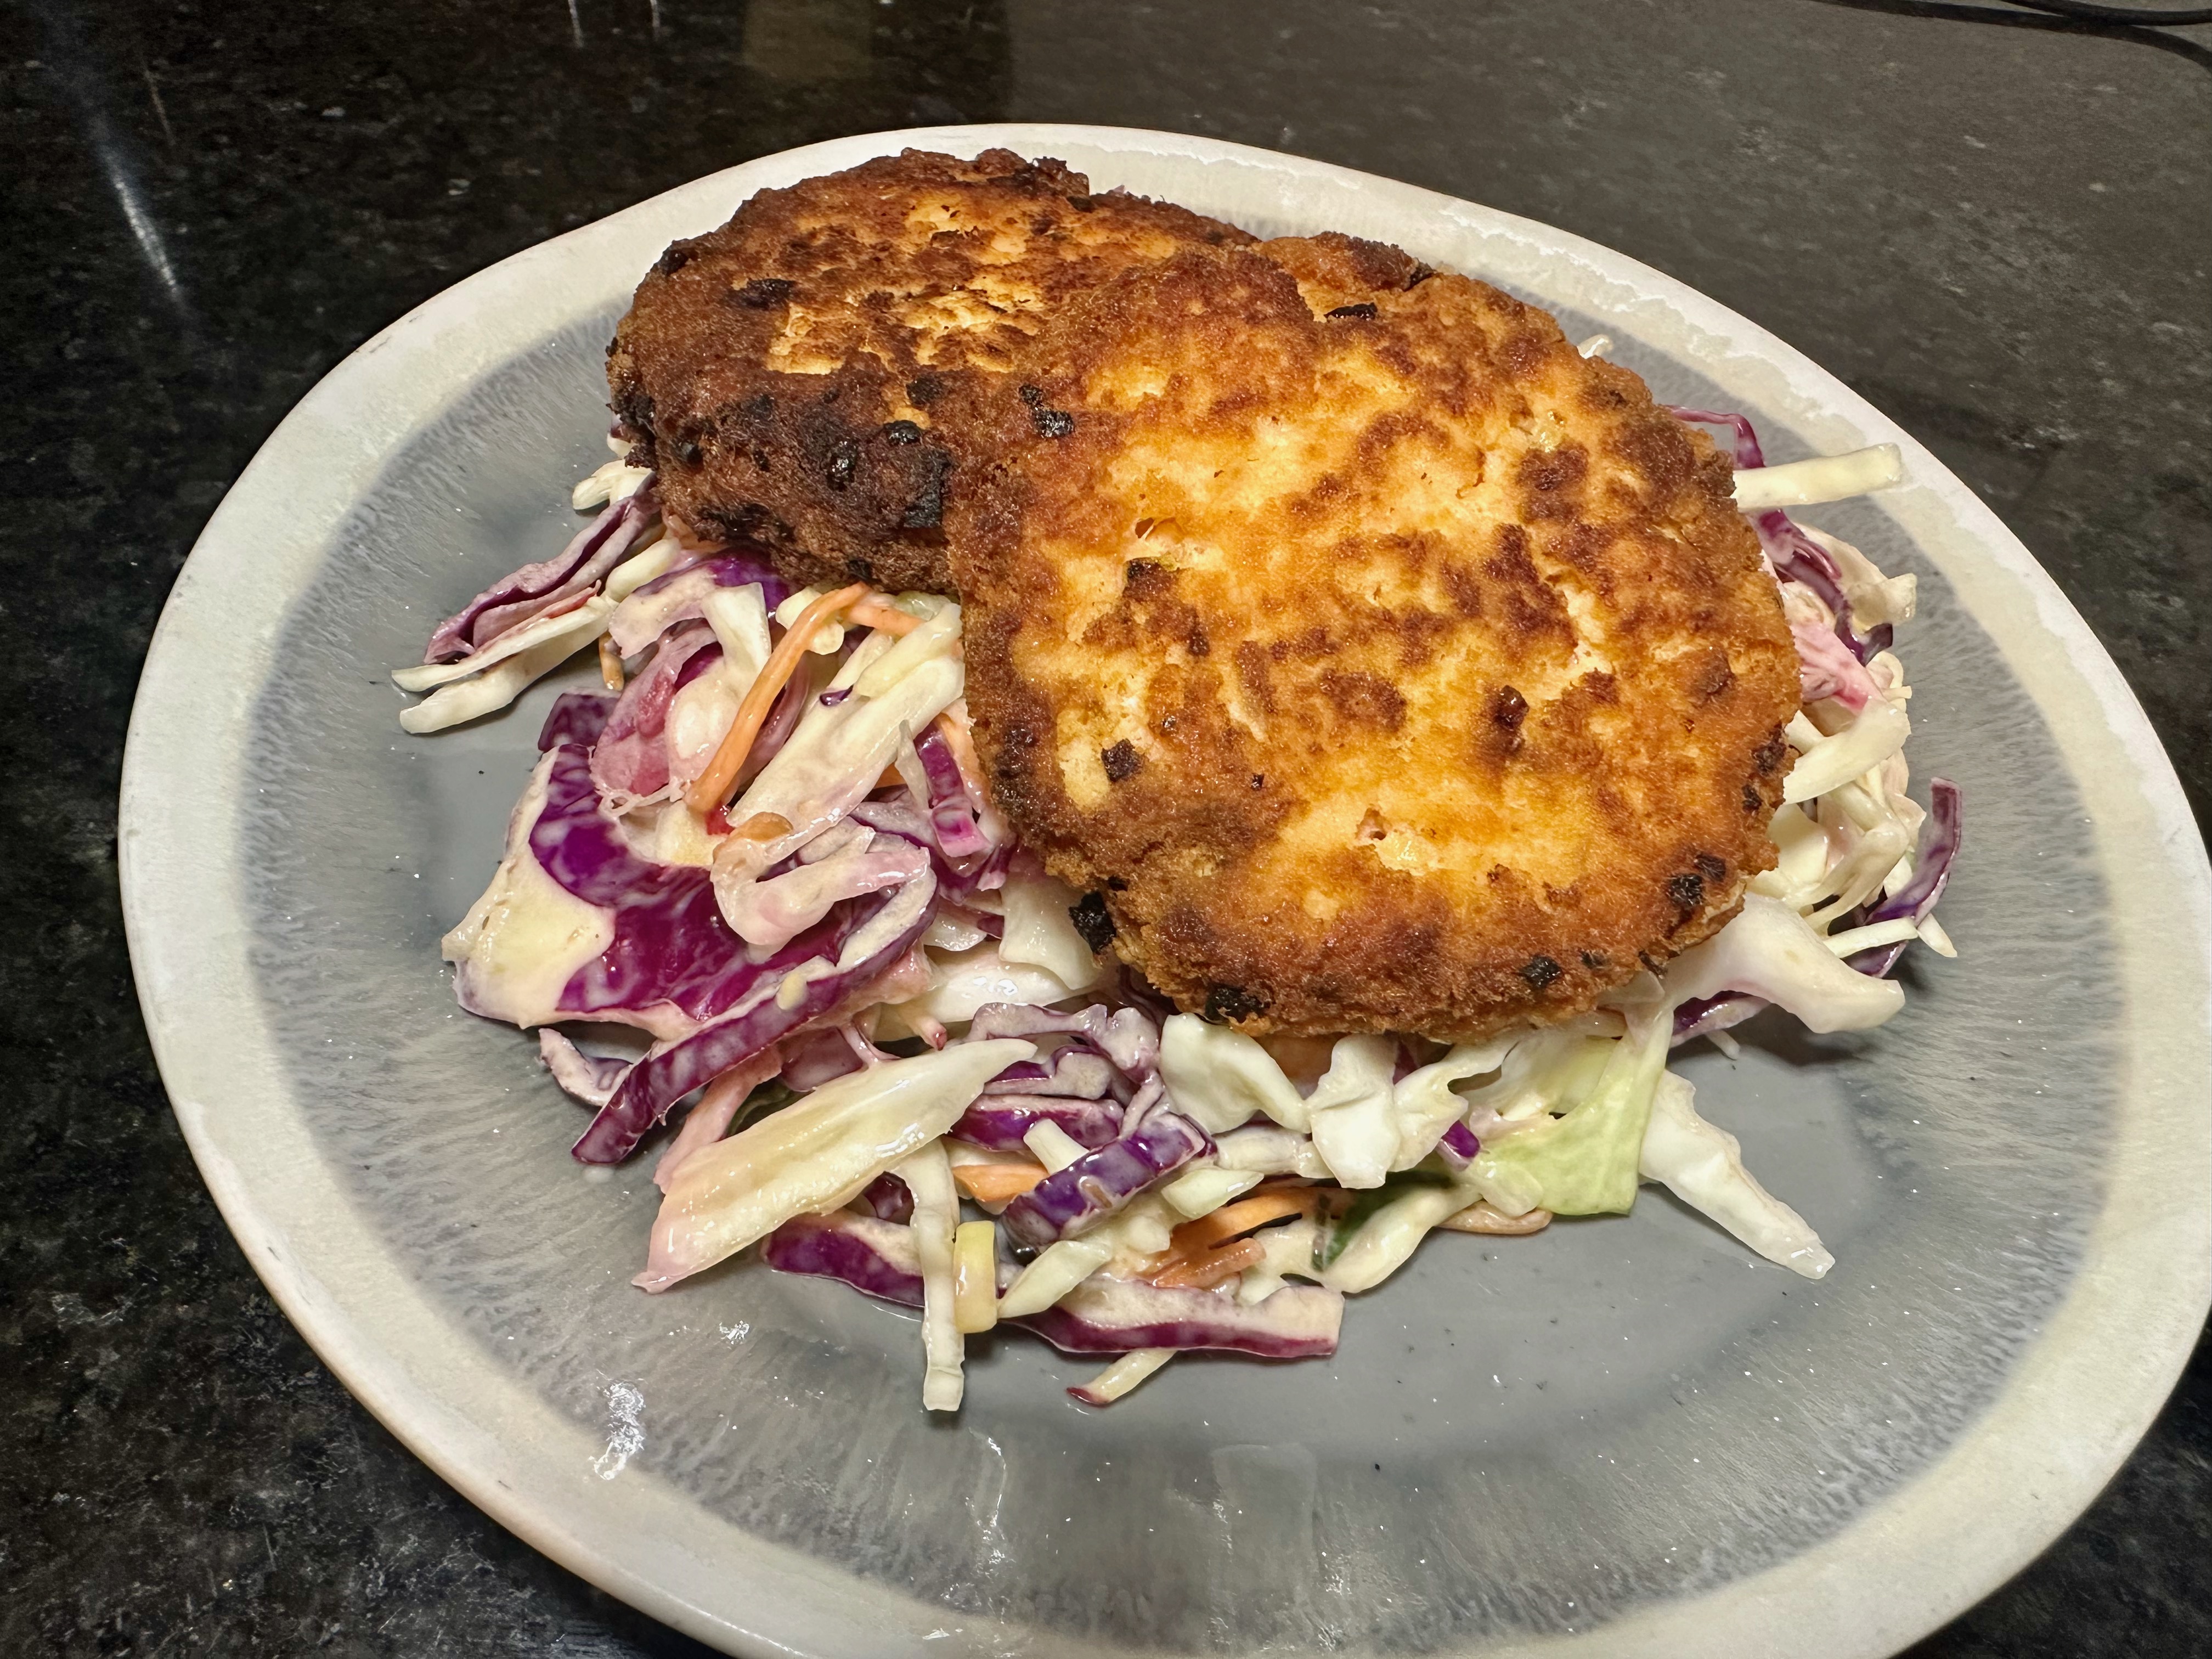
Asian fish cakes

Freezer meal

Hands up if you are busy. Who is way too tired to get in the kitchen to cook at the end of the day? Definitely me.

My days are filled with meetings, to-do lists, emails and telling people what to do; by the time I finish work, the last thing I want to do is get stuck into cooking a meal and cleaning up afterwards. I want to work out and do something fun before I crash. That is why freezer meals are my favourite solution to the challenge of a busy life. A few hours on the weekend, and you find yourself with a stack of options for dinner that can be thawed and cooked for a healthy, delicious meal that is good for you.

Not so blah now

My previous experience with fish cakes was never good; they were always bland white burger-shaped food, mushy in the middle and blah on the outside. I like white fish, but I get bored quickly when baked or pan-fried, so I wanted to try something different with the fillets I picked up this week. I remembered a recipe from a food magazine for fish cakes and decided to experiment by swapping some ingredients and making it a little spicy. 

With some leftover cauliflower rice in my fridge, I smashed these tasty little cakes together. 

Cook once, eat many times

As I can’t eat 12 fish cakes in one sitting (I’m sure some people can), I packed my leftovers with baking paper to separate the cakes and put them in the freezer. The cakes can be pulled out of the freezer to thaw and reheated in a frying pan over medium heat until they are heated through. You can reheat them in the microwave, but be warned you will disgust anyone else in the building for an extended period.

Asian style fish cakes recipe

Ingredients

Asian style fish cake
  • 500g raw white fish
  • 1 cup cauliflower rice 
  • 2 tsp. coriander
  • 1 tbsp. Thai green curry paste

Instructions

In a food processor, mix together the fish, coriander and curry paste.

Add the fish, coriander and curry paste to a food processor.

When you have a smooth consistency stir in the cauliflower rice.

Stir in the cauliflower rice

Shape the mix into 12 patties.

Portion out the mixture
Shape the mix into patties.

Place them on a baking tray lined with baking paper or a silicone liner.

Bake in a preheated oven at 180 degrees C/ 350 degrees F for 15 minutes.

Cooked fish cakes ready to eat.

Asian fish cakes

  • Servings: 12
  • Rating: ★★★★★
  • Print

These spicy fish cakes are a great way to use up some left over cauliflower rice.


Credit: Cath @ easycleaneats

Ingredients

  • 500g raw white fish
  • 1 cup cauliflower rice
  • 2 tsp. coriander
  • 1 tbsp. Thai green curry paste

Directions

  1. In a food processor mix together fish, coriander and curry paste.
  2. 1 cup cauliflower rice
  3. Shape the mix into patties.
  4. Place them on a baking tray lined with baking paper or a silicone liner.
  5. Bake in a preheated oven at 180 degrees C/ 350 degrees F for 15 minutes.

Nutrition

Per Serving: 51 calories; 0.6 g fat; 0.4 g carbohydrates; 7.5 g protein

Equipment

  • Food processor 
  • Measuring cups
  • Measuring spoons
  • Spatula
  • Baking tray
  • Baking paper or silicone liner

Nutritional disclaimer

Nutrition information is provided as an estimate based on the ingredients used and available in my area (New Zealand). The nutritional information is here to help you understand the recipe; I use MyFitnessPal to generate my estimates. For more accurate nutritional information, please use a nutritional calculator with the ingredients in your area.

Bolognese

Master the basics

Eating clean gets a lot easier once you have mastered a few essential recipes. This recipe is basic; not like basic unicorn basic, more like beard and flannel basic. Back to the point (which isn’t Unstable unicorns), having basic skills and recipes in your arsenal means you will never be left with only Uber Eats as your weeknight option. Once you master this recipe, the possibilities are endless.

New take on a classic

Bolognese is one of those dishes that everyone knows and probably has their version of. While traditionally, Bolognese is used to dress pasta, this meaty sauce is a perfect centrepiece to a meal instead of dressing.

This dish is full of flavour and tastes better the day after you make it.

Bolognese is an easy recipe; it is cheap and makes the perfect weeknight dinner.

Bolognese recipe

Ingredients

  • 500g beef mince
  • 2 tins chopped tomatoes
  • 2 onions, finely diced
  • 2 garlic cloves, minced
  • 2 tbsp. tomato puree
  • 2 tbsp. olive oil
  • a handful of basil, plus extra for garnish.
  • 1 tsp. dried oregano.

Instructions

Put a large stock pot over medium heat.

Add the olive oil to the pan. 

When the oil is hot, add the onions and stir them.

Reduce the heat when the onions start to colour.

Add the garlic, basil and oregano.

Add the beef mince to the pan with the onions.

Cook the meat off until it is browned.

Use a spoon to break the meat up as it cooks.

Stir in the chopped tomatoes and puree into the meat.

Turn up the heat to bring the liquids up to a boil.

When you have rolling bubbles reduce the heat and keep stirring everything.

When you get to a gentle simmer, put the lid on your pan and let everything cook down for a least an hour.

Stir the sauce now and then to make sure it doesn’t stick or catch on the bottom.

Serve over some coodles with some grated parmesan cheese.

The flavour will develop and be better the day after you have made it, so it will be great for leftovers.

Bolognese

  • Servings: 8
  • Print


Credit: Cath @ easycleaneats 

Ingredients

  • 500g beef mince
  • 2 tins chopped tomatoes
  • 2 onions, finely diced
  • 2 garlic cloves, minced
  • 2 tbsp. tomato puree
  • 2 tbsp. olive oil
  • a handful of basil, plus extra for garnish.
  • 1 tsp. dried oregano.

Directions

  1. Put a large stock pot over medium heat.
  2. Add the olive oil to the pan. 
  3. When the oil is hot, add the onions and stir them.
  4. Reduce the heat when the onions start to colour.
  5. Add the garlic, basil and oregano.
  6. Add the beef mince to the pan with the onions.
  7. Cook the meat off until it is browned.
  8. Use a spoon to break the meat up as it cooks.
  9. Stir in the chopped tomatoes and puree into the meat.
  10. Turn up the heat to bring the liquids up to a boil.
  11. When you have rolling bubbles reduce the heat and keep stirring everything.
  12. When you get to a gentle simmer, put the lid on your pan and let everything cook down for a least an hour.
  13. Stir the sauce now and then to make sure it doesn’t stick or catch on the bottom.
  14. Serve over some coodles with some grated parmesan cheese.

Nutrition

Per Serving: 186 calories; 10.7g fat; 9.3g carbohydrates; 12g protein

Equipment

  • Knife
  • Chopping board
  • Stockpot 
  • Wooden spoon 
  • Measuring spoons

Nutritional disclaimer

Nutrition information is provided as an estimate based on the ingredients used and available in my area (New Zealand). The nutritional information is here to help you understand the recipe; I use MyFitnessPal to generate my estimates. For more accurate nutritional information, please use a nutritional calculator with the ingredients in your area.


Meal prep and making the most of your time

Hands up who wants to spend two hours a night in the kitchen each night? 

I love cooking, but I don’t want to spend hours in the kitchen every night preparing a real meal. We all have more interesting and important things to do when we get home from work. 

The key to getting real food daily without spending hours cooking is managing time and planning. OK, I may have a slight advantage in this area. I plan things out for a living, but it’s easy to get into the swing of planning to make better use of the time you have. 

Here are the key things to managing your time and making real food easy: 

  • Plan your meals before you shop
  • Make sure the plan meets your needs
  • Make the freezer your friend
  • Make sure you clear a part of your day
  • Make sure you have the right tools for the job
  • Plan out your time in the kitchen
  • Prep lots of things at the same time

Plan your meals before you shop 

This is probably the most important factor in minimising the time you spend in the kitchen each week. If you intend to make seven different dishes for breakfast, lunch, and dinner, you will have a nightmare in the kitchen and, more than likely, a very expensive food bill. 

Simple meals will minimise the time you spend preparing and cooking. Look for meals that can be frozen or put in the slow cooker, plan to make extra (the cook once, eat twice principle), and don’t be afraid to use the same ingredients. 

Save the fancy meals and new recipes to try and experiment on the weekends, when you have a little more time. Write out your shopping list and stick to it. My personal tip is to avoid going food shopping when you are hungry! It is a surefire way to end up with a million things you don’t want or need.

Make sure the plan meets your needs 

One speed bump most of us encounter is that our plan doesn’t account for everything else going on. To make the plan fit for purpose, it pays to tailor it to what is happening in your life. I plan my meals around my weekly activities and commitments, and how much free time I will have. Here is an example: Two days a week, I work from the office, which means I have at least an hour-long commute home, followed by a workout with a friend that takes at least an hour. That means on these two days, I won’t set foot in the kitchen until 7 pm at the earliest. On these days, my meals include morning protein smoothies and a meal that has been sitting in the slow cooker or just needs 15 minutes to reheat. For these longer days, I’ll plan a curry, chilli, or chicken roasted in the slow cooker, with a salad. 

Make the freezer your friend 

This is the most critical aspect of making the most of your time. Being able to prepare all your meals for a week depends on you making friends with the freezer. Don’t get me wrong; you can food prep and store your food in the fridge, but that means you have three or four days of food. 

If you only have four days’ worth of food, that means a second trip to the supermarket and another couple of hours in the kitchen on a weeknight. The alternative is to use the freezer. Plan your meals so that the produce that is best eaten fresh is used within two days after you have shopped; store that in the fridge. Then plan for everything else so it can be cooked, then frozen, or frozen when raw. That way, you have meals that can be reheated when needed or put into the slow cooker. 

Make sure you clear a part of your day. 

Find a time in your week, or on the weekend, to block out for food preparation and make it part of your routine. Saturday morning is an excellent time for food prep. I spend two hours slicing, dicing, simmering, and portioning before heading out for breakfast with friends. I do as much as possible during those two hours, so on weekdays my meals are usually ready to eat in less than 30 minutes. I feel relaxed knowing I’ve ticked off a big chore before I go to drink coffee and talk sh*t for a few hours. 

Find a time that works for you and block it out so you can work uninterrupted and get busy in the kitchen. 

Make sure that you have the right tools for the job 

Once upon a time, I would spend an entire day in the kitchen on the weekend, preparing food for the coming week. God, I am glad that is not the case now. 

Having the right tools for the job can drastically reduce your time in the kitchen. At a minimum, a food processor with a grater and slicing attachment will save you heaps of time. The slicing-and-dicing gadgets you can pick up for a few bucks can help, but in my experience, you still have to do a lot of chopping before you can use them. A good food processor that can grate and slice requires minimal chopping before you can use it. Save the money you would spend on gadgets and put it towards a food processor.

A real-world example is making cauliflower rice. Grating a head of cauliflower by hand will take at least 30 minutes, and if you are lucky, the skin of only one knuckle. The same task with a grating attachment on a food processor will take 2 minutes. 

Investing in a few key pieces of kit for your kitchen can make your life easier and give you back some free time. 

If you don’t have the right tools for the job, look in the freezer aisle at the supermarket; you can buy cauliflower rice, diced onions, diced carrots and more. If it is in your budget, buy what you need in the form you need it. 

Plan out your time in the kitchen 

You don’t need to write down a plan every time you set foot in the kitchen (unless that makes you happy, and please stop judging me), but it does pay to have a rough plan of what you are going to do and in what order. Look at your food plan and use it as the basis for your plan. You should be able to get an idea of the different tasks (chopping, slicing, dicing, peeling, etc.) and how long they might take you. 

Plan your time out so you start with the challenging and time-consuming tasks first. That way, you get them out of the way, and everything else will go quickly.

Prep lots of things at the same time 

The way I figure it, if I’m in the kitchen, I want to get as much done as possible in the shortest time. Multitasking is the key. Dividing tasks and grouping similar ones is a good approach. If you can do two things at once, do so. 

Here are some of the things I do and plan for when I’m in the kitchen 

  • Have your bags or containers ready and labelled before you start. This makes it easy to throw things in as they are ready.
  • Prep and portion your meat; it’s one of the more time-consuming tasks, so get it out of the way.
  • Make sauces at the same time; you can often leave them to simmer while you do something else.
  • If you have vegetables to peel, you can peel them all at once; it will actually save you time.
  • Do specific tasks together. For example, if you have to dice onions, carrots, and courgettes, do it all together; same for mincing and slicing.

Gingernut cookies

Flashback

Back in another lifetime, there was a weekend tradition. On Sunday mornings, a small person would stumble out of bed into the living room, still half asleep and plonk on the sofa. I would always offer a cup of tea to help him wake up. The offer of tea always sparked the same question, ‘Are there ginger nuts?’. Because what more could you ask for when you have just woken up, a brew and a ginger nut to dunk in your tea?

Gingernut cookies ready to eat
Gingernut cookies

Try to clean up the ginger nut

My inspiration for coming up with a grain-free ginger nut cookie was in an effort to reduce the amount of crap the small people in my life were eating. While my efforts to provide healthier alternatives didn’t always go down well, this is one of the few times my baked goods beat the store-bought version.

Crunchy, not teeth-breaking.

As these things go, this recipe was pretty easy to develop. I knew the challenge would be getting the right amount of crunch. Too much crunch and we could be looking for replacement teeth, not enough crunch and you have a terrible cookie with no structural integrity for dunking. The key to a good ginger nut is how long you bake it for. The trick with this recipe is to remove the cookies from the oven on time and let them sit on the hot baking tray to crisp up and develop the right amount of crunch. If you leave them in the oven too long, you will be looking for new teeth, and no amount of dunking will help you. 

While I no longer have to bake ginger nut cookies weekly to keep a child happy, they are still my go-to treat for road trips. If I know I am heading off on any kind of adventure, I make sure I have a few ginger nut cookies in my car for those coffee pit stops. Having my ginger nuts on hand means I get a fuel-up when I make a stop for coffee and a leg stretch without having to run the gauntlet of grain and sugar-filled offerings at coffee shops and petrol stations.

Gingernut cookies

Gingernut cookies ingredients

Ingredients

  • 200g seed butter
  • 3 tsp. Ground ginger
  • 1 egg
  • 100g coconut sugar

Instructions

Preheat oven to 200 degrees c/ 392 degrees f 

Have a baking tray ready with baking paper on it 

Into a food processor, place the coconut sugar and ginger blend until thoroughly combined. 

Into a food processor place, the coconut sugar and ginger.
Blend until thoroughly combined.

Add the seed or nut butter and mix until thoroughly combined; it will start to clump together. 

 Add the seed or nut butter
Add the seed or nut butter
mix until thoroughly combined, it will start to clump together.
Mix until thoroughly combined, it will start to clump together.

Add the egg and mix again until the mixture starts to form a ball. If it doesn’t form a ball straight away, don’t worry. 

Add the egg.
Add the egg.

When everything is thoroughly combined and sticking together, stop the processor. 

Mix again until the mixture starts to form a ball

Use an ice cream scoop to portion out the cookie dough, place each portion onto the lined baking tray, and make sure there is space between each portion so that the cookies have space to spread. 

Use an ice cream scoop to portion out the cookie dough.
Place each portion onto the lined baking tray.
Make sure there is space between each portion so that the cookies have space to spread.

Use the back of a spoon to press down the pieces slightly. 

Use the back of a spoon to press down the pieces slightly.

Bake the cookies for 15 minutes or until they are golden brown. 

Remove the cookies from the oven, let them cool on the baking tray; this will let them crisp up. 

When the cookies are hard, move them to a container; they will keep for about a week. 

Fresh and crunchy cookies

Gingernut cookies

  • Servings: 10
  • Rating: ★★★★★
  • Print

This recipe is my take on the traditional gingernut, it is gluten-free but still has all the flavour and crunch.


Credit: Cath @ easycleaneats

Ingredients

  • 200g seed butter
  • 3 tsp. Ground ginger
  • 1 egg
  • 100g coconut sugar

Directions

  1. Pre-heat oven to 200 degrees c 392 degrees f
  2. Have a baking tray ready with baking paper on it
  3. Into a food processor place, the coconut sugar and ginger blend until thoroughly combined
  4. Add the seed or nut butter and mix until thoroughly combined, it will start to clump together.
  5. Add the egg and mix again until the mixture starts to form a ball if it doesn’t form a ball don’t worry when everything is thoroughly combined stop the processor.
  6. Use an ice cream scoop to portion out the cookie dough, place each portion onto the lined baking tray, and make sure there is space between each portion so that the cookies have space to spread.
  7. Use the back of a spoon to press down the pieces slightly.
  8. Bake the cookies for 15 minutes or until they are golden brown.
  9. Remove the cookies from the oven, let them cool, and crisp up.
  10. When the cookies are hard, move the cookies to a container, they will keep for about a week.

Nutrition

Per Serving: 161 calories; 10 g fat; 15 g carbohydrates; 4 g protein.

Equipment 

  • Food processor 
  • Ice cream scoop 
  • Baking tray
  • Baking paper/ silicone liner
  • Spoon 
  • Measuring spoons
  • Scales

Nutritional disclaimer

Nutrition information is provided as an estimate based on the ingredients used and available in my area (New Zealand). The nutritional information is here to help you understand the recipe; I use MyFitnessPal to generate my estimates. For more accurate nutritional information, please use a nutritional calculator with the ingredients in your area.


Taco cupcakes

Are you ok with tacos? 

Possibly the most stupid question I can ask. The answer is always the same: YES!!!! While the traditional build-your-taco approach to dinner never disappoints, sometimes a little more structural integrity is needed to ensure dinner doesn’t distract from those blink-and-you-will-miss-it sporting moments. I had a friend over to watch some UFC recently and needed an easy-to-eat dinner that would allow for uninterrupted viewing of some great fights. This is how I solved the problem. 

What could be better 

Everyone loves cupcakes, and everyone loves tacos. What could be better than combining the two? It isn’t as crazy as it sounds, I promise. These little cupcakes are perfectly portioned, with a crispy case and tasty fillings, and they have the bonus of not having to worry about losing half the filling while you are trying to eat them.

Gluten-free wraps 

I like to use the traditional corn tortilla wraps for my tacos, but this recipe works well with wheat-based wraps and even egg wraps. Egg wraps don’t get crispy, but they do taste amazing. The corn tortillas are less flexible, so you have to be careful when placing them in the cupcake pan. I find slightly warming the wraps before use makes them easier to shape. 

These taco cupcakes are an excellent option for dinner parties, shared lunch at work or just because you want something a little different on the weekend. 

Taco cupcakes recipe 

Taco cupcake ingredients

Ingredients

  • 500g minced beef 
  • 1 onion, finely diced 
  • 2 tbsp. taco seasoning 
  • 12 large corn tortilla discs 
  • 12 small corn tortilla discs 
  • 400g can refried beans 
  • 2 cups cheese, grated  
  • Sour cream 
  • Fresh coriander, chopped

Instructions

Preheat the oven to 160 degrees C/ 375 degrees F. 

In a large, heavy-bottomed frying pan, fry the onion until translucent. 

When the onion has cooked for a few minutes, add the beef to the pan and cook until browned. 

Add the taco seasoning to the meat just before it is completely cooked. 

Remove the pan from the heat and set it aside. 

Take a medium-sized 12-cup muffin pan. In each cup, place one large tortilla disc and press it into shape to create a cup. 

Taco cupcakes filled

In the centre of each tortilla cup, add one teaspoon of refried beans. 

On top of the beans, add a small tortilla disc.  

On top of the small disc, add two tablespoons of the cooked beef. 

Sprinkle each cup with cheese.  

Taco cupcakes topped

Bake for 15 minutes or until the cheese is golden brown. 

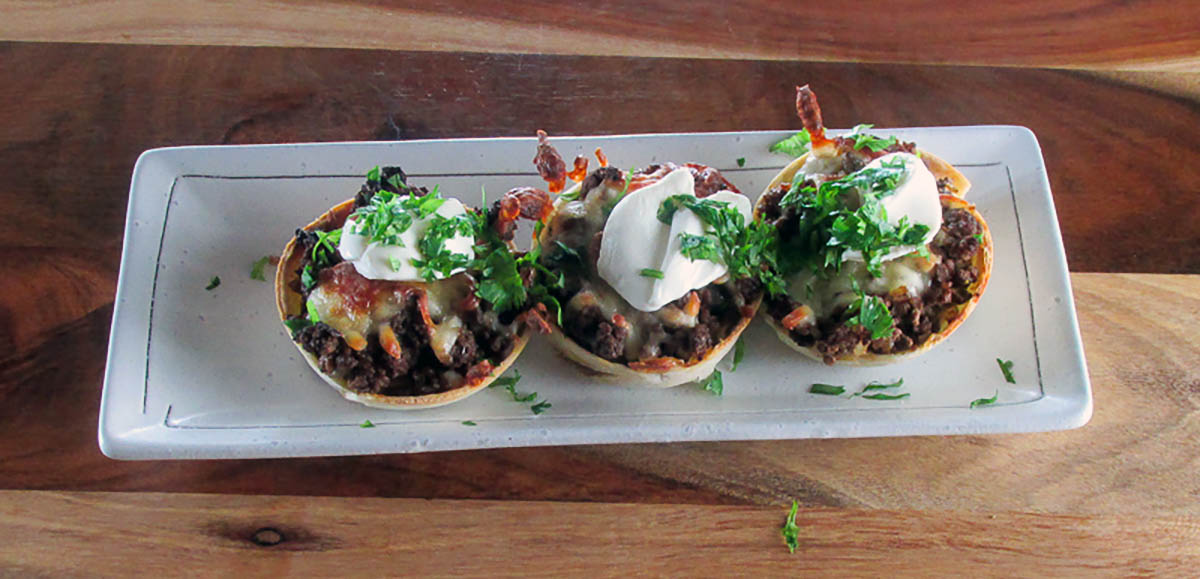
Taco cupcakes fresh from the oven

Remove the cupcakes from the oven and top them with a teaspoon of sour cream and chopped fresh coriander.

Taco cupcakes topped with sour cream and coriander

Serve while they are hot.

Taco cupcakes

  • Servings: 12
  • Rating: ★★★★★
  • Print

These little cupcakes are perfectly portioned, have a little crispy case and tasty fillings,


Credit: Cath @ easycleaneats

Ingredients

  • 500g minced beef 
  • 1 onion, finely diced 
  • 2 tbsp. taco seasoning 
  • 12 large corn tortilla discs 
  • 12 small corn tortilla discs 
  • 400g can refried beans 
  • 2 cups cheese, grated  
  • Sour cream 
  • Fresh coriander, chopped. 

Directions

  1. Preheat the oven to 160 degrees C/ 375 degrees F. 
  2. In a large, heavy-bottomed frying pan, fry the onion until translucent. 
  3. When the onion has cooked for a few minutes, add the beef to the pan and cook until browned. 
  4. Add the taco seasoning to the meat just before it is completely cooked. 
  5. Remove the pan from the heat and set it aside. 
  6. Take a medium-sized 12-cup muffin pan. In each cup, place one large tortilla disc and press it into shape to create a cup. 
  7. In the centre of each tortilla cup, add one teaspoon of refried beans. 
  8. On top of the beans, add a small tortilla disc. 
  9. On top of the small disc, add two tablespoons of the cooked beef. 
  10. Sprinkle each cup with cheese.  
  11. Bake for 15 minutes or until the cheese is golden brown. 
  12. Remove the cupcakes from the oven and top them with a teaspoon of sour cream and chopped fresh coriander.
  13. Serve while they are hot.

Nutrition

Per Serving: 276 calories; 10 g fat; 25 g carbohydrates; 20 g protein

Equipment

  • Scales
  • Measuring cups
  • Measuring spoons
  • Frying pan
  • Wooden spoon
  • Knife
  • Chopping board
  • Large round cookie cutter
  • Medium round cookie cutter
  • Muffin pan/ cupcake pan
  • Teaspoon

Nutritional disclaimer

Nutrition information is provided as an estimate based on the ingredients used and available in my area (New Zealand). The nutritional information is here to help you understand the recipe; I use MyFitnessPal to generate my estimates. For more accurate nutritional information, please use a nutritional calculator with the ingredients in your area.


Beef and onions

Slow cooker season

Cards on the table: I hate coming home from a busy day and knowing I have to walk into the kitchen at 7 pm, cook a full meal, and then clean up. Don’t get me wrong; I love cooking. It gives me joy to create a beautiful and healthy. After a 10-hour day at work, an hour commute home, and a heavy workout, cooking is not much joy; it is a chore. I’m usually borderline hangry at the end of a long day, and I want my food as fast as possible. 

This is where having a slow cooker comes into its own. I know that I can walk in and find a meal that is cooked, hot, and ready to serve. That means food is served as soon as I want it, not 30 to 60 minutes later.

Beef and onions on a bed of cauliflower rice
Beef and onions

Putting the slow cooker on the counter

It has been getting a bit cold in the mornings and evenings here in the southern hemisphere, and the cost of salad is going through the roof. Yes, it means winter is upon us. It also means that the slow cooker is coming out of the cupboard and taking up residence on the kitchen counter again. My slow cooker is my favourite kitchen appliance when the weather cools down. To celebrate the slow cooker taking its place on the countertop, I decided to make brisket and onions. 

A little bit of effort, a lot of reward

This slow-cooker meal isn’t a dump-and-go recipe; it requires some prep work, but it is worth the effort. Making a bed of caramelised onions for the brisket to sit on in the slow cooker gives the meat an extra level of flavour that kicks ass and takes names. The bone broth helps to make a rich sauce that can easily be turned into a gravy. If you want to kick things up on the comfort-food front, whisk a tablespoon of tapioca flour into a small amount of the bone broth, then return it to the slow cooker and mix well. I love combining my brisket and onions with cauliflower rice, but it also goes well with mashed sweet potatoes or cauliflower mash. 

Sear in the flavour

I spent some time experimenting with this recipe to create a deeper flavour; I finally landed on the seared meat to make this recipe extra special. The extra step of searing the meat adds a beautiful caramelised flavour to the meat and, more importantly, to the gravy. 

Brisket and onions Recipe

Ingredients

Beef and onions ingredients
  • 1 tbsp. olive oil
  • 4 onion, sliced
  • 1.5kg beef roast
  • 6 cloves garlic, minced
  • 2 cups beef bone broth
  • 2 tbsp. Worcestershire sauce
  • 1 tbsp. coconut aminos
  • Salt and pepper

Instructions

slice the onions
slice the onions

In a large frying pan, heat the olive oil over a medium heat.

In a large frying pan, heat the olive oil over a medium heat.
Add the sliced onions to the pan and let them cook for about 15 minutes
Be sure to stir the onion now and then
Be sure to stir the onion now and then.

Add the onions to the pan and let them cook for about 15 minutes, stirring them now and then.

When the onions are caramelised, spread them on the bottom of your slow cooker.

When the onions are caramelised, spread them out on the bottom of your slow cooker.

Return the frying pan to the heat.

Season the brisket before searing it in the pan where the onions were cooked.

Season the beef well.
Sear the beef in the pan the onions were cooked in.

When the meat is browned, place it on top of the onions in the slow cooker.

Sear the beef on all slides.
When the meat is browned all over, place it on top of the onions in the slow cooker.

Put half of the onions on top of the brisket.

Pour the Worcestershire sauce, coconut aminos and broth over the meat.

Pour the Worcestershire sauce, coconut aminos and broth over the meat.
Cook the beef on a low heat setting for 6 to 8 hours.

Cook the brisket on low heat for 6 to 8 hours. 

The meat should pull apart with a fork.

Let the meat rest for 20 minutes before serving.

Use two forks to pull the brisket apart and mix it well with the onions and cooking juices.

Serve on a bed of cauliflower rice.

Beef and onions

  • Servings: 10
  • Rating: ★★★★★
  • Print

This slow cooker meal is one of my favourites and delivers so much flavour.


Credit: Cath @ easycleaneats

Ingredients

  • 1 tbsp. olive oil
  • 4 onion, sliced
  • 1.5kg beef brisket
  • 6 cloves garlic, minced
  • 2 cups beef bone broth
  • 2 tbsp. Worcestershire sauce
  • 1 tbsp. coconut aminos
  • Salt and pepper

Directions

  1. In a large frying pan, heat the olive oil over medium heat.
  2. Add the onions to the pan and let them cook for about 15 minutes, stirring them now and then.
  3. When the onions are caramelised, spread them on the bottom of your slow cooker.
  4. Return the frying pan to the heat.
  5. Season the brisket before searing it in the pan where the onions were cooked.
  6. When the meat is browned, place it on top of the onions in the slow cooker.
  7. Put half of the onions on top of the brisket.
  8. Pour the Worcestershire sauce, coconut aminos and broth over the meat.
  9. Cook the brisket on low heat for 6 to 8 hours.
  10. The meat should pull apart with a fork.
  11. Let the meat rest for 20 minutes before serving.
  12. Use two forks to pull the brisket apart and mix it well with the onions and cooking juices.
  13. Serve on a bed of cauliflower rice.

Nutrition

Per Serving: 259 calories; 8 g fat; 6 g carbohydrates; 38 g protein

Equipment

  • Knife
  • Chopping board
  • Measuring jug
  • Measuring spoons
  • Frying pan
  • Wooden spoon
  • Tongs
  • Whisk

Nutritional disclaimer

Nutrition information is provided as an estimate based on the ingredients used and available in my area (New Zealand). The nutritional information is here to help you understand the recipe; I use MyFitnessPal to generate my estimates. For more accurate nutritional information, please use a nutritional calculator with the ingredients in your area.


Salmon cakes

Freezer meal

Hands up if you are busy. Who is way too tired to get in the kitchen to cook at the end of the day? Definitely me.

My days are filled with meetings, to-do lists, emails and telling people what to do; by the time I finish work, the last thing I want to do is get stuck into cooking a meal and cleaning up afterwards. I want to work out and do something fun before I crash. That is why freezer meals are my favourite solution to the challenge of a busy life. A few hours on the weekend, and you find yourself with a stack of options for dinner that can be thawed and cooked for a healthy, delicious meal that is good for you.

Meal prep on the weekend

Last weekend, I restocked my freezer and added a few easy meals to make life easier on those very busy days. Salmon was on special offer at my bulk store, so I picked up a side and decided that salmon cakes would be my easy-added protein option for salads over the next few weeks. I like a bit of variety when preparing meals, and these salmon cakes give me an easy option that doesn’t need to be reheated before eating and tastes fantastic. If you can get your hands on a lot of salmon at a price that doesn’t require you to sell a kidney, you can easily make a large batch and package them up for the freezer.

Salmon cakes recipe

Ingredients

  • 600g salmon fillets, cooked
  • 4 eggs
  • 1 onion, finely sliced
  • 1/4 cup coconut flour

Instructions

In a large bowl, combine all ingredients and ensure everything is well mixed. 

Take a small handful of the mixture and shape it into a patty; repeat with the remaining mixture. 

Fry the patties in some oil over medium heat until the cakes are crisp on the outside.

“Salmon

  • Rating: ★★★★★
  • Print

“Simple


Credit: Cath @ easycleaneats

Ingredients

  • 600g salmon fillets, cooked
  • 4 eggs
  • 1 onion, finely sliced
  • 1/4 cup coconut flour

Directions

  1. In a large bowl, combine all ingredients and ensure everything is well mixed.
  2. Take a small handful of the mixture and shape it into a pattie; repeat with the remaining mixture.
  3. Fry the patties in some oil over medium heat until the cakes are crisp on the outside.

Nutrition

Per Serving: 192 calories; 8g fat; 5g carbohydrates; 18g protein

Equipment

  • Knife
  • Chopping board
  • Large mixing bowl
  • Frying pan 
  • Spatula 

Nutritional disclaimer

Nutrition information is provided as an estimate based on the ingredients used and available in my area (New Zealand). The nutritional information is here to help you understand the recipe; I use MyFitnessPal to generate my estimates. For more accurate nutritional information, please use a nutritional calculator with the ingredients in your area.


Workout of the week 8 July 2026

Week five new training program

It is week four of my new training program to get myself out of a bit of a funk and regain some of the fitness and strength I’ve lost over the last few months. 

The aim of my new training program is to enable me to:

  1. Exercise every single day.
  2. Rebuild my base fitness level.
  3. Rebuild strength and muscle mass.
  4. Set regular goals to show progress.

This is my fifth week of training and the start of my second cycle in this program. While I would love to report that I have been powering through the week and smashing my goals, I can’t. Unfortunately, my busy few weeks, including flying around the country, caught up with me. 

A lovely cold and sore throat took me down hard, forcing me to drop my weights and add more rest between sets so I could make it through my workouts. While I would enjoy the lively debate about whether you should work out when you are sick, I know myself well enough to know that if I stop working out, it would take weeks to ramp myself back up to sticking with the programme again. Whenever I’m sick, I try to keep exercising and adjust my activity based on how I’m feeling, how much sleep I’ve had and my fueling (food and hydration) that day. Some days I may have to drop the weights completely or just do the cardio part of the workout so I don’t flatline myself for the rest of the week. I know that being sick means needing more recovery time, and I see a massive increase in muscle soreness, so I work with what I have.

What have I been doing?

Each week, I will share one of the workouts I’ve done here so you can see the program and exercise details.

This week I’ll be sharing the lower body focused strength training session, along with my warm-up and cool-down.

Day 6 – Lower body focus strength training 

Activations and warm-up

Banded standing clams 10 each side, foot forward and foot backward
Banded lateral walks 10 each side
Banded monster walks 10 each side forward and backward
Band pull-aparts10

2 rounds

  • 10 push ups
  • 10 mountain climbers
  • 10 walking lunges
  • 10 sit-ups
  • 10 pull ups

Workout

Barbell back squat 3 sets 8 reps 50%
Reverse lunge 3 sets 8 reps each leg 50%
Glute bridge3 sets 12 reps 50%
Calf raise3 sets 12 reps 50%
Treadmill 10 rounds 20 second sprint, 20 second rest

Cool down

Standing quad stretch 2 sets, 30 seconds each leg
Straight leg calf stretch2 sets, 30 seconds each leg
Kneeling hip flexor stretch2 sets, 30 seconds each leg
Hamstring stretch 2 sets, 30 seconds each leg
Figure 4 stretch 2 sets, 30 seconds each leg
Pigeon pose2 sets, 30 seconds each side

Workout disclaimer

I share my workouts to show what I do, not to tell you what to do.  

I post my workouts using percentages of my max lifting capacity rather than stating the weights or speeds I use. Everyone is different and has different levels of fitness and capability. Your body is yours alone. If you want to start working out, I recommend spending some time with a personal trainer to get you on the right path.  

When working out with weights, remember your one-rep max is yours alone; finding the weights that are right for you is important. If you decide to try a workout, find out which weights you should use first. 


Women and strength training

Women and strength training – time for the truth

Women and strength training were two things that, until a few years ago, had not been put together in a sentence in most circles.

Many of us were introduced to exercise by our mothers, in the middle of the living room, following the instructions of a motivational trainer dressed head to toe in lycra (I could be showing my age here). For decades, women have been guided towards predominantly cardiovascular activities; step classes, running, Zumba, Pilates, and yoga were the closest things to strength training many women got.

As women, we have been conditioned to associate weight loss, healthy lifestyles, and the ‘perfect’ body with long, hard cardiovascular training. For a very long time, TV, magazines, and the internet reinforced this for us all, until recently.

The last few years have seen a significant shift in the fitness industry and attitudes in mass media; strength training is the new cardio, and strong is the new skinny.

With this dramatic shift in direction towards promoting strength in women, many women feel confused and hold onto what we were told when cardio was king.

It is time to examine some of the myths about strength training, uncover the truth, and discover some of the benefits of lifting heavy regularly.

Lifting weights will make me look manly

Let’s get to the root of this one. For years, the primary visual examples of women who lifted weights in the media were images of female bodybuilders from the ’80s and ’90s. Don’t get me wrong, I greatly respect these women, but this is not what lifting weights as a woman does to your body; these women are the exception, not the rule. To take a female body and make it look manly requires a combination of hormone manipulation and pharmaceutical supplementation; unless you have a massive imbalance in your testosterone levels, you are safe and won’t look manly just from lifting weights. Lifting weights will increase your muscle mass but will not turn you into a man.

Lifting weights will make me look bulky

This is a common response when the topic of strength training is raised with women. The truth is that lifting does not cause bulk. Bulk requires excess calories, testosterone and heavy lifting. Women do not have a large amount of testosterone, so it is hard to become ‘bulky’. You will gain weight if you eat more than you need and lift weights, but you can gain weight if you eat more than your body needs. Eating a balanced diet will help you build muscle and look more toned. Over time, the amount of fat between your muscles and skin will reduce, and you will look leaner and more muscular. If people think that is bulky, then they have probably never picked up a weight themselves.

Lifting weights will not help you lose weight

If your goal is to look like a stick-thin model, weightlifting probably isn’t for you. Weightlifting is the fastest way to change your body composition; it will help you burn fat and build muscle. However, numbers on a scale aren’t the most reliable measure of change. Reducing body fat and increasing muscle mass may not show on the scale, but it will show in how your clothes fit and the new wardrobe you need to buy.

Lifting weights is dangerous

Lifting weights can be dangerous, but so can running.  The danger comes from undertaking any activity with poor form.  When lifting weights, the risk usually stems from a combination of heavy loads and poor technique.  If you took up running, you would not start by doing a marathon; you would learn proper running technique and build up distances over time.  The same principle applies to lifting weights: start with a broomstick to master technique and form, then move on to a bar and start adding weights, reducing the risk of injury.

Lifting weights turns your fat into muscle

I would love to say that is a fact, but it is not. In a magical world of unicorns and calorie-free chocolate, this may be the case, but in our world, fat cannot turn into muscle; it is physically impossible. The same applies to the reverse; muscle will not become fat. Lifting weights will help you burn fat, but it will not turn into muscle.

Now that we have dispelled some common myths about women and strength training, it is time to examine some of its benefits.

Reduce your risk of osteoporosis

By undertaking weight-bearing exercises, you are stressing your bones. Don’t worry; this is a good thing. Stressing the bones will increase bone density and reduce the risk of osteoporosis. As a woman, this is especially important, as we are at greater risk of osteoporosis than men as we get older.

Reduce the risk of depression

Strength training has a side effect; it increases the level of endorphins in your body. These are the natural opiates the brain produces that make you feel great. Studies have shown that strength training is a natural antidepressant and improves sleep quality and general well-being.

You will lose body fat

Strength training is the best way to increase your lean muscle mass; the more muscle you have, the more calories you burn, so your body will use its fat stores as fuel.

Reduces the risk of injury as you age

When you have strong muscles, tendons and ligaments, they are less likely to give way under stress, which means you are far less likely to get injured.

You will look great

This is not shallow; it is simply honesty. Most people start an exercise program to change how they look. Lifting weights will give you a lean, toned, and fit body, making you feel and look amazing.


Delicious Gluten-Free Oreo Crepes Recipe

Lockdown inspiration

These delicious gluten-free crepes are a COVID-inspired recipe.
2020 was a rough year, but it wasn’t all bad. I managed to get out of Auckland and made it to Wellington for a mini-adventure. While I wasn’t a fan of the cold, surprisingly, I got a few non-windy days! I love mooching around, seeing the sights and getting out and about in a new place; if I don’t end up with sore legs from walking around a city, I’ve done adventure wrong. Discovering new places to eat is always a highlight of any trip away. While in Wellington, I came across a great little place that had all of the crepes, seriously, all of the fillings, and they do buckwheat crepes. On a recent work trip back to Welly, I went to see if the little place was still open; it seems they didn’t survive the bumps left by COVID, but I haven’t been able to stop thinking about crepes since then. There was only one solution: make my own.

Grain-free crepes

Taking inspiration from that little crepe shop, I experimented to come up with my own buckwheat-flour batter for crepes that could be made more exciting by adding anything. As with all of my experiments, I had to eat a few mistakes before I came up with a base batter that was smooth and the crepes don’t fall apart when you try to flip them over.

Make it like an Oreo

What can I say? If you find something that works, stick with it. While I’m not a fan of chocolate, I do like Oreos. I refuse to buy them, but I will try to recreate the flavours when I want a sweet treat. 

For me, these Oreo crepes are the perfect balance of sweet filling and dark chocolate wrapping.

Oreo crepes

Ingredients

  • 3 eggs
  • 1/4 cup cream
  • 1/4 cup water
  • 1/4 cup buckwheat flour
  • 2 tbsp. cacao powder
  • 1/2 tsp. vanilla powder
  • Filling
  • 190g cream cheese
  • 2 tbsp. monk fruit sweetener
  • 1/4 tsp. vanilla powder
  • 2 tbsp.buckwheat flour

Instructions

To make the filling, take a mixing bowl, beat together the cream cheese, sweetener, vanilla powder and flour. I recommend using a stand mixer for this to achieve a smooth, fluffy mixture. 

Beat until the mixture is light and fluffy.

Put this mixture to one side.

Put the cream cheese mixture aside for later.

In a bowl, whisk together the cream, sweetener, vanilla and two tablespoons of buckwheat flour for the base crepe batter. 

In another bowl, beat the eggs and water together.

Add the eggs to the base crepe batter and whisk. 

Whisk in the cacao and buckwheat flour, beat until you have a smooth batter.

Heat a crepe or frying pan and lightly oil the pan.

Put a quarter cup of the batter in the pan and swirl it around to create a thin, even layer.

Cook over low heat for about 1 minute, or until the edges are set, before turning.

Cook for a minute on the other side.

Set the cooked crepe aside and repeat the process with the remaining batter.

To plate the crepes, place one crepe on a plate, add a heaped tablespoon of the cream filling in the centre, then spread it out evenly.

Fold the crepe in half and then in half again.

Sprinkle with a bit of cacao powder to serve.

“Oreo

  • Print

“Perfect


Credit: Cath @ easycleaneats

Ingredients

  • 3 eggs
  • 1/4 cup cream
  • 1/4 cup water
  • 1/4 cup buckwheat flour
  • 2 tbsp. cacao powder
  • 1/2 tsp. vanilla powder
  • 190g cream cheese
  • 2 tbsp. monk fruit sweetener
  • 1/4 tsp. vanilla powder
  • 2 tbsp.buckwheat flour

Directions

  1. In a bowl, whisk together the cream, sweetener, vanilla and two tablespoons of buckwheat flour for the base crepe batter.
  2. Beat until the mixture is light and fluffy.
  3. Put this mixture to one side.
  4. To make the filling, take a mixing bowl, beat together the cream cheese, sweetener, vanilla powder and flour. I recommend using a stand mixer for this to achieve a smooth, fluffy mixture.
  5. Put the cream cheese mixture aside for later.
  6. In another bowl, beat the eggs and water together.
  7. Add the eggs to the base crepe batter and whisk.
  8. Whisk in the cacao and buckwheat flour, beat until you have a smooth batter.
  9. Heat a crepe or frying pan and lightly oil the pan.
  10. Put a quarter cup of the batter in the pan and swirl it around to create a thin, even layer.
  11. Cook over low heat for about 1 minute, or until the edges are set, before turning.
  12. Cook for a minute on the other side.
  13. Set the cooked crepe aside and repeat the process with the remaining batter.
  14. To plate the crepes, place one crepe on a plate, add a heaped tablespoon of the cream filling in the centre, then spread it out evenly.
  15. Fold the crepe in half and then in half again.
  16. Sprinkle with a bit of cacao powder to serve.

Nutrition

Per Serving: calories; g fat; g carbohydrates; g protein

Equipment

  • Mixing bowls (3)
  • Whisk
  • Measuring cups and spoons
  • Kitchen scales
  • Frying pan/Crepe pan
  • Spatula
  • Tablespoon

Nutritional disclaimer

Nutrition information is provided as an estimate based on the ingredients used and available in my area (New Zealand). The nutritional information is here to help you understand the recipe; I use MyFitnessPal to generate my estimates. For more accurate nutritional information, please use a nutritional calculator with the ingredients in your area.