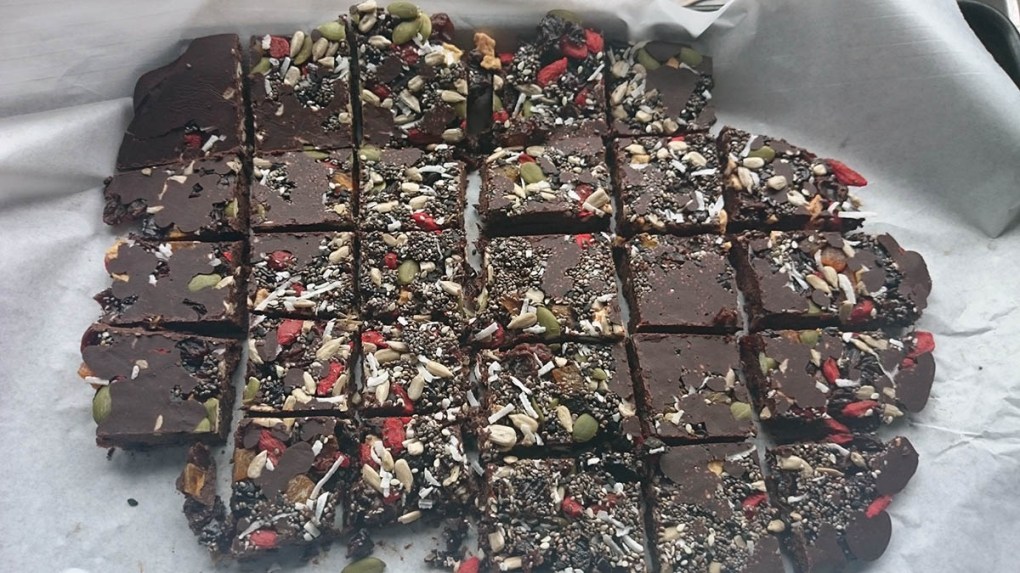
My family love chocolate, when I say love I mean it, they will eat chocolate multiple times a day if I let them. I don’t mind them eating chocolate but like to make the chocolate as healthy as possible.
Chocolate drops ready to eat.
Slightly better for you
If you are looking for a sweet treat that doesn’t leave you feeling guilty, this could be the treat for you. The combination of chocolate, seeds and berries is perfect. You can make these up and keep them in the fridge (if they last that long), so you have a treat on hand when you need one.
Chocolate drops recipe
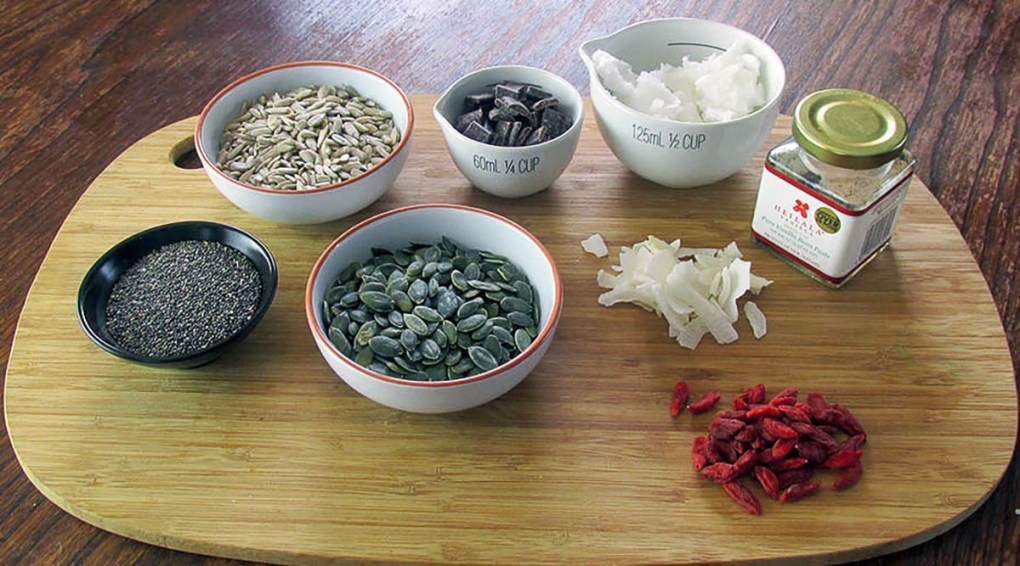
Chocolate drops ingredients
Ingredients
2 tbsp. chia seeds
3 tbsp. sunflower seeds
3 tbsp. pumpkin seeds
3 tbsp. goji berries
2 tbsp. coconut chips
1/4 cup homemade chocolate
Chocolate drops with some white chocolate drizzle.
Melt the chocolate so that it is easy to pour, I like to use a saucepan.
In a bowl mix the seeds and dried fruit.
Line a baking tray with baking paper or a silicone liner.
Pour the chocolate onto the baking tray.
Sprinkle the seed and fruit mix over the top of the chocolate and press it in slightly.
Put the chocolate into the fridge and allow it to set.
Once the chocolate is set cut it into squares.
Store the chocolate in a jar or an airtight container in the fridge.Store the chocolate in a jar or an airtight container in the fridge.
Nutrition
Per Serving: 90 calories; 6 g fat; 8.5 g carbohydrates; 3.9 g protein
Equipment
Mixing bowl
Saucepan
Spatula
Baking paper
Baking paper or a silicone liner
Knife
Chopping board
Nutritional disclaimer
Nutrition information is provided as an estimate based on the ingredients used and available in my area (New Zealand). The nutritional information is here to help you understand the recipe; I use MyFitnessPal to generate my estimates. For more accurate nutritional information, please use a nutritional calculator with the ingredients in your area.
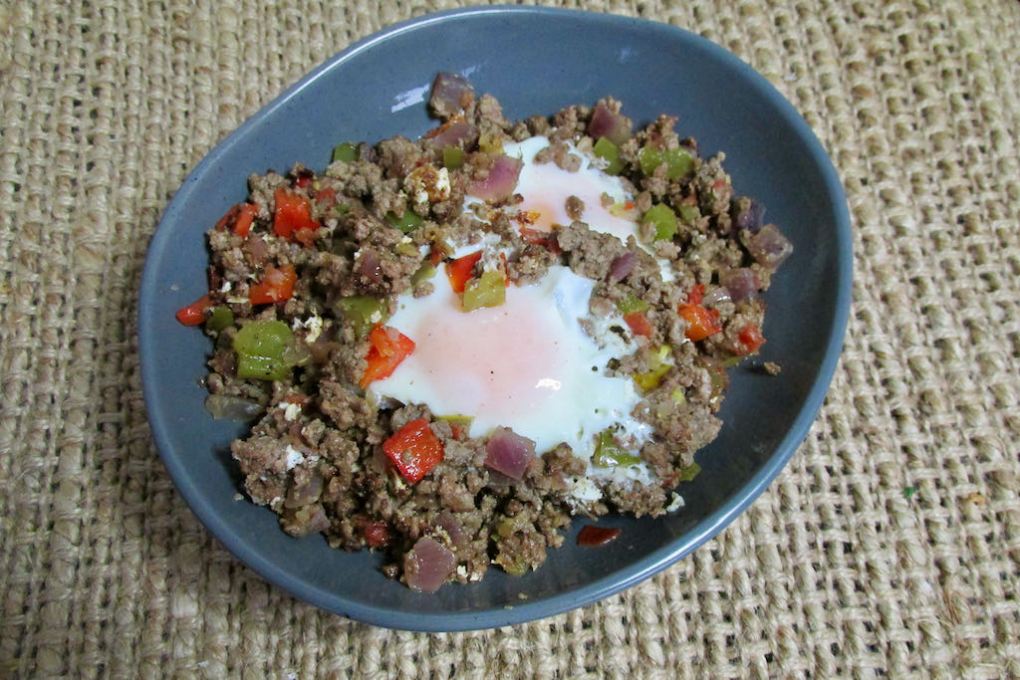
When I came up with this recipe, I wanted something different for breakfast but didn’t have anything specific in mind or much in the fridge. I know that huevous rancheros has a spicy tomato sauce, but I don’t always want a breakfast that has a tomato base. Sometimes I want something without sauce.
Mexican eggs from the pan
Raid the fridge recipe
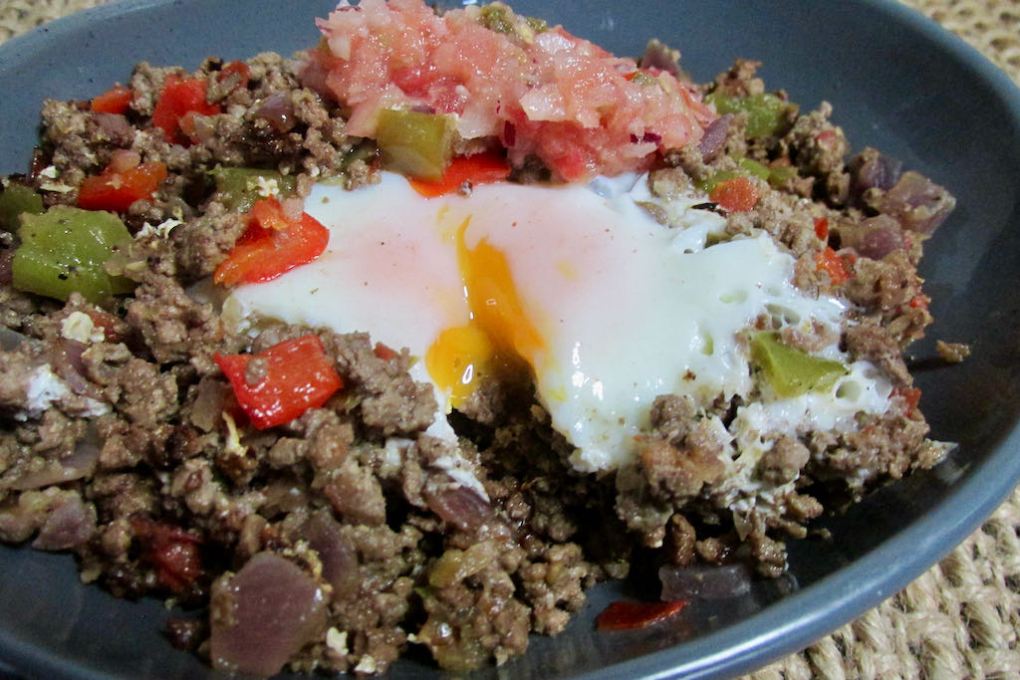
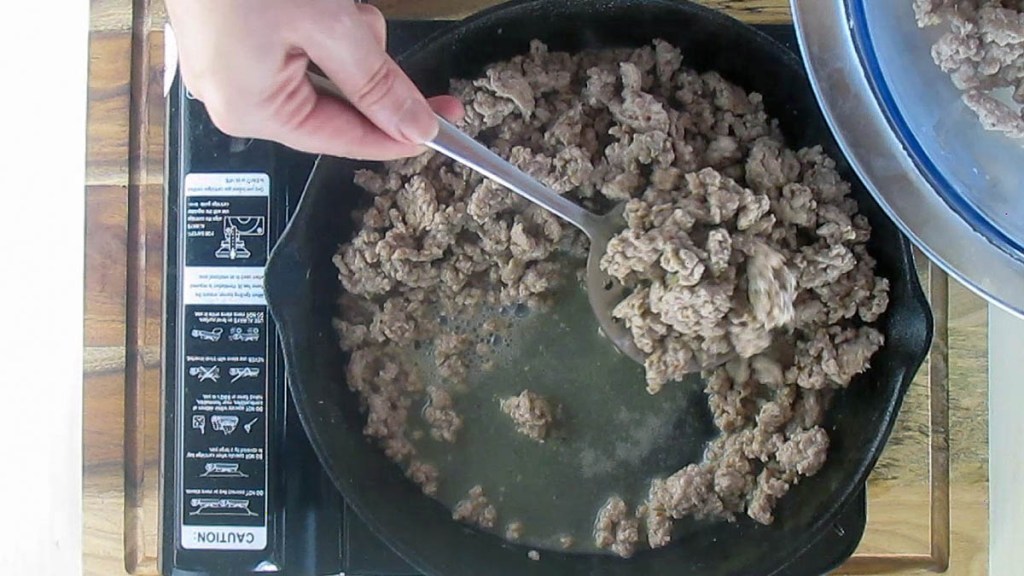
The first time I tried to make Mexican eggs for breakfast, l used some leftover taco mince, salsa, and a leftover pepper. Nothing fancy or too complicated, just doing something fun with our taco leftovers. After some experimentation, l landed on a recipe that delivered everything I wanted. The spicy beef mixed with onions and peppers makes this a quick, easy and tasty option for brunch with friends or an easy weeknight meal. I’ve portioned this recipe for two people; if you want to feed more people, just double the recipe.
Mexican style eggs recipe
Mexican eggs ingredients
Ingredients
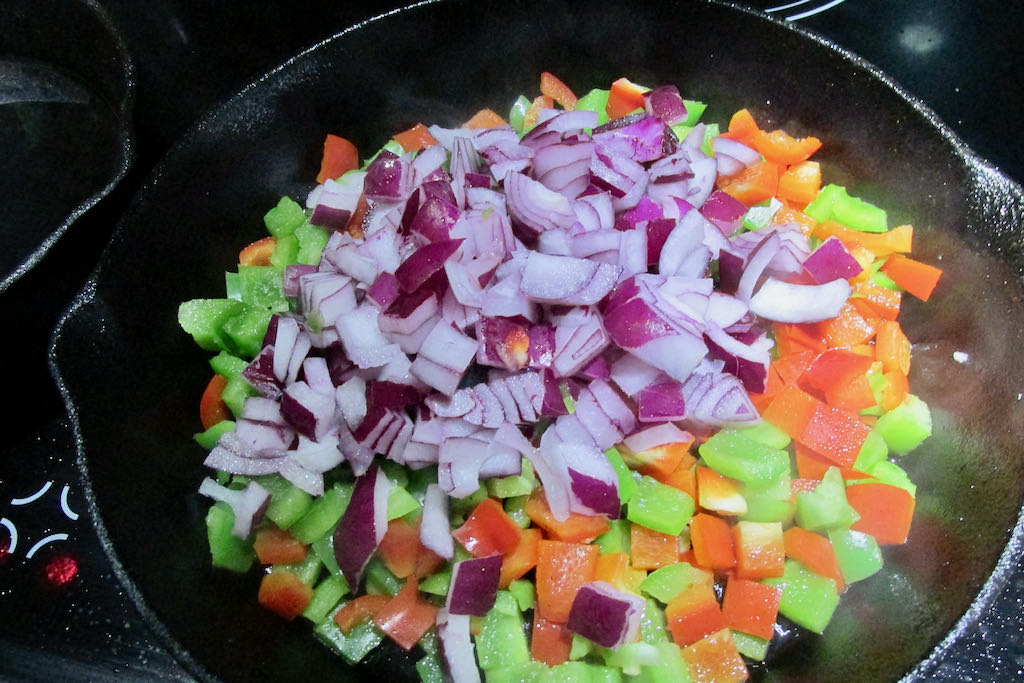
1 onion, chopped
1/2 green pepper, chopped
1/2 red pepper, chopped
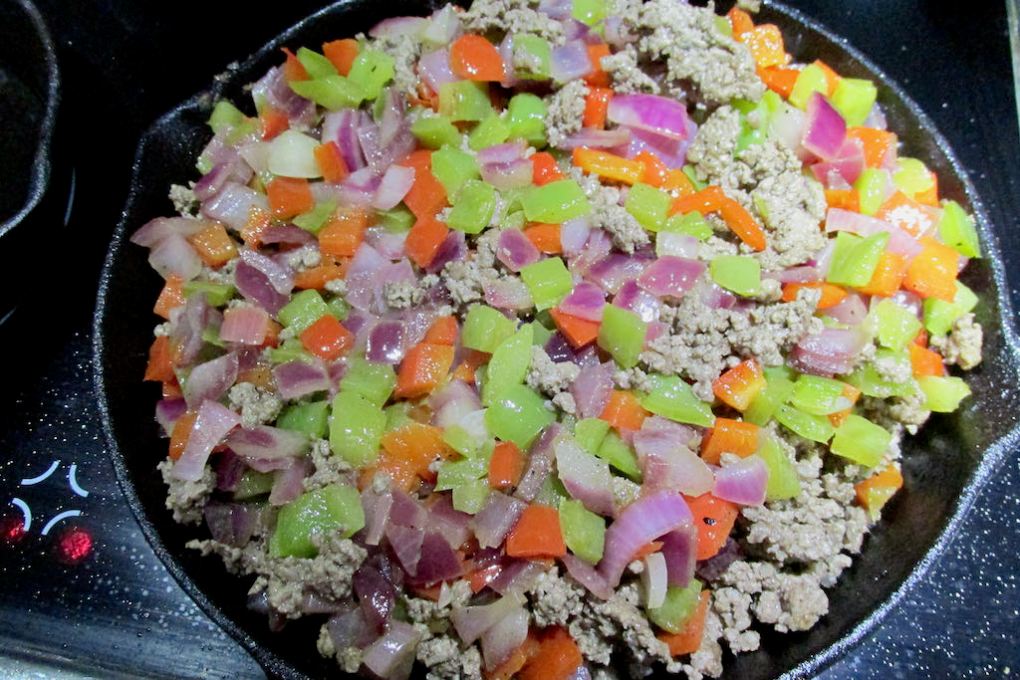
150g minced beef
Salt and pepper
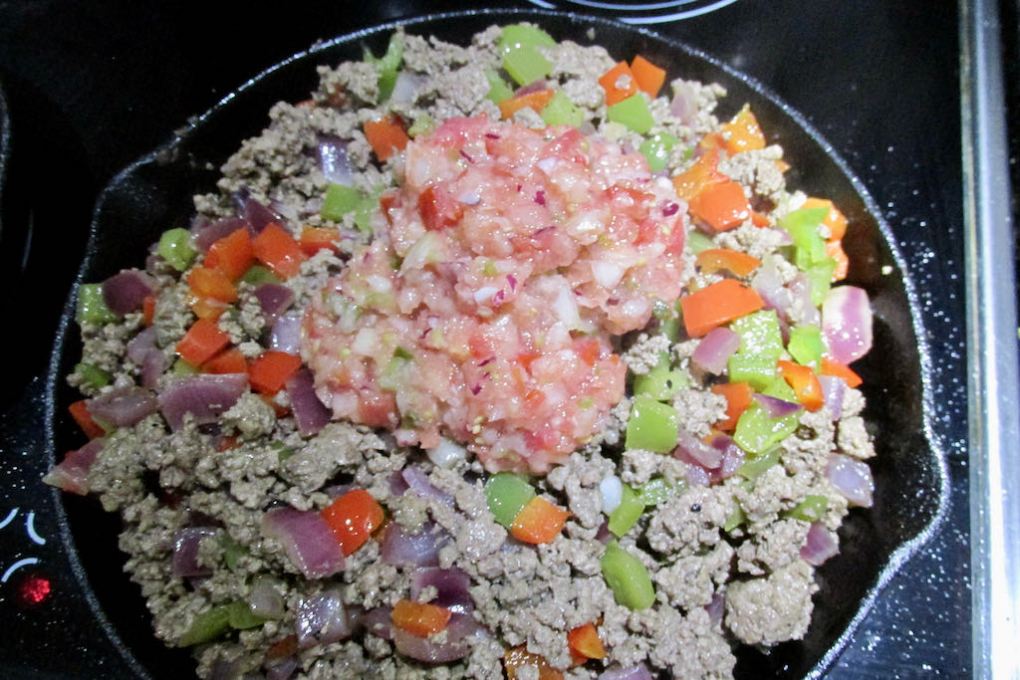
1/4 cup salsa
2 eggs
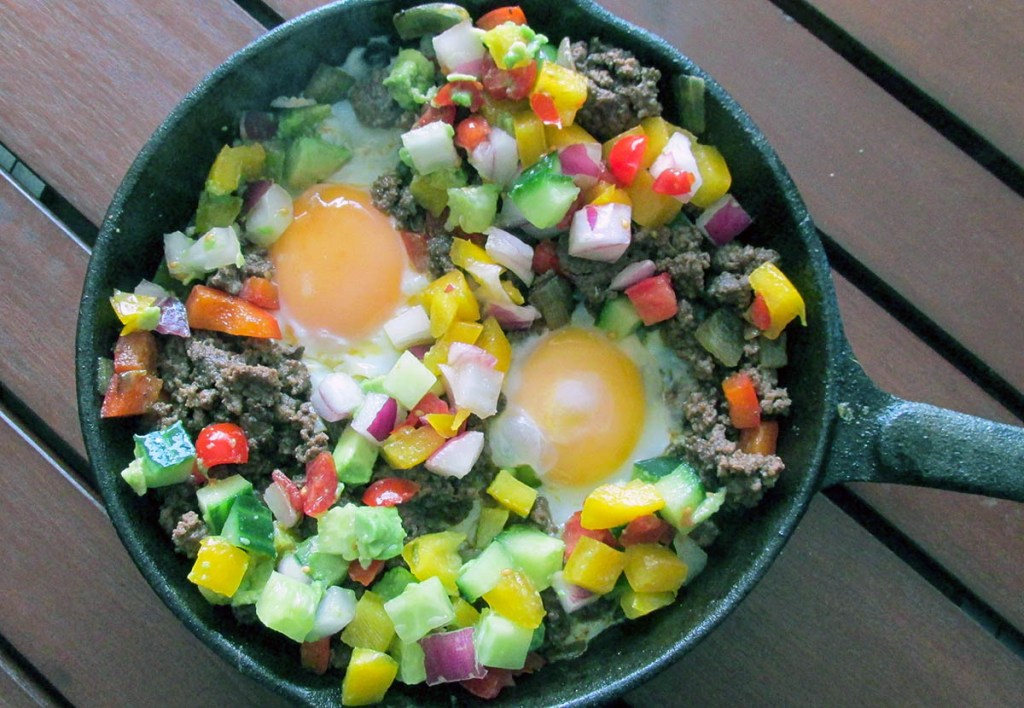
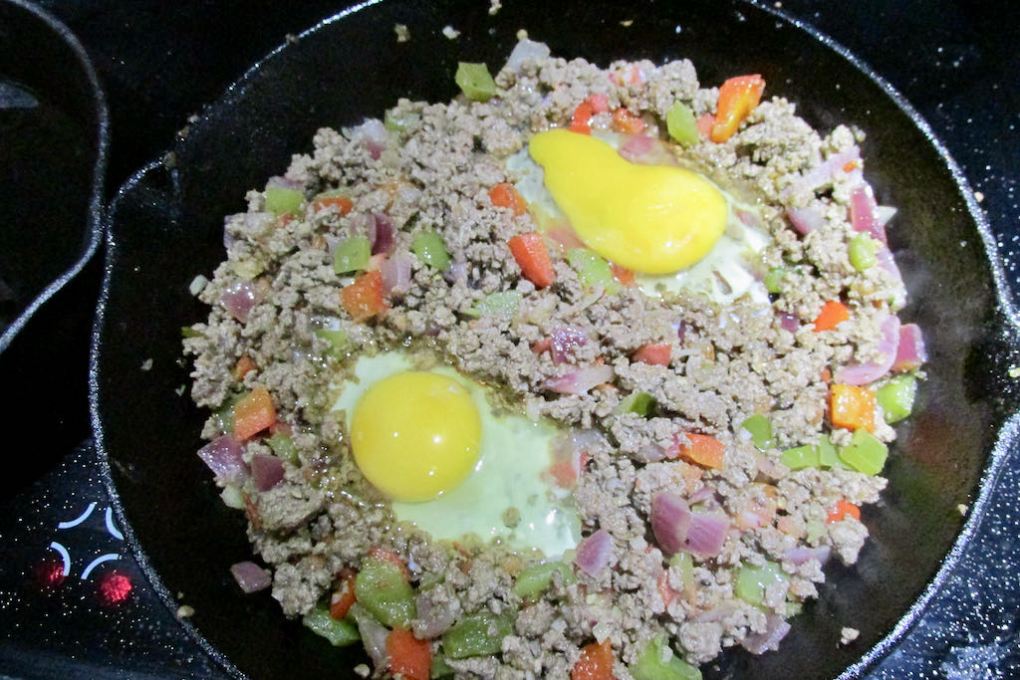
In a pan over a medium heat add the peppers.And the onions to the pan.Sauté over a medium heat.Add the mince and seasoning.Mix well.Add the salsa to the pan.Create two wells in the mixture.Crack in two eggs to the pan.Cover the pan with a lid and cook for a few minutes.When the eggs are cooked to your liking they are ready to serve.Tasty eggs ready to eat.Serve with a little bit of salsa.
In a frying pan sauté the onion and peppers over a medium heat.
Add the minced beef to the pan and season.
Add the salsa to the beef when the meat is browned.
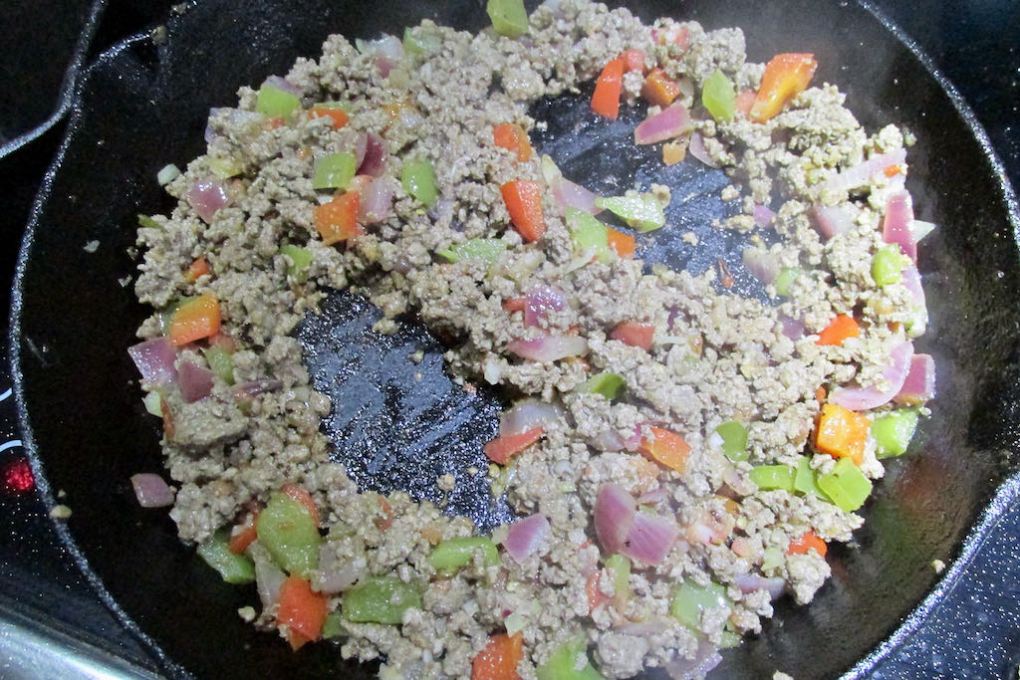
Make two small wells in the meat, use the back of a spoon, this is where you can crack the eggs.
Cover the pan with a lid and cook for a few minutes.
When the eggs are cooked to your liking, it is ready to serve.
Nutrition
Per Serving: 202 calories; 8.1 g fat; 10.9 g carbohydrates; 21.3 g protein
Equipment
Knife
Chopping board
Scales
Measuring cup
Frying pan
Wooden spoon
Tablespoon
Nutritional disclaimer
Nutrition information is provided as an estimate based on the ingredients used and available in my area (New Zealand). The nutritional information is here to help you understand the recipe; I use MyFitnessPal to generate my estimates. For more accurate nutritional information, please use a nutritional calculator with the ingredients in your area.
I’ve been revisiting recipes that have been some of my old school recipes and family favourites that were our staples when we got started as clean eaters. I first posted this recipe in 2018; at that time, the kids were fussy, vegetables had to be hidden and disguised, and there was no potential for intense flavours or spice.
Times (thankfully) have changed, the kids have grown (like man-sized grown), and they now enjoy a wide range of foods. Things like vegetables are enjoyed, spice and chilli are consumed without complaint, and new ingredients are tried without tantrums.
As the kids have grown, they have started to enjoy recipes that they previously turned their noses up at; this is one of those recipes.
Impasta
Pasta is amazing, it tastes great, but it does come with some unpleasant side effects thanks to the carb overload. If you love ravioli but don’t like all the wheat and carbs that come along with it, you can give this a go. This impasta courgette ravioli takes a little time to make, but it is more than worth the effort.
Freezer meal
Hands up if you are busy. Who is way too tired to get in the kitchen to cook at the end of the day? Definitely not me.
My days are filled with meetings, to-do lists, emails and telling people what to do; by the time I finish work, the last thing I want to do is get stuck into cooking a meal and then cleaning up afterwards. I want to work out and spend some time with Jaime. That is why freezer meals are my favourite solutions to the challenge of a busy life. A few hours on the weekend, and you find yourself with a stack of options for dinner that can be thawed and cooked for a healthy, delicious meal for the family.
Courgette ravioli recipe
Ingredients
4 courgette
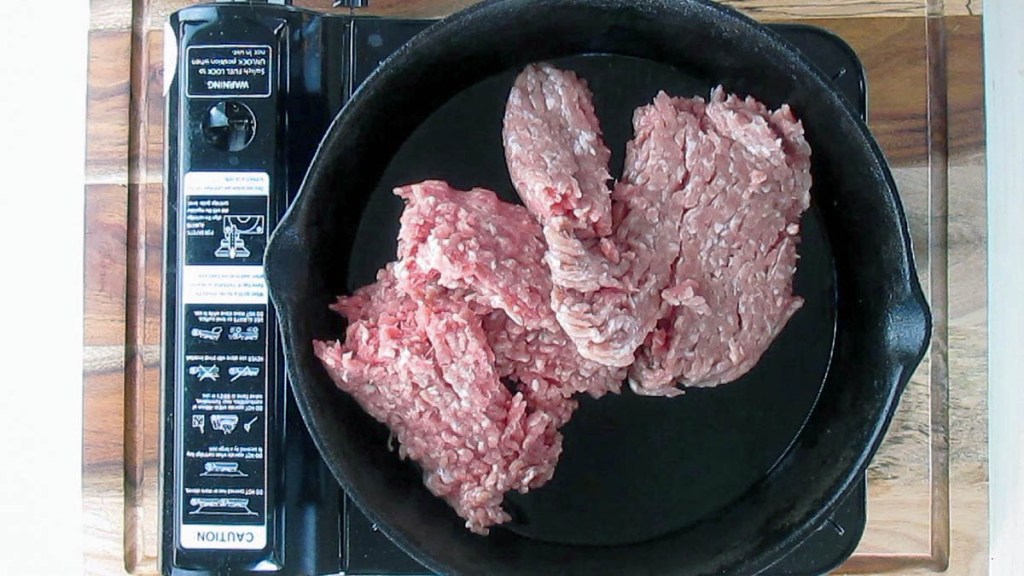
300g chicken mince
2 tbsp. olive oil
3 shallots, diced
3 garlic cloves, minced
200g mushrooms diced
6 slices of prosciutto
1 tsp. garlic powder
1/2 tsp. chicken seasoning
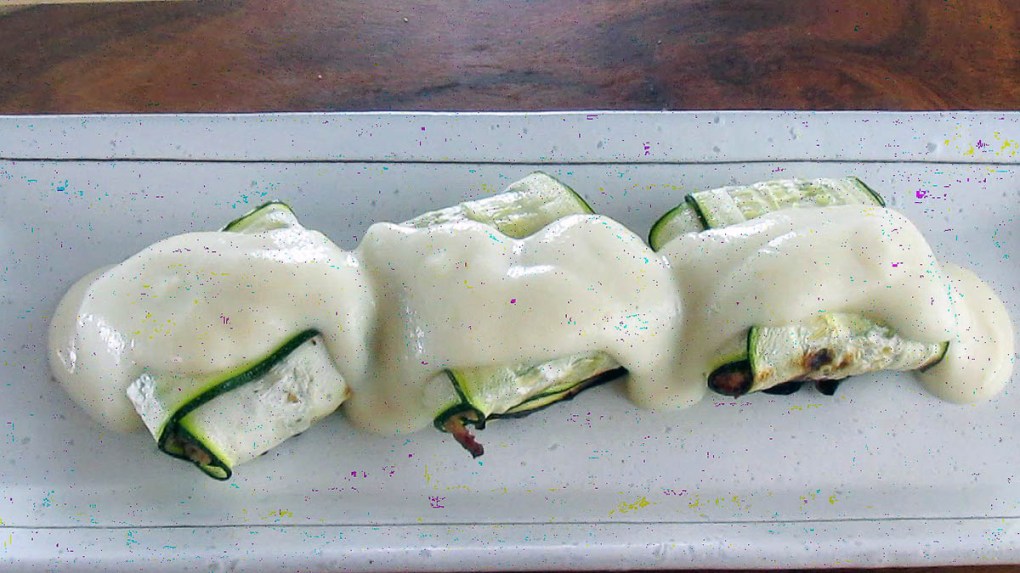
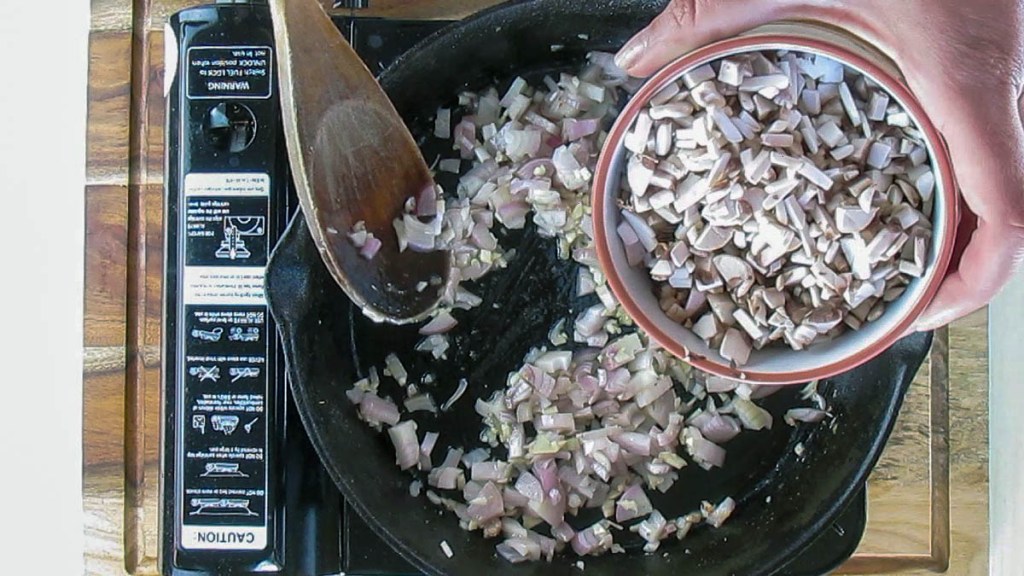
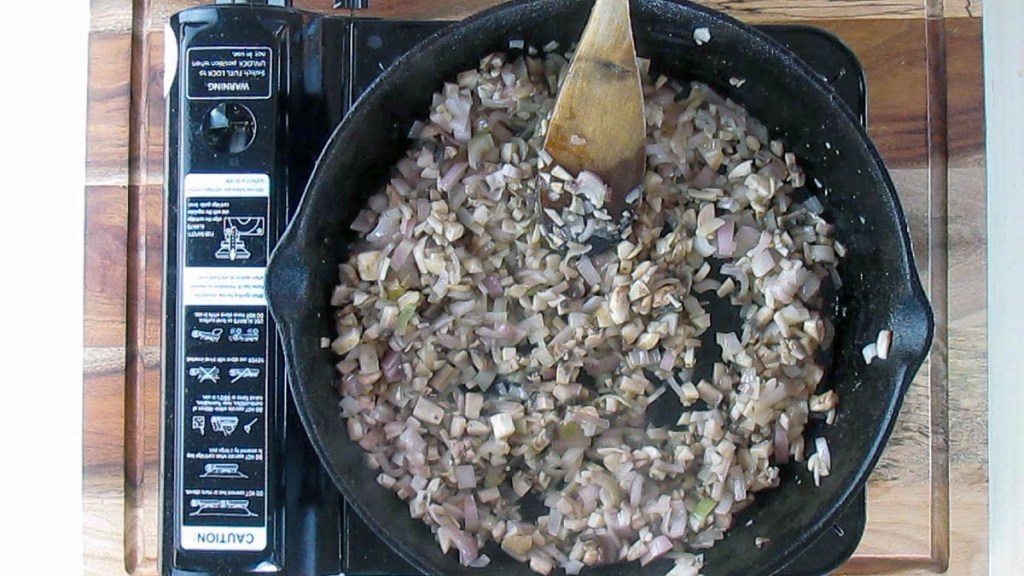
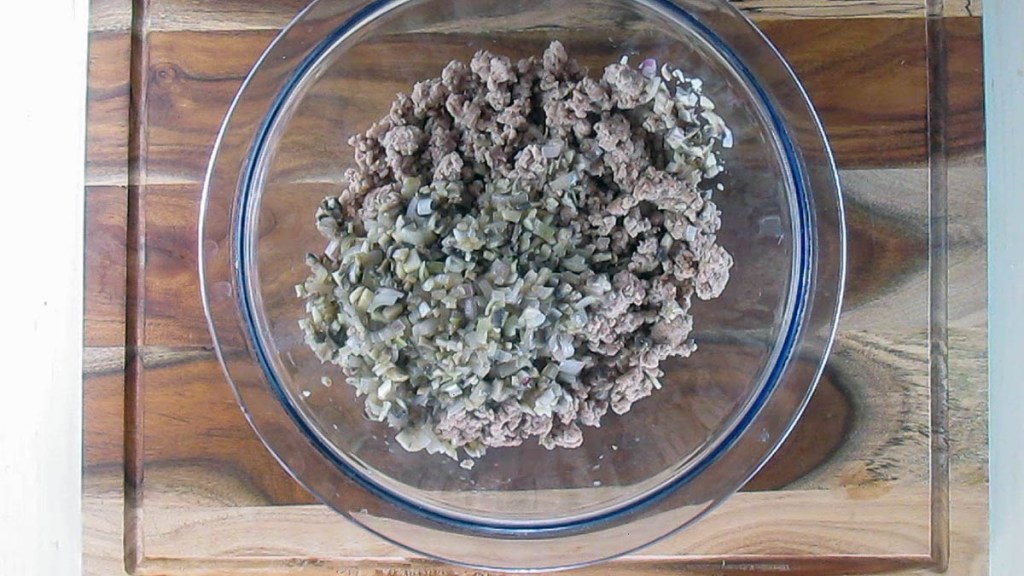
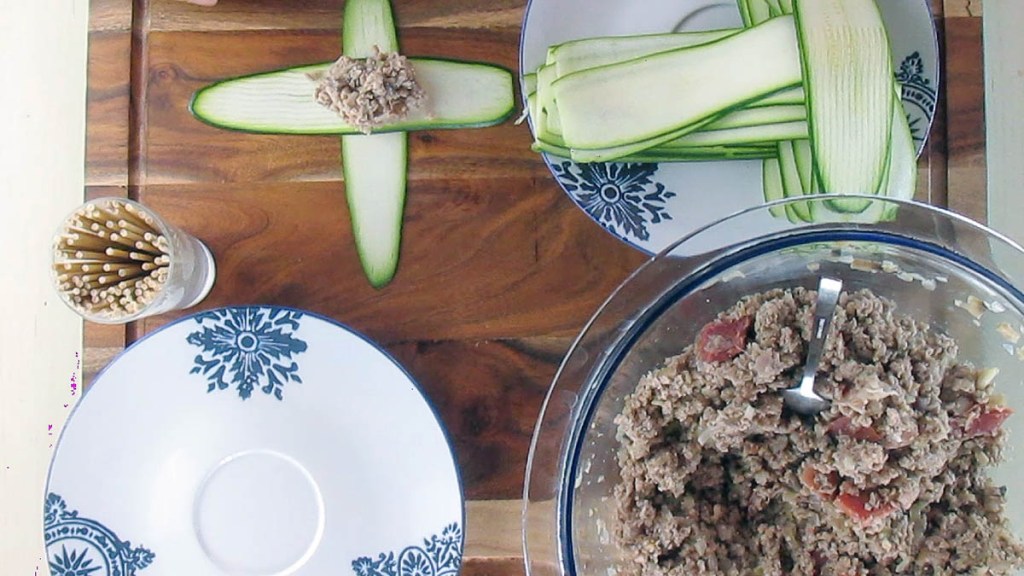
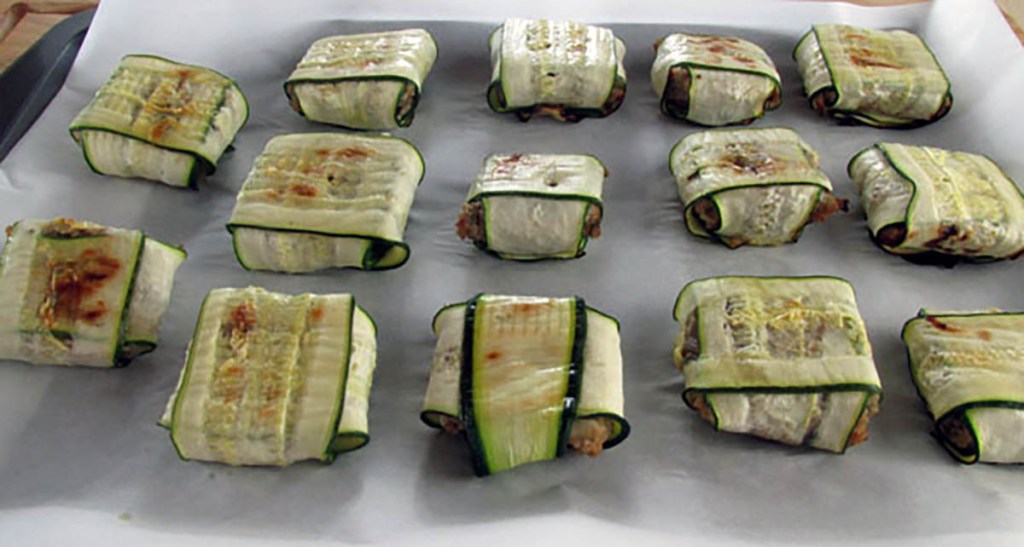
Take a large frying panFry off the chicken mince, garlic powder and chicken seasoningAs the meat cooks break it up.As the meat cooks break it up.When the chicken is cooked, remove it from the pan.Sauté the shallots and garlic cloves over a medium heat until the shallots soften.Add the mushrooms.Let the mushrooms and shallots soften.When the shallots are cooked, add them to the bowl with the chicken.Chicken, mushrooms and shallots.Fry off the prosciutto.When the chicken is crispy move it to the bowl with the chicken.Add the prosciutto to the chicken.Mix well.Use a mandolin to slice the courgettes into long ribbons.Lay down two courgette ribbons in the shape of a cross. Spoon the filling into the centre of the courgettes.Fold the ends of the courgette up to cover the filling.You will need to use a toothpick to secure the ends of the courgette and keep the ravioli closed. Repeat with the remaining filling.Place the ravioli on a baking tray lined with baking paper or a silicone liner.Bake the ravioli for 20-25 minutes at 200 degrees C/ 400 degrees F.Courgette ravioli with cauliflower sauce
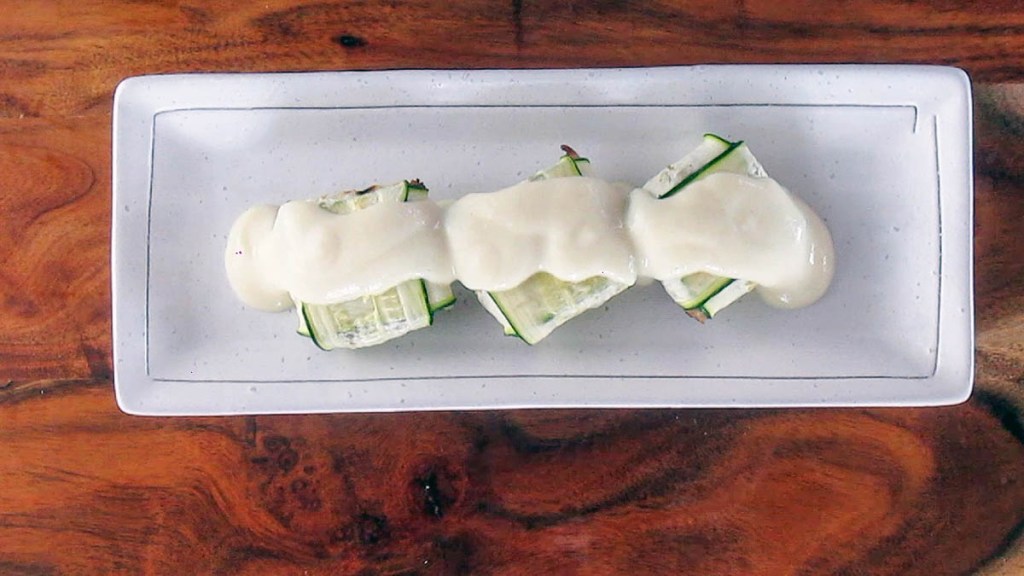
If you love ravioli but don't like all the wheat and carbs that come along with it, you can give this a go. This impasta courgette ravioli takes a little time to make but it is more than worth the effort.
Credit: Cath @ easycleaneats
Ingredients
4 courgette
300g chicken mince
2 tbsp. olive oil
3 shallots, diced
3 garlic cloves, minced
200g mushrooms diced
6 slices of prosciutto
1 tsp. garlic powder
1/2 tsp. chicken seasoning
Directions
In a large frying pan fry off the chicken mince, garlic powder and chicken seasoning in the olive oil over a medium heat.
When the chicken is cooked, remove it from the pan.
Put the chicken in a bowl then set it aside.
Sauté the shallots and garlic cloves over a medium heat until the shallots soften.
Add the mushrooms.
When the shallots are cooked, add them to the bowl with the chicken.
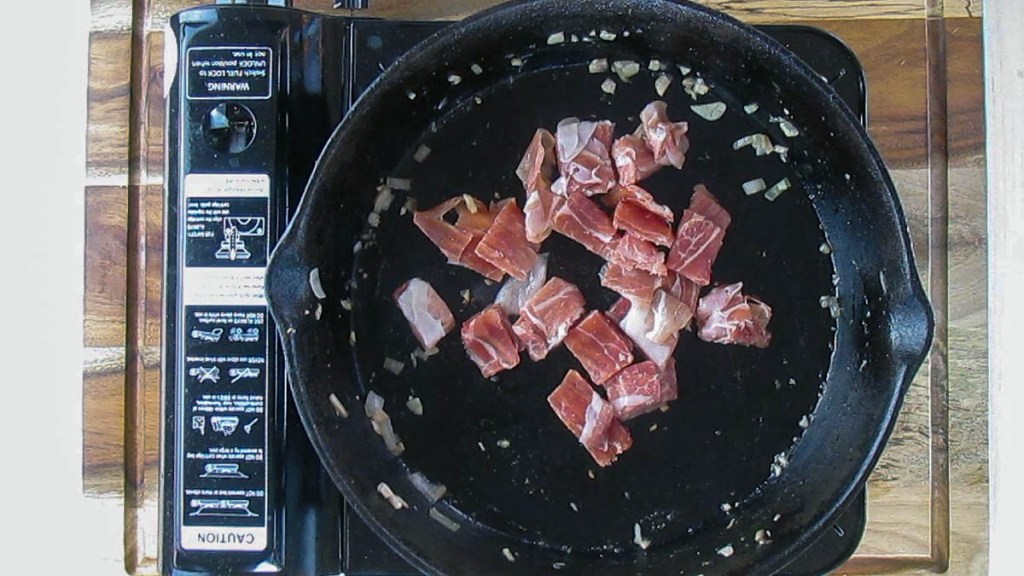
Cut the prosciutto slices into cubes.
Fry off the prosciutto until it becomes crispy, when it is cooked add it to the chicken.
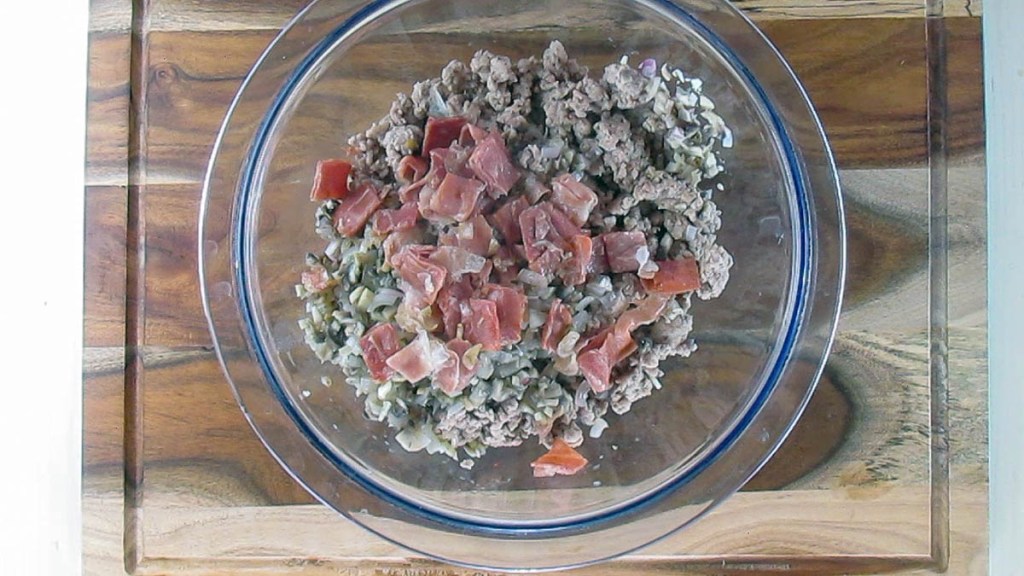
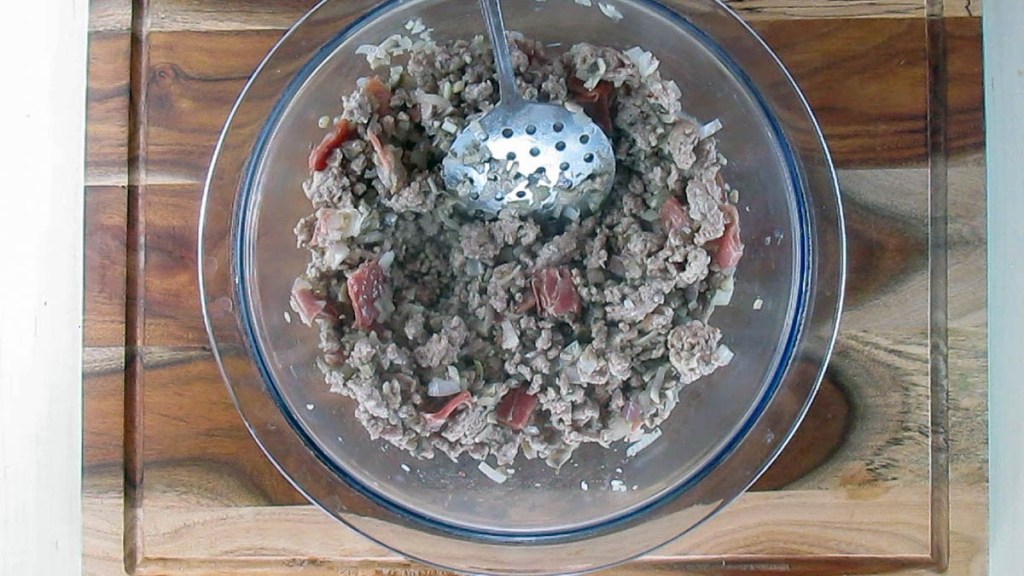
Mix the chicken, shallots, garlic and prosciutto together in the bowl.
Split the mixture in half.
Blend half of the mixture in a food processor, you want it to have a paste consistency.
Add the paste mixture back to the rest of the chicken mixture and mix it everything together.
It should be a very sticky mixture.
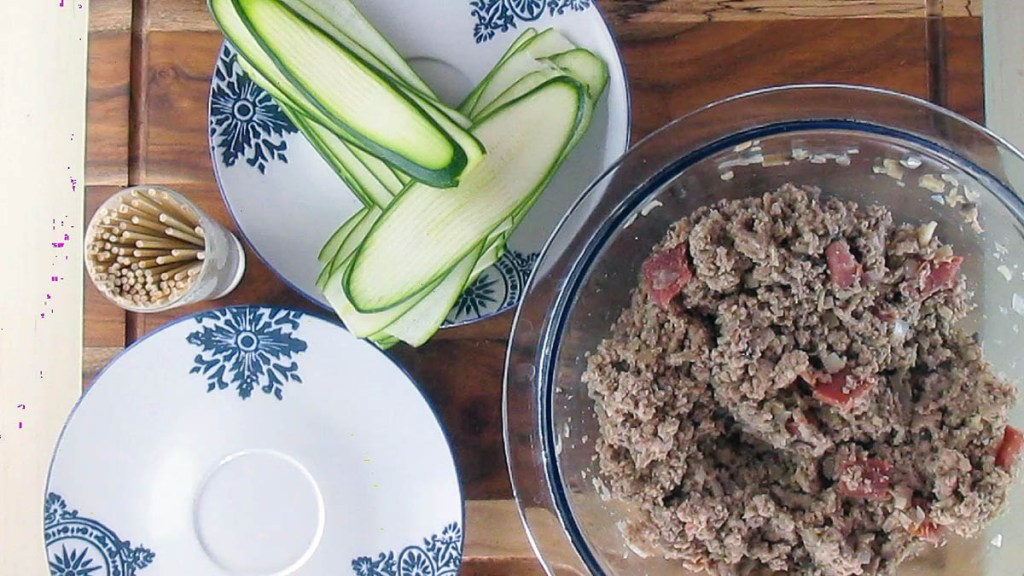
Use a mandolin to slice the courgettes into long ribbons.
Lay down two courgette ribbons in the shape of a cross.
Spoon the filling into the centre of the courgettes.
The amount of filling will depend on how large the courgette ribbons are.
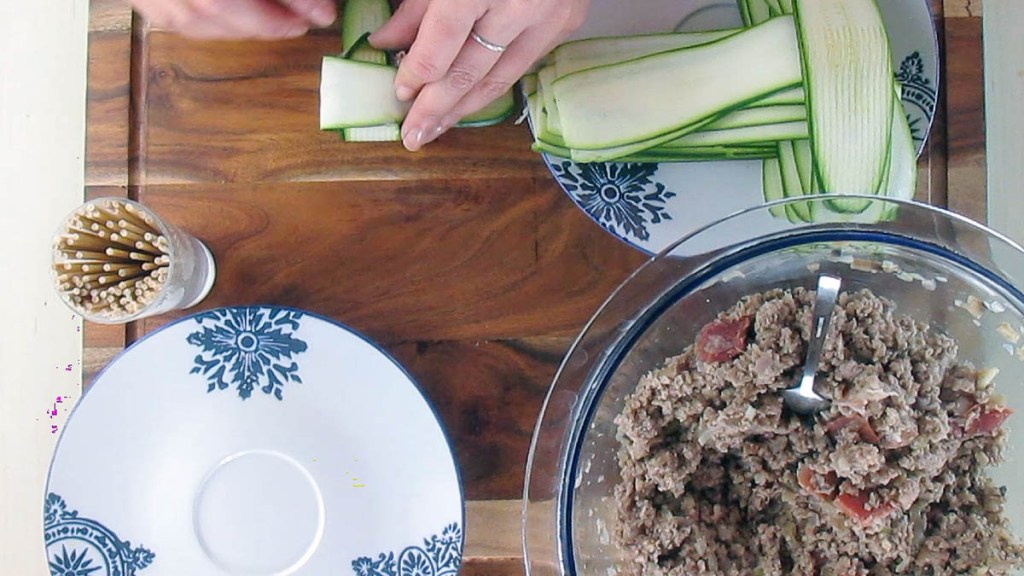
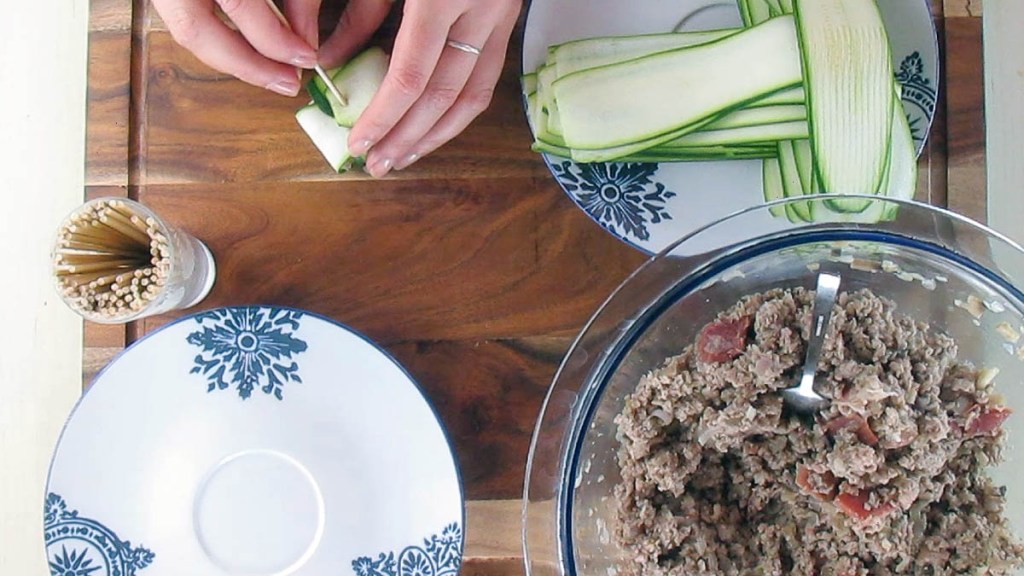
Fold the ends of the courgette up to cover the filling; you will need to use a toothpick to secure the ends of the courgette and keep the ravioli closed.
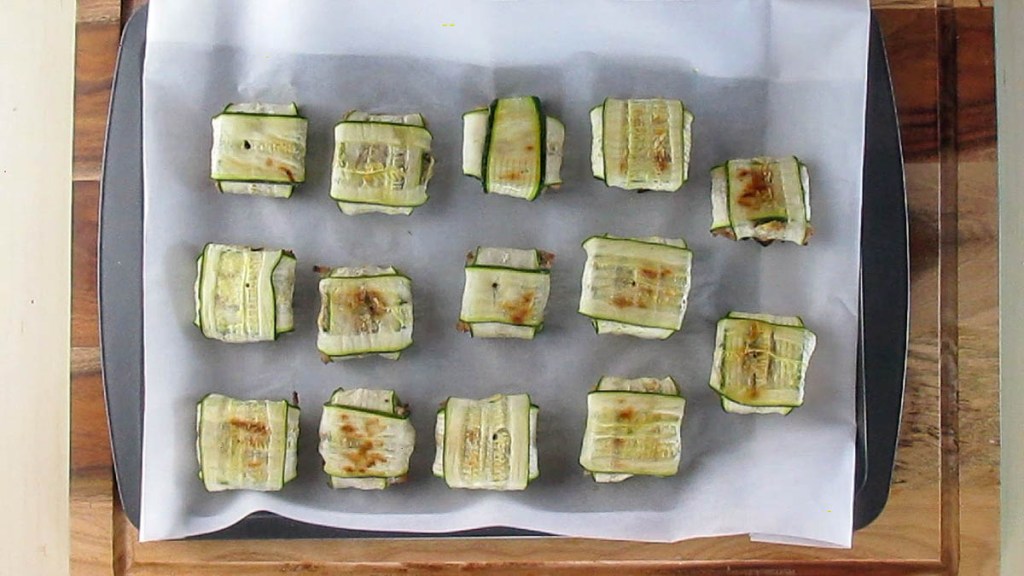
Place the ravioli on a baking tray lined with baking paper or a silicone liner.
Bake the ravioli for 20-25 minutes at 200 degrees C/ 400 degrees F.
Serve with cauliflower sauce.
Nutrition
Per Serving: 193 calories; 12 g fat; 6 g carbohydrates; 14 g protein
Equipment
Frying pan
Wooden spoon
Knife
Chopping board
Scales
Measuring spoons
Mandolin or vegetable peeler
Mixing bowl
Food processor
Spoon
Baking tray
Baking paper or a silicone liner
Nutritional disclaimer
Nutrition information is provided as an estimate based on the ingredients used and available in my area (New Zealand). The nutritional information is here to help you understand the recipe; I use MyFitnessPal to generate my estimates. For more accurate nutritional information, please use a nutritional calculator with the ingredients in your area.
It may surprise you to learn that Scotch eggs aren’t Scottish at all; they are actually English. The traditional Scotch egg is made with sausage meat, coated in breadcrumb and deep-fried until they are crisp on the outside. While I don’t have anything against a deep-fried meal, I was never a fan of the sausage meat that was probably mostly sawdust and the eggs with that horrible sulphur ring; no, thank you.
A new take
I decided to try something a bit different and develop a clean eating take on the traditional recipe. As ever when coming up with clean eating, there are challenges to developing a recipe that tastes great and isn’t awful for you.
Challenges to overcome
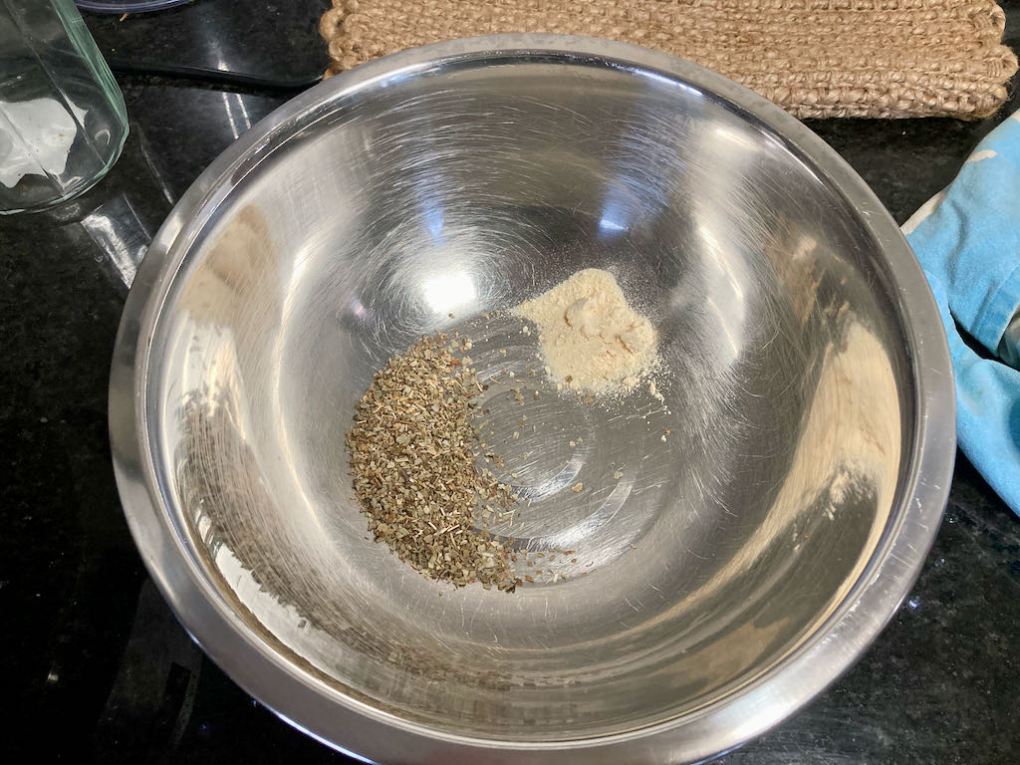
The first challenge was getting the perfect boiled egg; the trick is cooking the eggs enough to cook the egg white without overcooking the yolk. For Scotch eggs, go for a slightly runny yolk; this will give you a perfect yolk when the egg is baked. The next challenge is getting the meat to pack a flavour punch. I love having access to good quality pork; thankfully, it isn’t hard to get free-range pork here in Auckland. I find that free-range pork has far more flavour than high intensity farmed meat; it is always best for taste. The right blend of garlic, sage and Worcestershire sauce gives the meat a real step up in flavour. Finally, getting a nice crispy coating that isn’t deep-fried, I find that coconut flour and egg coating is a great alternative to breadcrumbs, and you don’t have to deep-fry it to make it crispy.
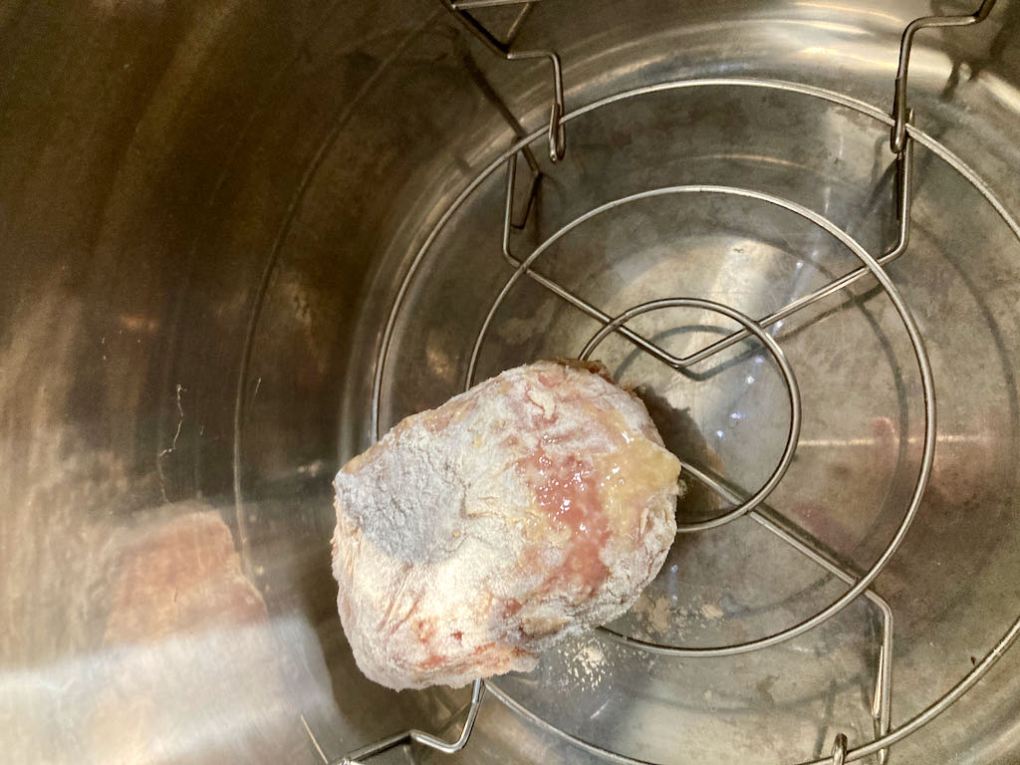
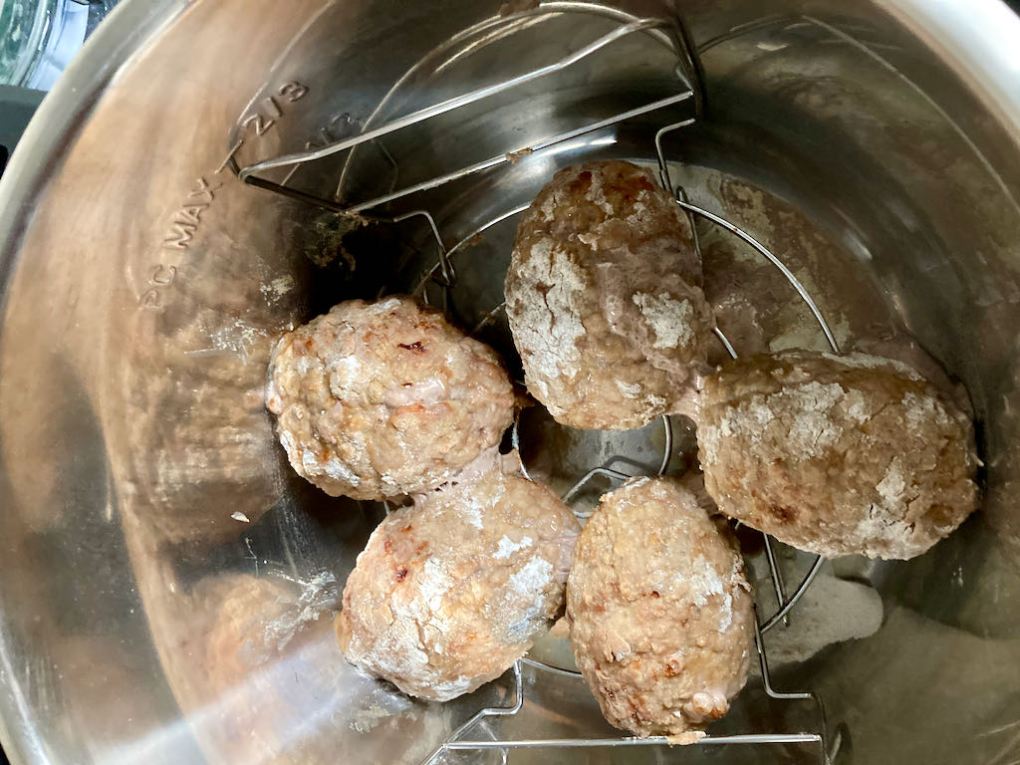
Instant pot
I recently purchased an Instant Pot duo crisp which is a slow cooker, pressure cooker and air fryer, plus more all in one. The last time I made up some Scotch eggs, I decided to bake them in the Instant Pot rather than putting them in the oven. I love the versatility of the Instant Pot, and it is quickly becoming my favourite kitchen appliance.
Scotch egg recipe
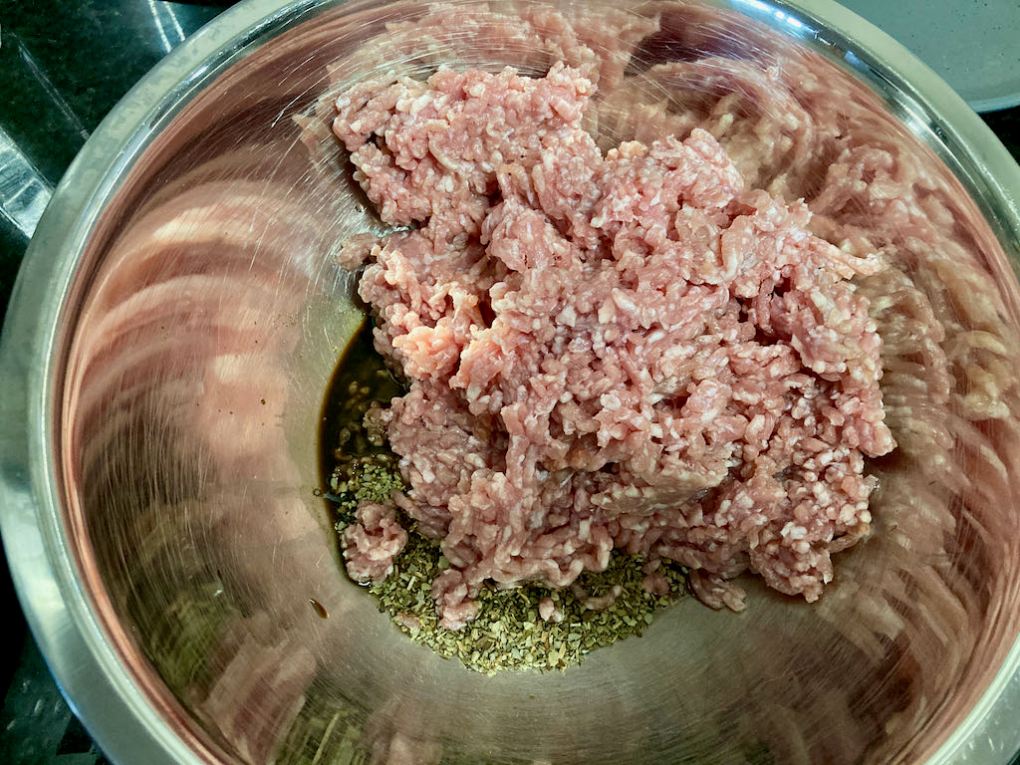
Ingredients
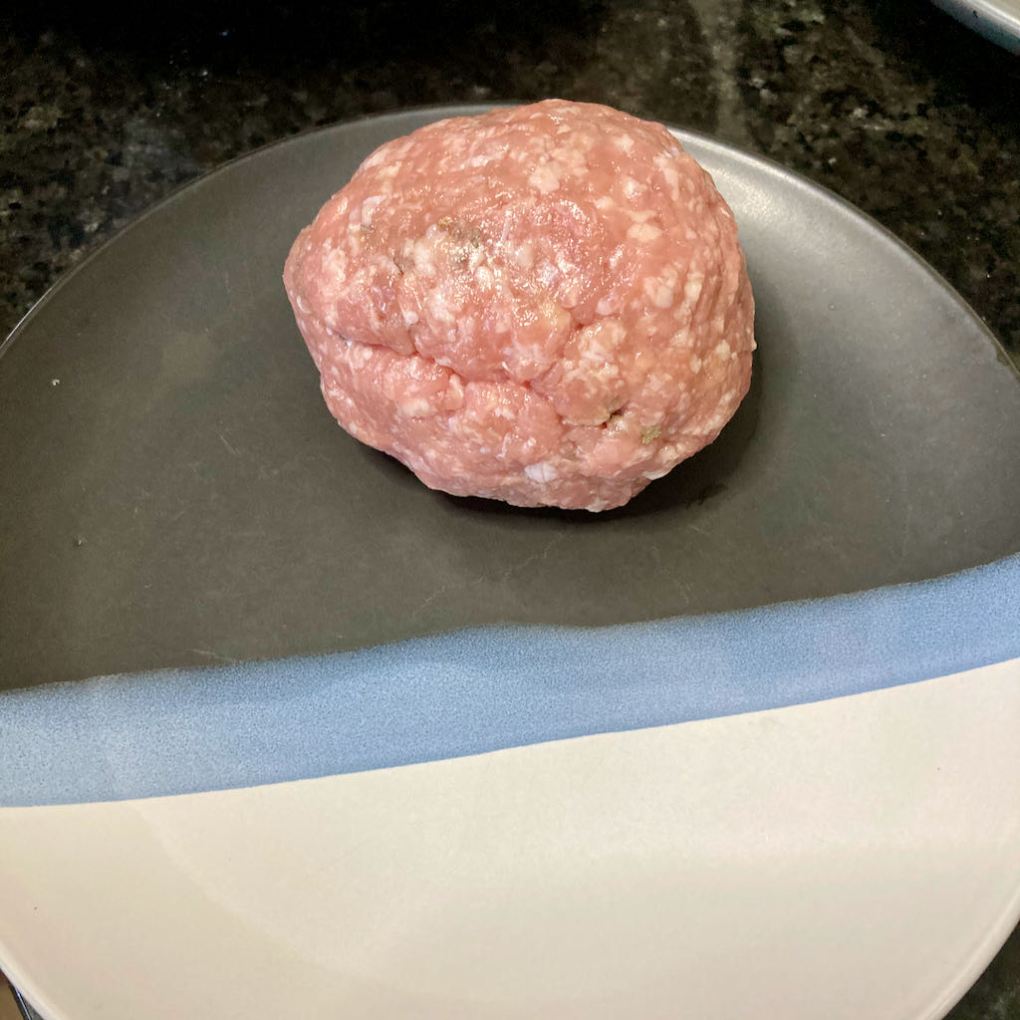
4 eggs hard boiled and peeled
500g minced pork
1 tsp. garlic powder
1 tbsp. dried sage
1 tsp. Worcestershire sauce
salt and pepper
1 cup coconut flour
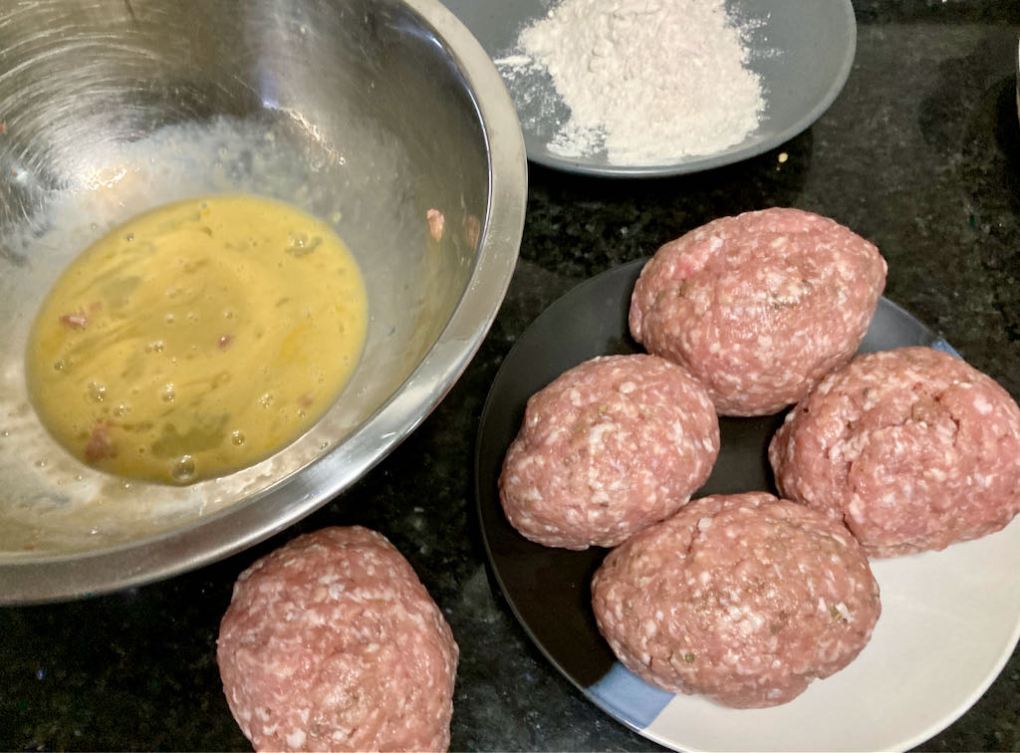
2 eggs, beaten
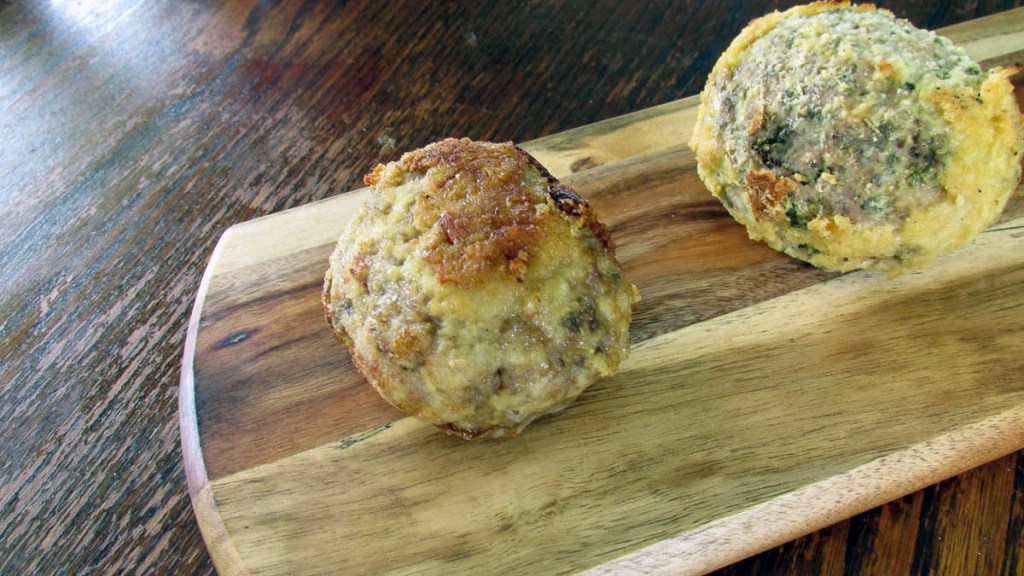
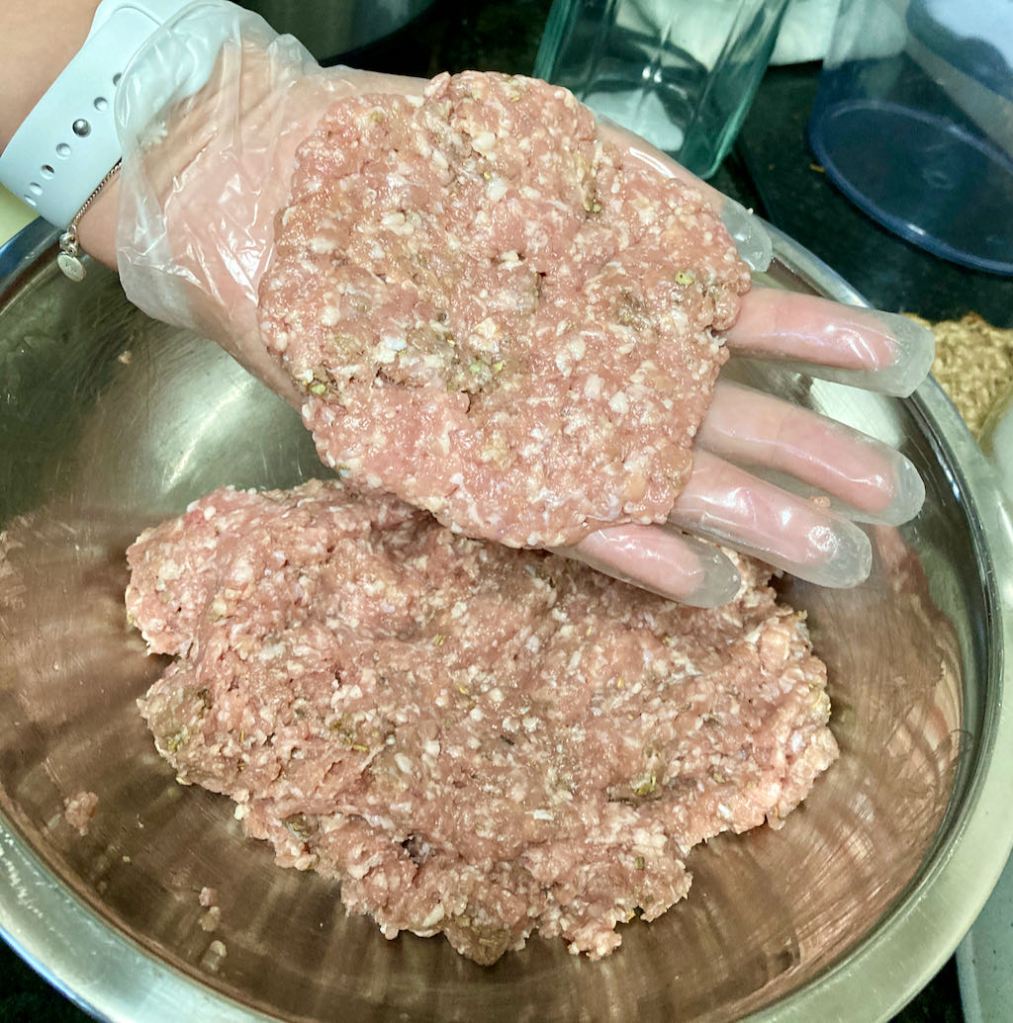
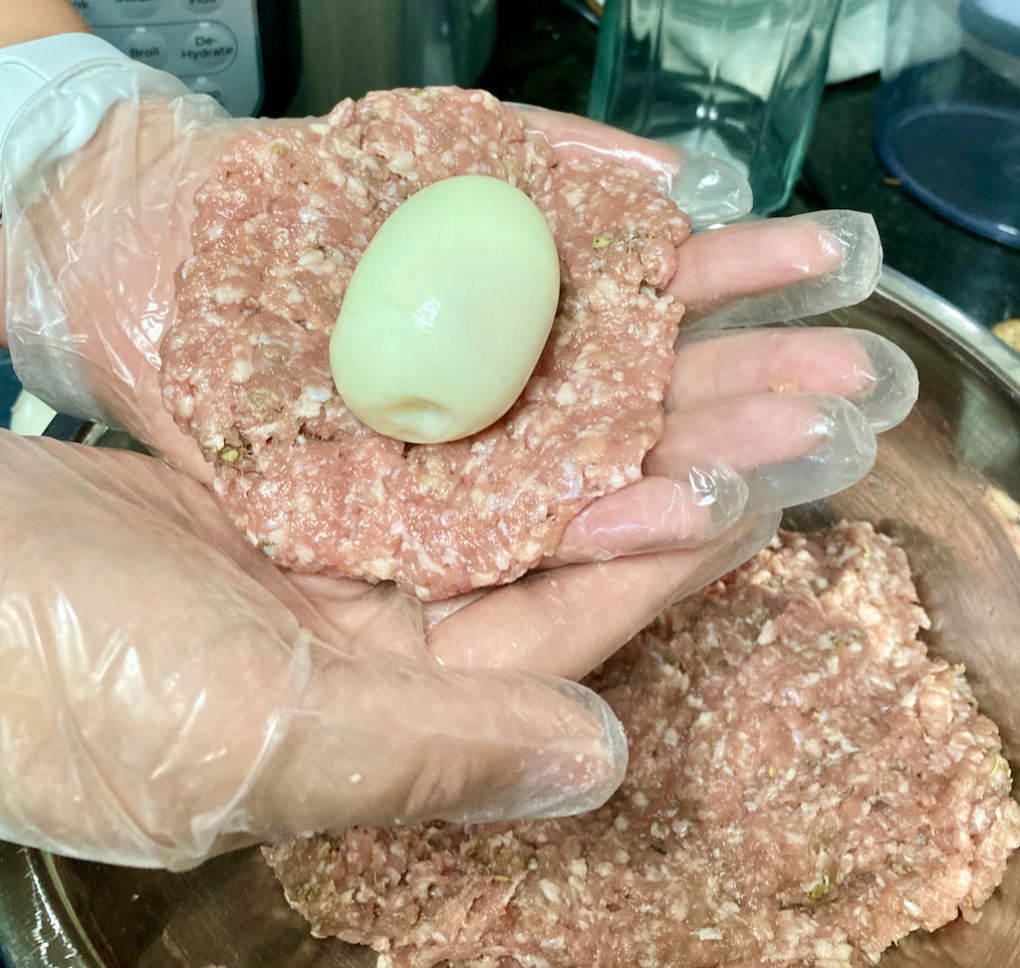
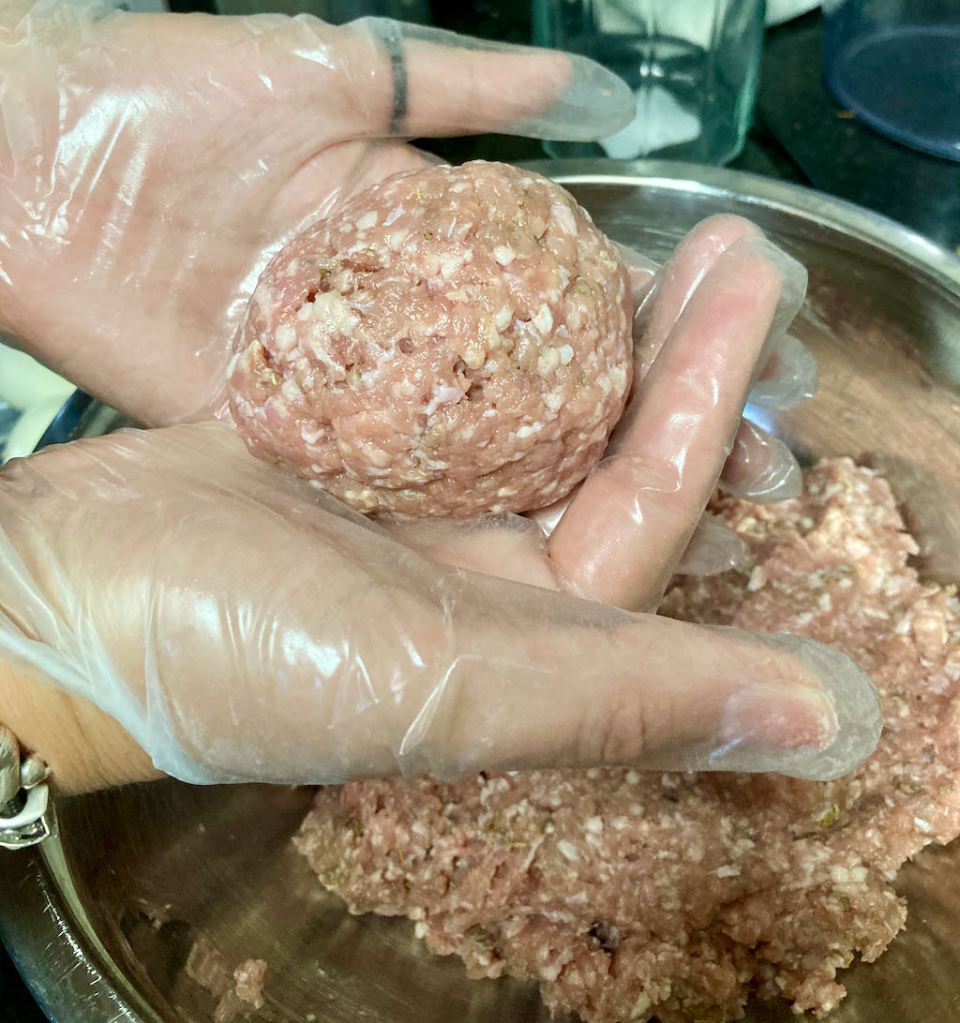
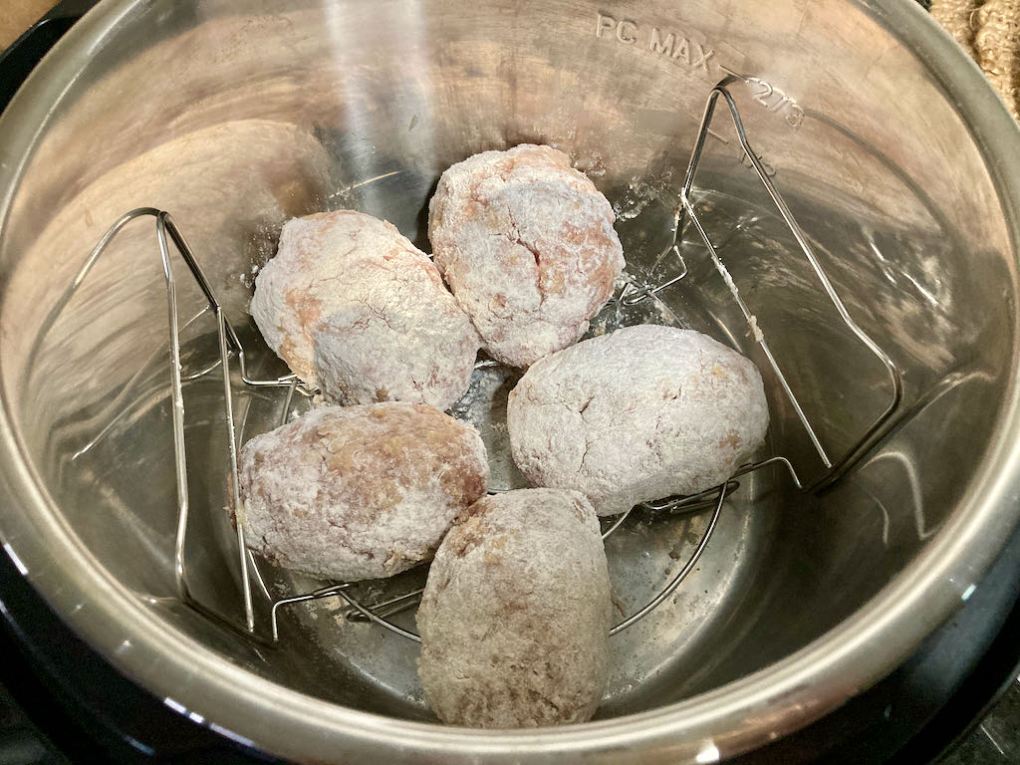
In a bowl add the garlic powder and sage.Add the pork mince and Worcestershire sauce.Mix everything together well.Take a portion of meat and flatten it in between your hands to make a meat patty.Place a boiled egg in the middle.Form the meat around the egg.Make sure the meat completely covers the egg.Repeat with the remaining meat and eggs.In another bowl beat the two remaining eggs. Place the flour on a plate and season it with some salt and pepper then mix.If you are using an Instant Pot place the wire rack inside the pot and put the coated eggs on the rack.Spread out the eggs in the pot,Bake for 15 minutesScotch eggs sliced and ready to eat.
This grain free version of Scotch eggs is perfect for protein packed snacking or a trying something different for lunch.
Credit: Cath @ easycleaneats
Ingredients
4 eggs hard boiled and peeled
500g minced pork
1 tsp. garlic powder
1 tbsp. dried sage
1 tsp. Worcestershire sauce
salt and pepper
1 cup coconut flour
2 eggs, beaten
Directions
Make four perfect boiled eggs.
Peel the four eggs and set them to one side.
In a bowl mix the pork mince, garlic powder, sage and Worcestershire sauce.
In another bowl beat the two remaining eggs.
Place the flour on a plate and season it with some salt and pepper then mix.
Take the meat and divide it into four portions.
Take a portion of meat and flatten it in between your hands to make a meat patty.
Place a boiled egg in the middle of the meat.
Form the meat around the egg.
Make sure the egg is completely covered.by the meat.
Repeat with the remaining eggs.
When the eggs are done start to dip and coat them.
Dip the meat covered egg in the beaten eggs.
Then roll the egg in the coconut flour, be sure the egg is completely coated.
Repeat with the remaining meat and eggs.
If you are going to oven bake your Scotch eggs I recommend frying them off first.
Heat a frying pan and a little olive oil, over a medium heat.
Fry off the meat until it is browned all over.
Transfer the eggs to a baking tray lined with baking paper or a silicone liner.
Bake in a preheated oven at 175 degrees C/ 350 degrees F for 15-20 minutes.
Serve warm or cold.
Nutrition
Per Serving: 371 calories; 14.6 g fat; 18 g carbohydrates; 38.9 g protein
Equipment
Saucepan
Slotted spoon
Mixing bowl x2
Plate
Frying pan
Tongs
Baking tray
Baking paper or silicone liner
Nutritional disclaimer
Nutrition information is provided as an estimate based on the ingredients used and available in my area (New Zealand). The nutritional information is here to help you understand the recipe; I use MyFitnessPal to generate my estimates. For more accurate nutritional information, please use a nutritional calculator with the ingredients in your area.
I have been on a mission this year to make simple but tasty meals. The aim was to create recipes that can be prepared and cooked quickly on a busy weeknight. We all struggle to make healthy and tasty meals while keeping on top of everything else in life. The preparation takes no more than 20 minutes, that is all of the slicing, dicing and mixing. Each meal is portioned to feed four adults.
Summertime meal
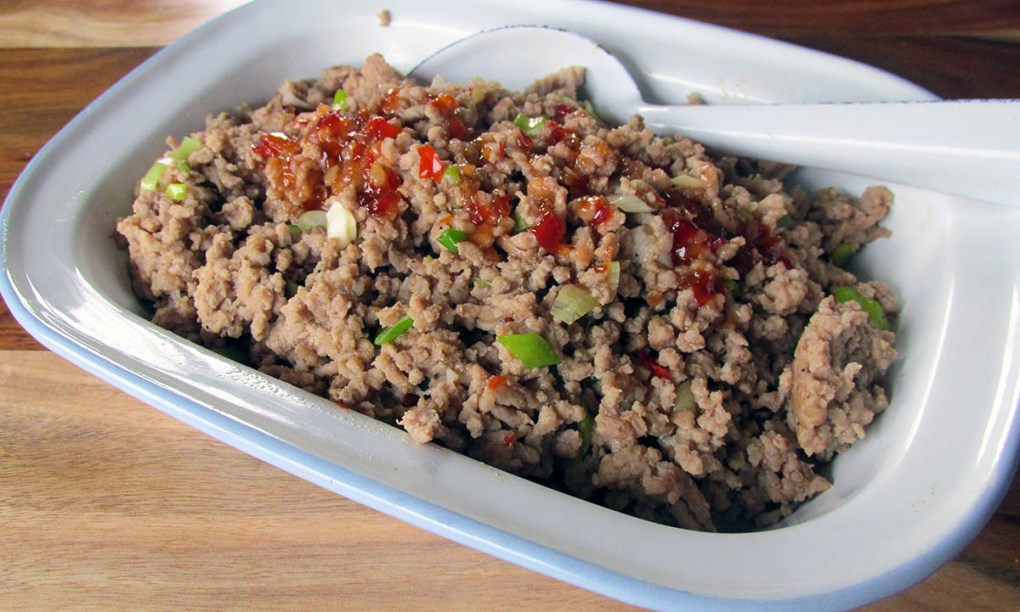
When it is hot and sticky outside, I don’t want a hot meal; I want something easy and fresh. Not everyone in our house feels the same. These tasty, easy wraps are a great dinner option and compromise. The sweet chilli sauce gives the meat a nice kick, the pork is hot, and the cos bring some summer freshness to the meal. Perfect!
These tasty, easy wraps are a great dinner option. The sweet chilli sauce gives the meat a nice kick and the cos bring some summer freshness to the meal.
Credit: Cath @ easycleaneats
Ingredients
2 Cos Lettuce
500g pork mince
1/2 tsp. red pepper flakes
2 tsp. minced garlic
1/2 tsp. salt
1 tbsp. coconut aminos
2 tbsp. water
2 tbsp. sweet chilli sauce
Directions
In a bowl mix the water, coconut aminos, salt, garlic, and red pepper flakes together.
Cut at the stalk and wash the lettuce.
Dry the lettuce leaves and store them in the fridge with a damp towel over the top.
In a large frying pan heat some oil and add the minced pork to the pan.
Pour over the amino and chilli mixture over the pork while it is cooking.
When the pork is cooked stir in the sweet chilli sauce.
Plate up the cos leaves, spoon the cooked pork into the leaves and serve.
Nutrition
Per Serving: 128 calories; 4.2 g fat; 4.7 g carbohydrates; 18.7 g protein
Equipment
Mixing bowl
Knife
Chopping board
Kitchen towel
Frying pan
Wooden spoon
Plate
Nutritional disclaimer
Nutrition information is provided as an estimate based on the ingredients used and available in my area (New Zealand). The nutritional information is here to help you understand the recipe; I use MyFitnessPal to generate my estimates. For more accurate nutritional information, please use a nutritional calculator with the ingredients in your area.
It may not sound appealing, believe me, I was not sold on the idea of coffee with a bunch of oil in it, to begin with, now it is one of my favourite ways to start the day.
Energy kick for the morning
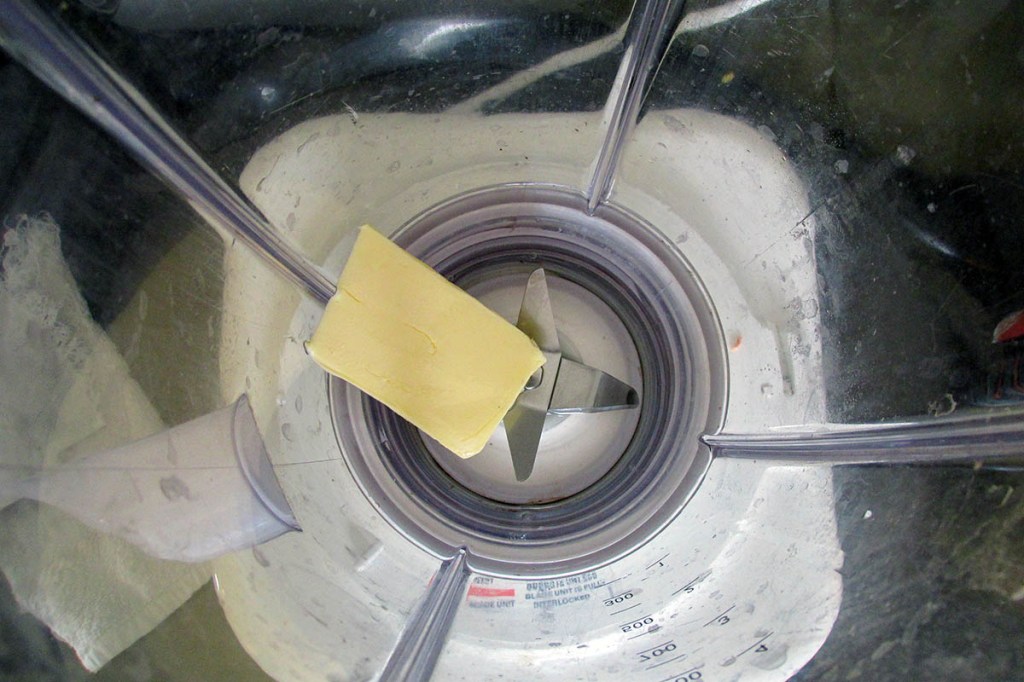
When I find myself short on time in the mornings or just not wanting to eat breakfast, a cup of buttered coffee is what I make. The oil and butter with the coffee give you a nice little boost of energy that will keep me going until lunchtime. By using good quality fat in your coffee, you get a good energy source without the crash you would get with an energy drink full of sugars and carbohydrates.
Different fats
When it comes to making your butter coffee, you can experiment to see what works best for you. I like to use coconut oil as it is the oil we use for cooking (and skincare), we buy virgin coconut oil that has a subtle flavour. As an alternative, you can use MCT oil which is derived from coconut oil. When it comes to butter, you want to best quality unsalted butter you can get your hands on. Grass-fed is best where possible, but don’t worry if you can’t get grass-fed butter any proper butter will do. Let’s be clear here, margarine will NOT do as an alternative to butter. Only real butter will do, not I can’t believe it’s not butter. If you can’t get butter or you don’t feel convinced about putting butter in your coffee, go with full-fat cream.
Variety is the spice of life
Everyone is different, and we all have varied tastes, butter coffee is no different. The idea around this drink is to keep it free from sugars and carbohydrates, this doesn’t mean your coffee has to be dull and boring. I like to mix things up every now and then to keep things interesting. Here are some of the things I do to mix up my coffee:
Add a pinch of stevia – this adds a little sweetness to the coffee. This is a tactic if you are trying to give up sugar but still have a sweet tooth.
Add a few drops of peppermint oil – this gives your coffee a fresh flavour.
Switch the butter for cacao butter – this will turn your coffee into a mocha.
Switch the coconut oil for MCT oil – the MCT oil is easier for your body to put to use.
If you are interested in a high energy way to start your day, give this coffee a try.
The first step is to make your coffee, you can use any coffee you want, but I recommend that you don’t use instant coffee.
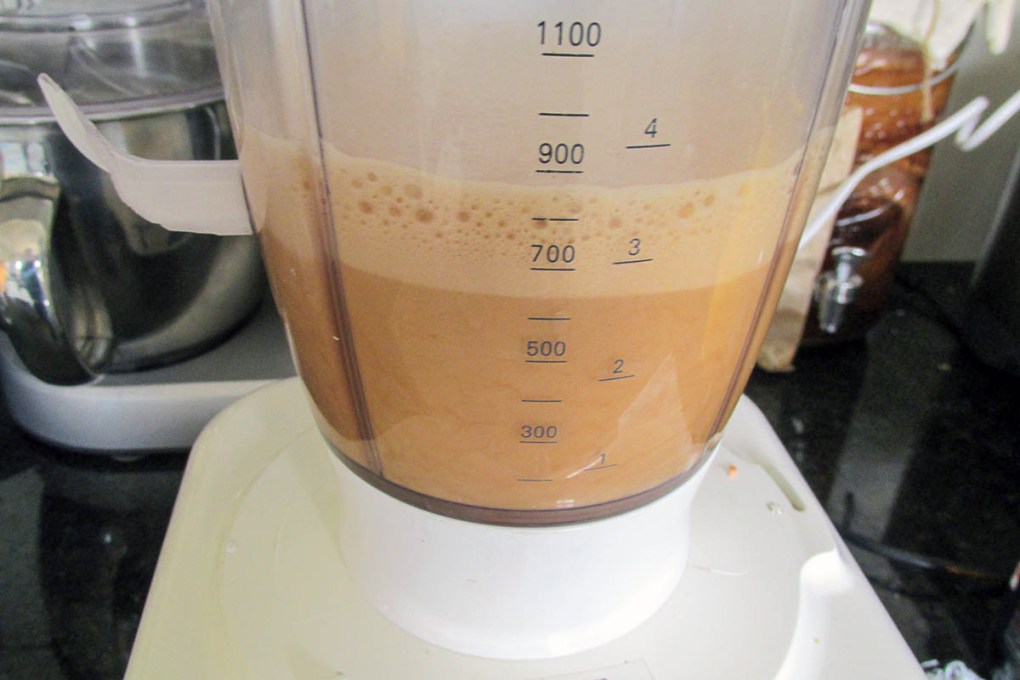
If you have a plastic jug blender, use some hot water to heat the plastic of the jug, this will reduce the risk of the jug cracking.
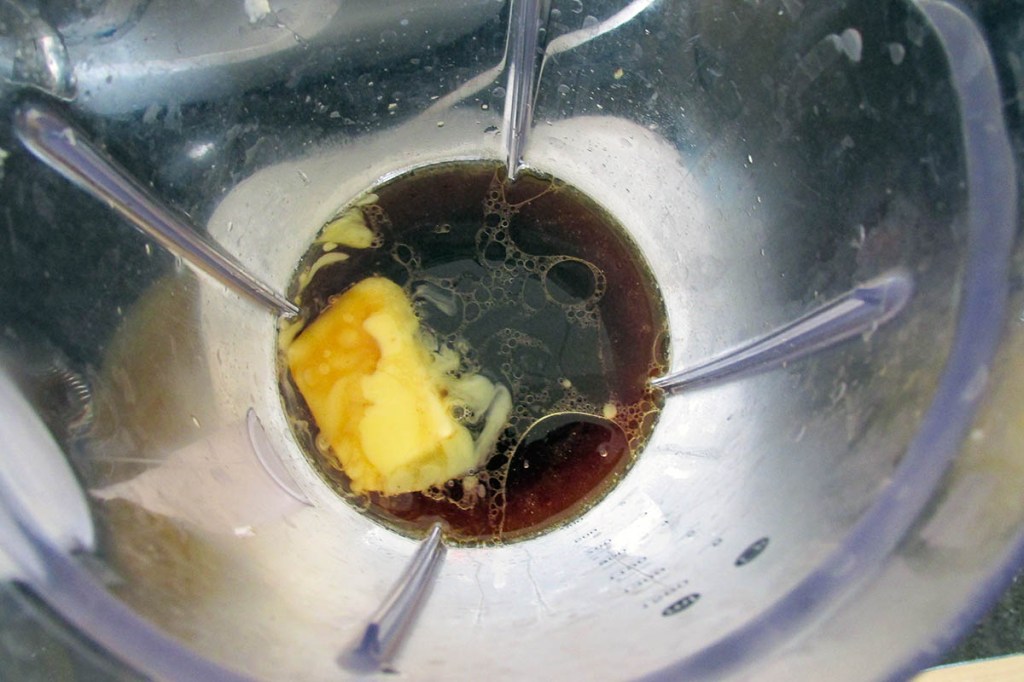
When the coffee is ready, empty out the hot water from the blender jug.
Add the coffee, butter, and coconut oil to the blender jug.
If you want to add, any flavours or sweeteners add them to the coffee.
Blend everything together until you have a thick layer of foam on the top of the coffee.
Serve and drink while hot.
Nutrition
Per Serving: 224 calories; 24.5 g fat; 0 g carbohydrates; 0.3 g protein
Equipment
French press
Blender
Tablespoon
Nutritional disclaimer
Nutrition information is provided as an estimate based on the ingredients used and available in my area (New Zealand). The nutritional information is here to help you understand the recipe; I use MyFitnessPal to generate my estimates. For more accurate nutritional information, please use a nutritional calculator with the ingredients in your area.
Eating clean gets a lot easier once you have mastered a few essential recipes. This recipe uses the basic omelette recipe; not like basic unicorn basic, more like beard and flannel basic. Back to the point (which isn’t Unstable unicorns), having basic skills and recipes in your arsenal means you will never be left with only UberEats as your weeknight options. Once you master a basic recipe, the possibilities are endless; this is an example of a possibility.
Seasonal eating
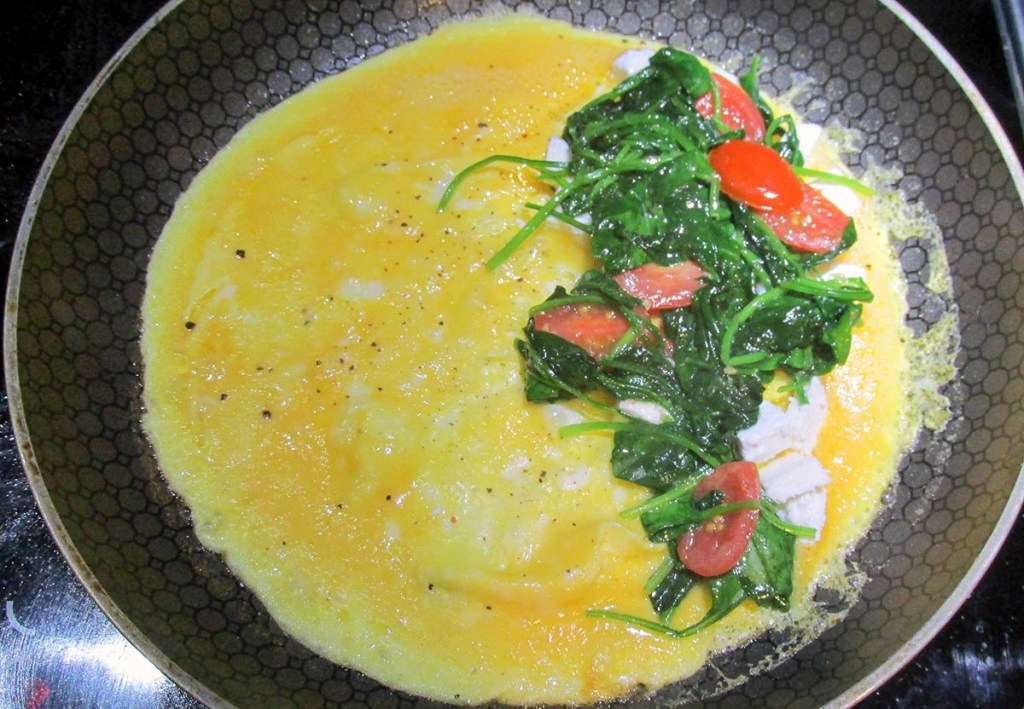
We currently have a vegetable bed bursting with baby spinach; this recipe is an excellent and easy way to use the abundance of green in the garden while making a simple and tasty meal. A quick dash out to the garden is enough to make a filling and fresh breakfast.
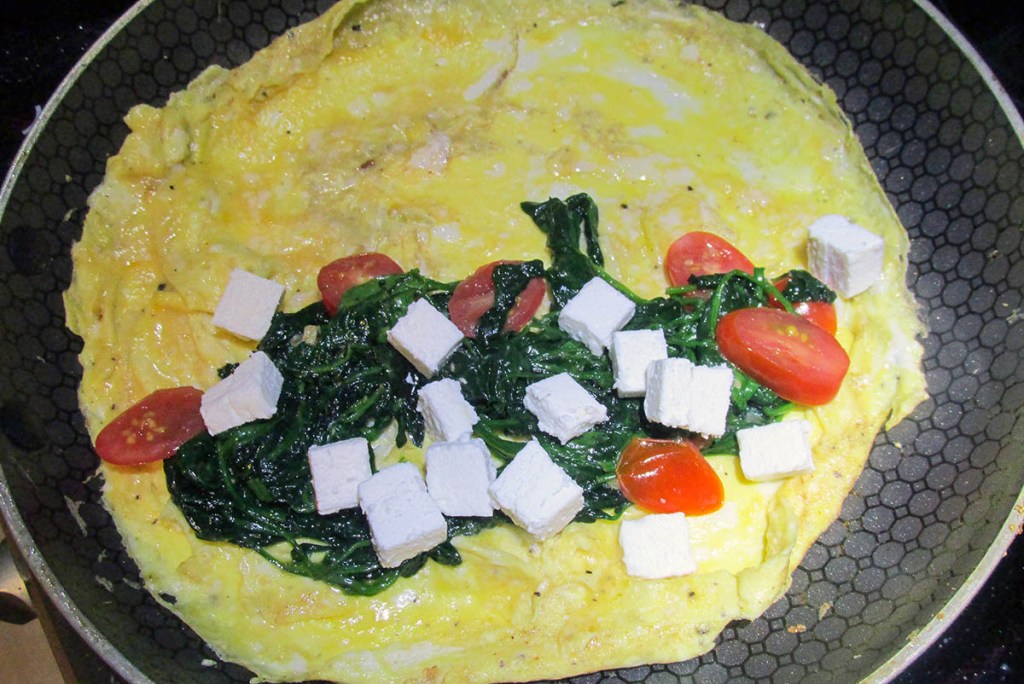
Tomato, spinach and goat cheese omelette recipe
Ingredients
2 eggs
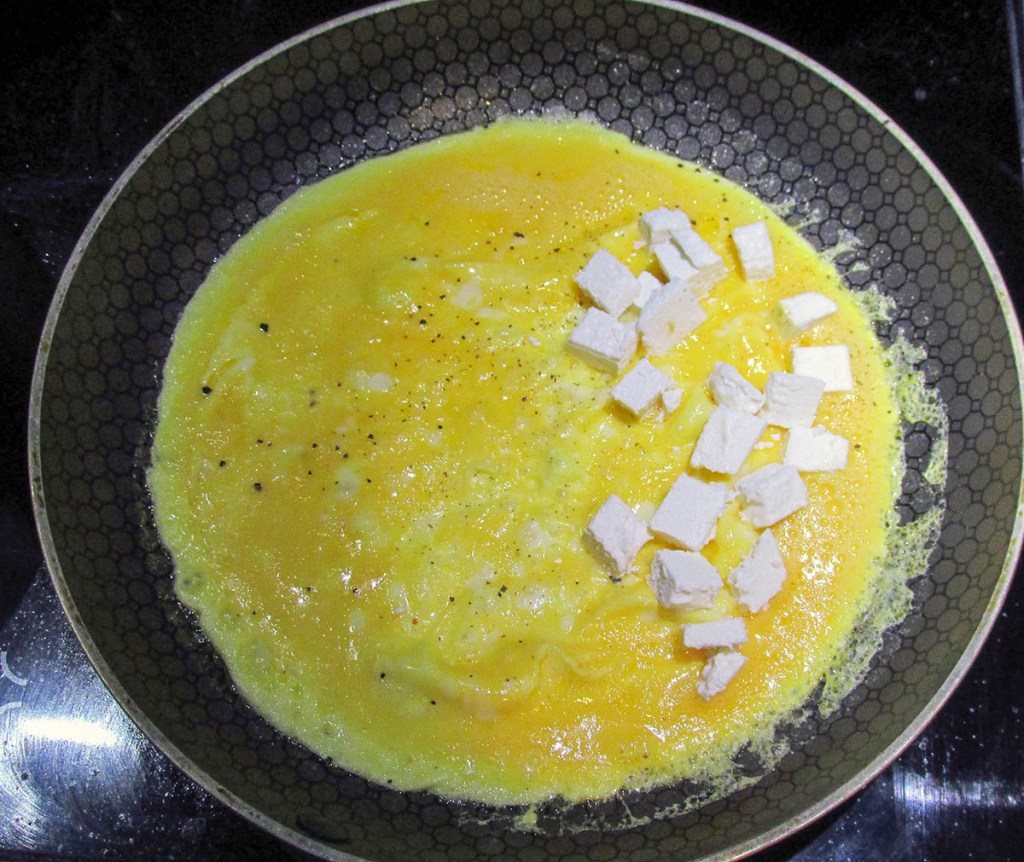
75g goat cheese
1/2 tomato, diced
1 handful of spinach
Instructions
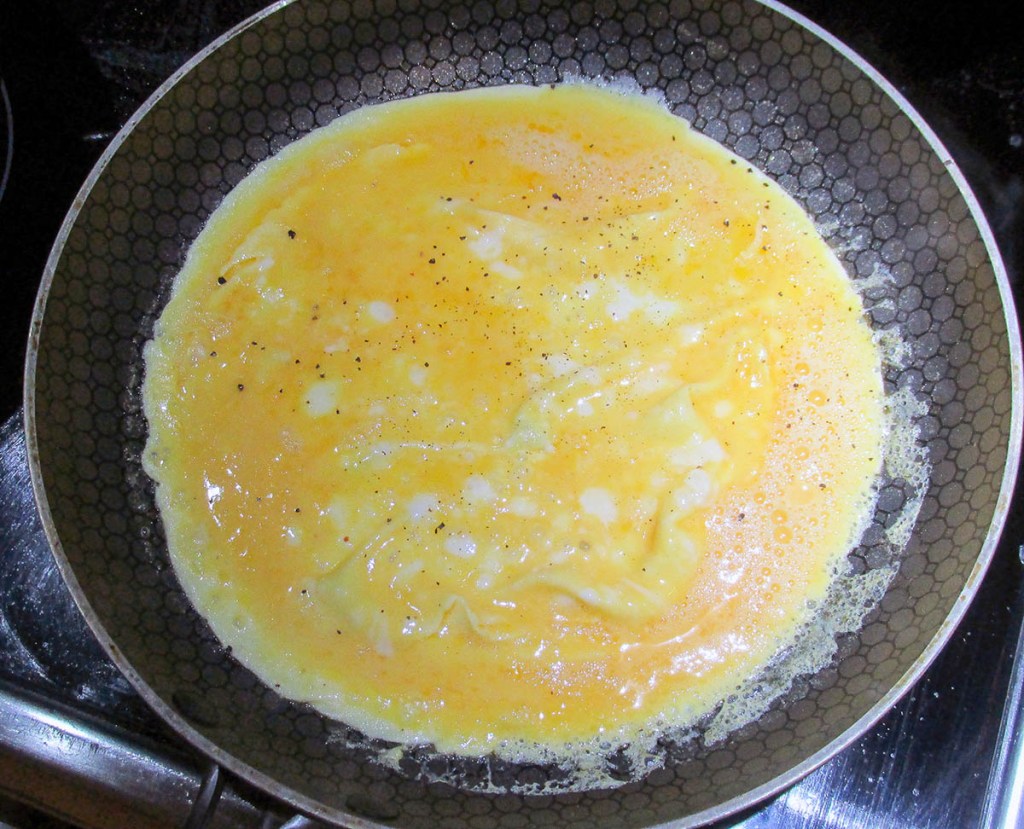
Crack eggs into a mixing bowl and beat them well.
Add a pinch of salt and pepper
Over a low heat, melt the butter in a small frying pan.
When the butter has melted, and the pan is hot pour in the eggs, make sure they are evenly spread in the pan.
When the edges of the egg start to cook, use a spatula to push the egg into the centre of the pan.
Repeat this until most of the egg is set.
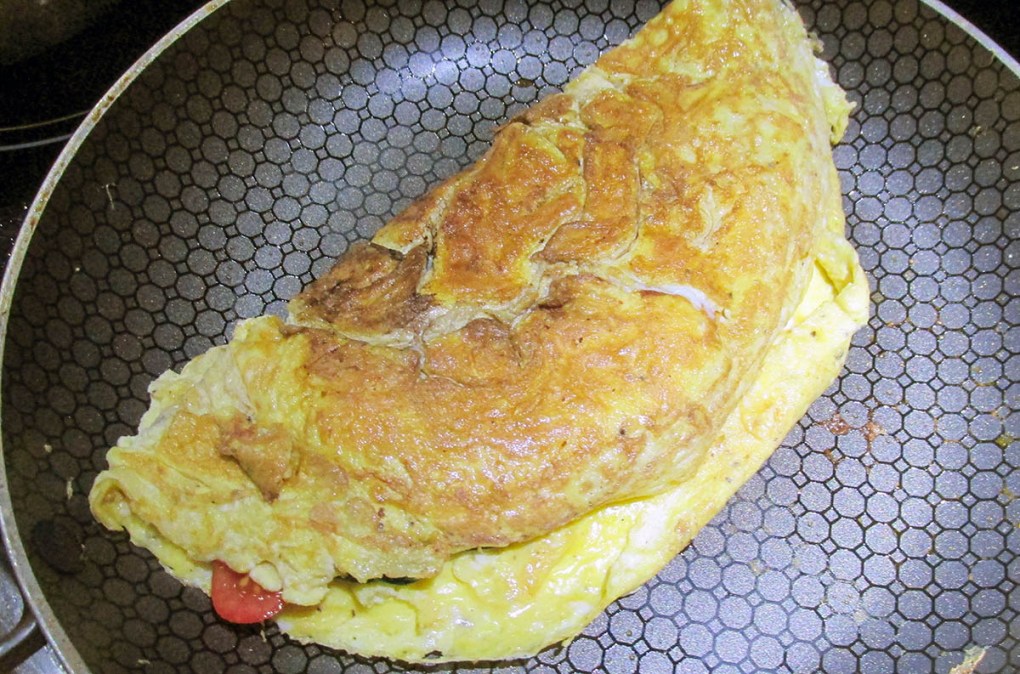
Add the goat cheese, tomato and spinach to one side of the omelette.
Fold the other side over the fillings.
When the bottom is golden brown on the underside, it’s ready to serve.
Over a low heat, melt the butter in a small frying pan.
When the butter has melted, and the pan is hot pour in the eggs, make sure they are evenly spread in the pan.
When the edges of the egg start to cook, use a spatula to push the egg into the centre of the pan.
Repeat this until most of the egg is set.
Add the goat cheese, tomato and spinach to one side of the omelette.
Fold the other side over the fillings.
When the bottom is golden brown on the underside, it’s ready to serve.
Nutrition
Per Serving:367 calories; 25.9 g fat; 8.4 g carbohydrates; 23.6 g protein
Equipment
Mixing bowl
Whisk or fork
Frying pan
Spatula
Nutritional disclaimer
Nutrition information is provided as an estimate based on the ingredients used and available in my area (New Zealand). The nutritional information is here to help you understand the recipe; I use MyFitnessPal to generate my estimates. For more accurate nutritional information, please use a nutritional calculator with the ingredients in your area.
I’ve been revisiting recipes that have been some of my old school recipes and family favourites that were our staples when we got started as clean eaters. I first posted this recipe in 2015 , at that time, the kids were fussy, vegetables had to be hidden and disguised, and there was no potential for intense flavours or spice.
Times (thankfully) have changed, the kids have grown (like man-sized grown), and they now enjoy a wide range of foods. Things like vegetables are enjoyed, spice and chilli are consumed without complaint, and new ingredients are tried without tantrums.
As the kids have grown my recipes have changes organically to meet their palates and preferences, I’ve updated this recipe because of that, but fear not, all I have done is make it a little bit better.
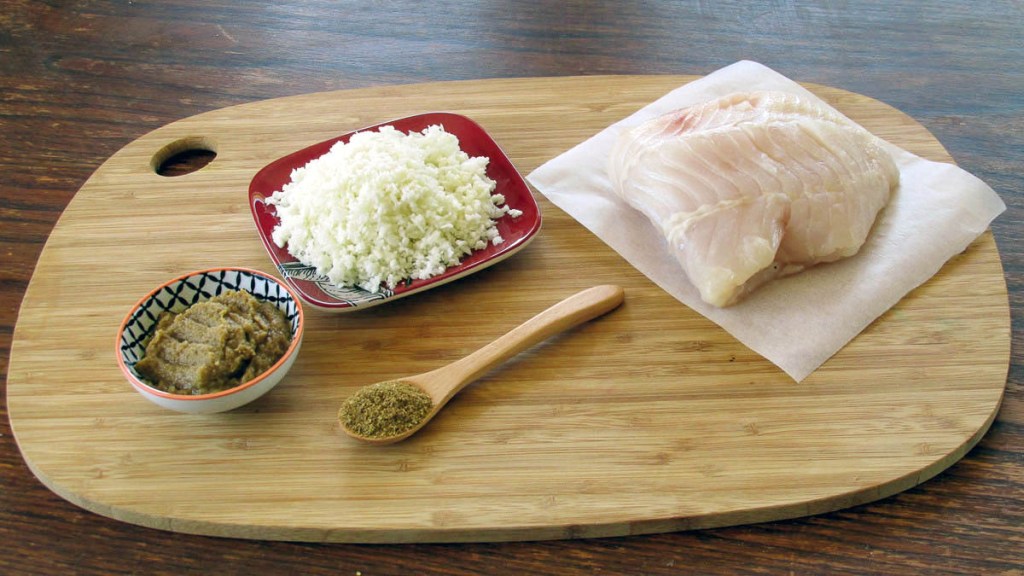
Spicy, not bland
My previous experience of fish cakes was of bland white burger-shaped food that was a bit blah. I used a recipe from a food magazine as the base for this but swapped out some of the ingredients to clean it up. It’s a great way to use up leftover cauliflower rice or fish if you get leftovers that is.
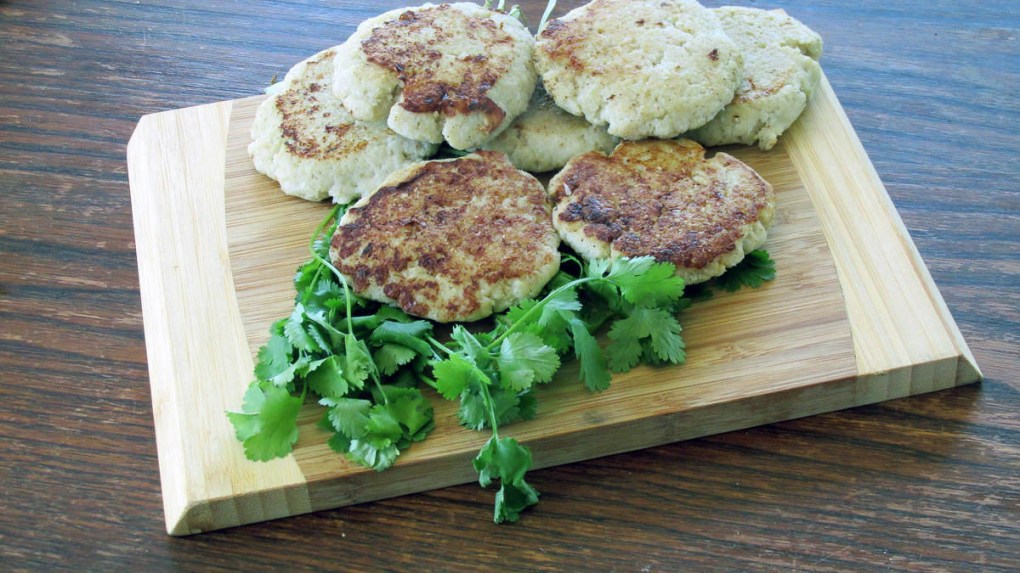
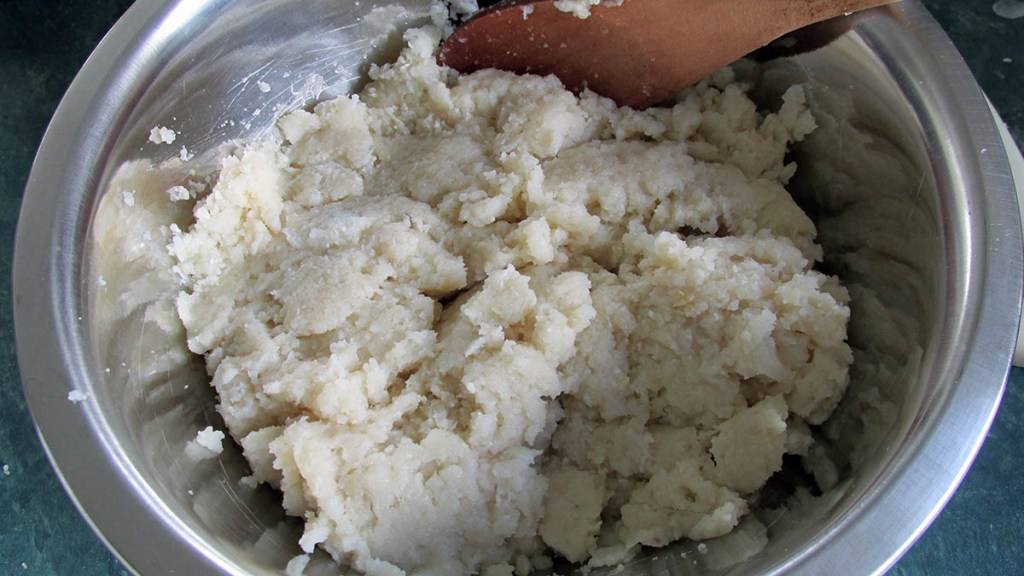
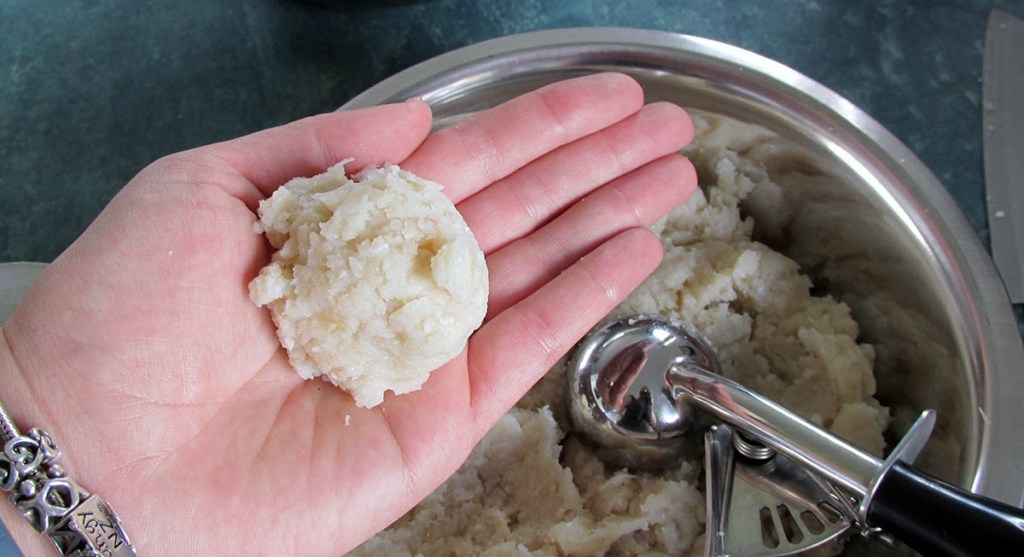
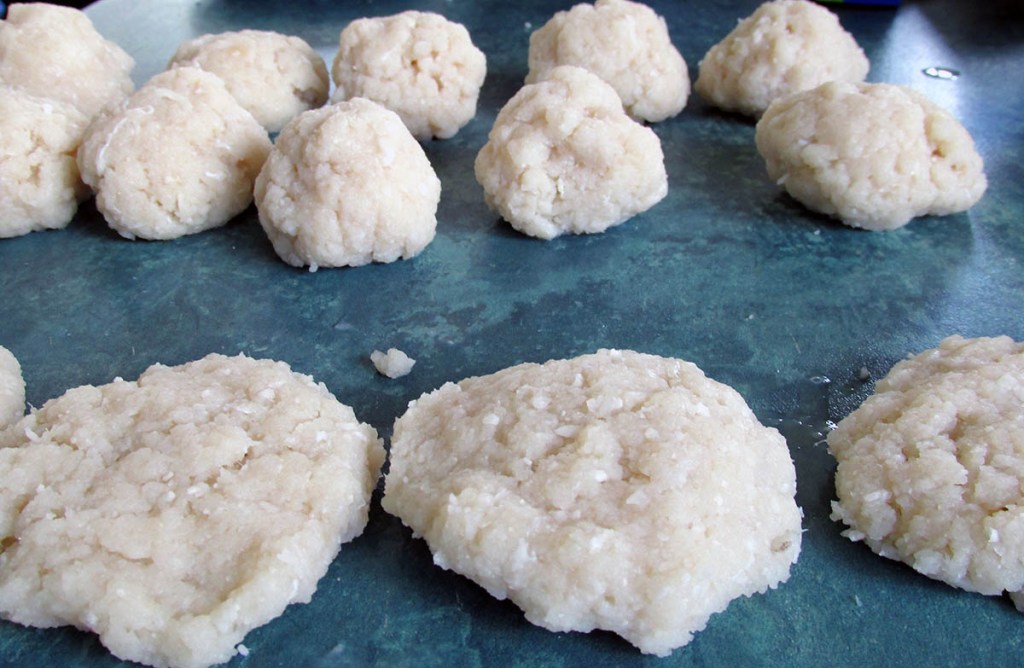
Add the fish, coriander and curry paste to a food processor.Blend to a smooth consistency.Stir in the cauliflower rice Portion out the mixtureShape the mix into patties.Cooked fish cakes ready to eat.
These spicy fish cakes are a great way to use up some left over cauliflower rice.
Credit: Cath @ easycleaneats
Ingredients
500g raw white fish
1 cup cauliflower rice
2 tsp. coriander
1 tbsp. Thai green curry paste
Directions
In a food processor mix together fish, coriander and curry paste.
1 cup cauliflower rice
Shape the mix into patties.
Place them on a baking tray lined with baking paper or a silicone liner.
Bake in a preheated oven at 180 degrees C/ 350 degrees F for 15 minutes.
Nutrition
Per Serving: 51 calories; 0.6 g fat; 0.4 g carbohydrates; 7.5 g protein
Equipment
Food processor
Measuring cups
Measuring spoons
Spatula
Baking tray
Baking paper or silicone liner
Nutritional disclaimer
Nutrition information is provided as an estimate based on the ingredients used and available in my area (New Zealand). The nutritional information is here to help you understand the recipe; I use MyFitnessPal to generate my estimates. For more accurate nutritional information, please use a nutritional calculator with the ingredients in your area.
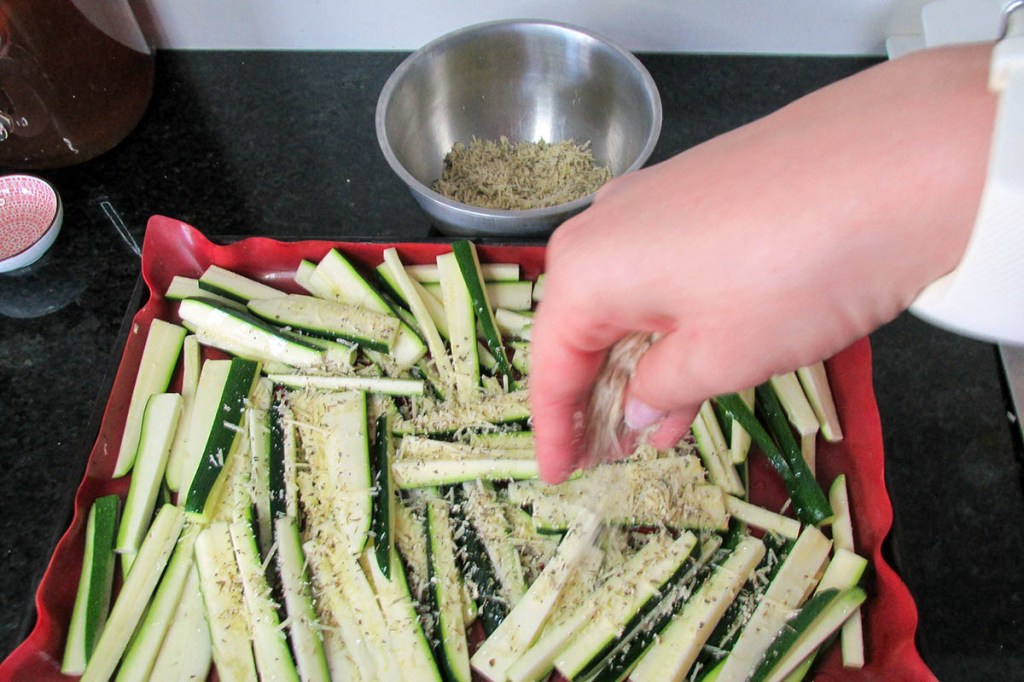
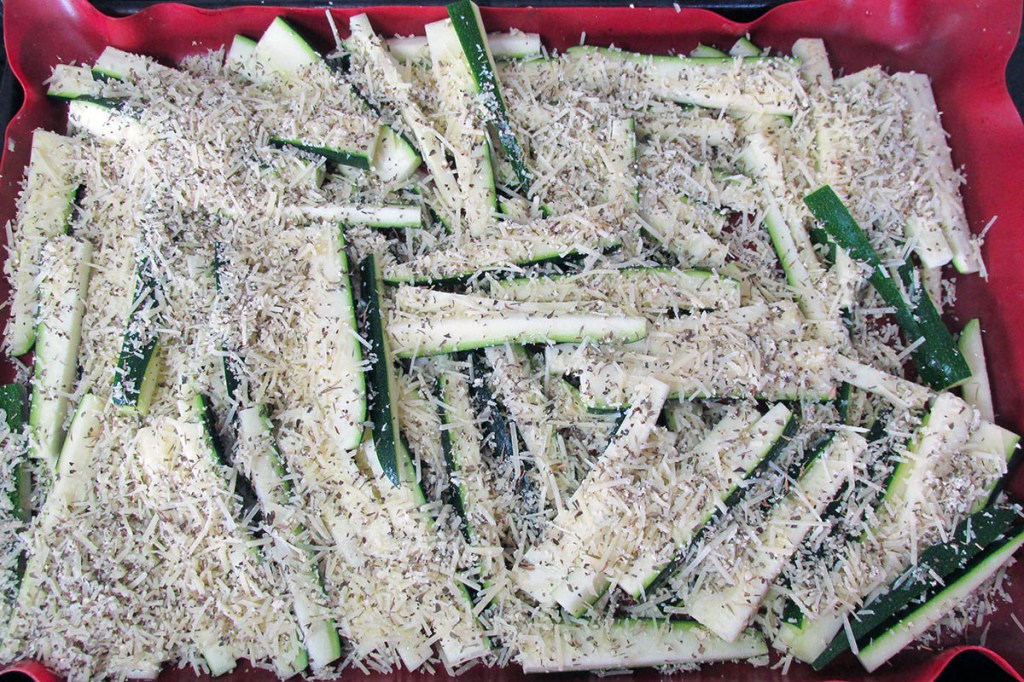
I’ve been getting courgettes from our little plant on the deck for a while now. They have been growing like crazy. I have a few good-sized courgettes hanging out that need to be used before the birds get them. I decided that making some fries was the best way to use them up and make something tasty.
Lower carbs
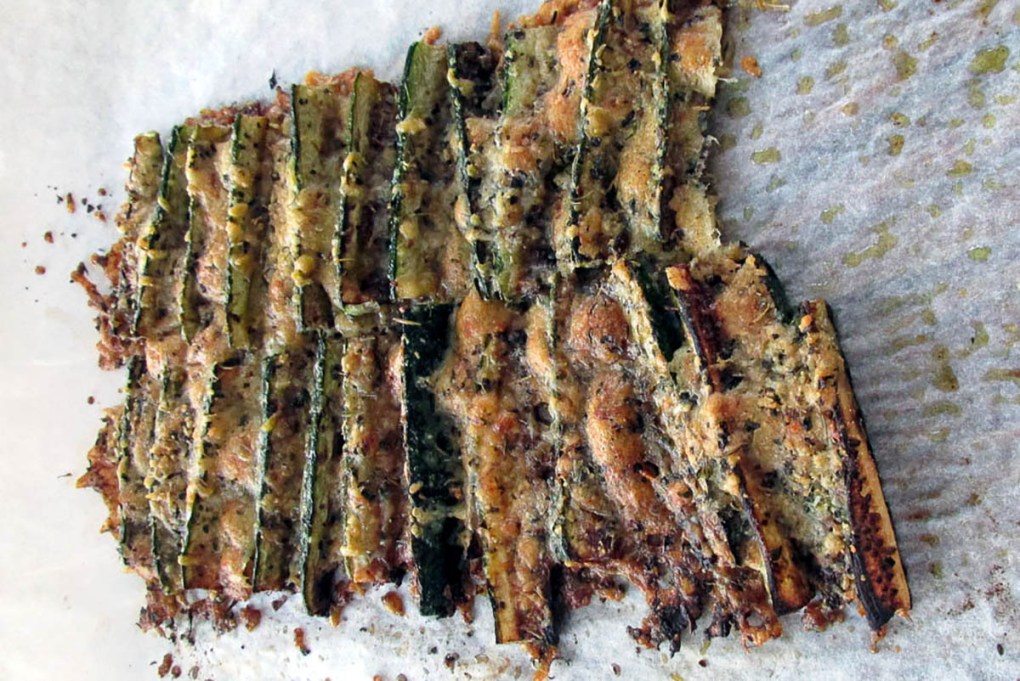
I like fries, but don’t like the carb coma that usually follows eating them. Whenever possible, I like to swap out the traditional potato fries with something different. These courgette fries have the fantastic combination of soft centres with a crunchy outside thanks to the cheese.
Courgette fries recipe
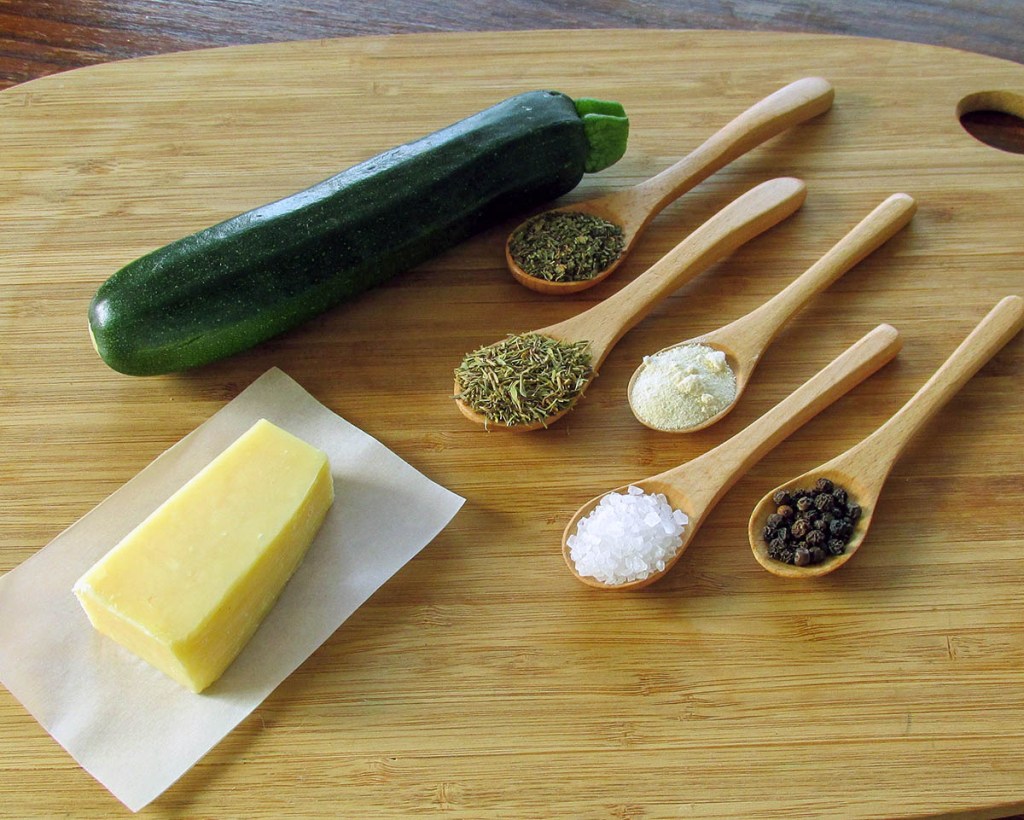
Ingredients
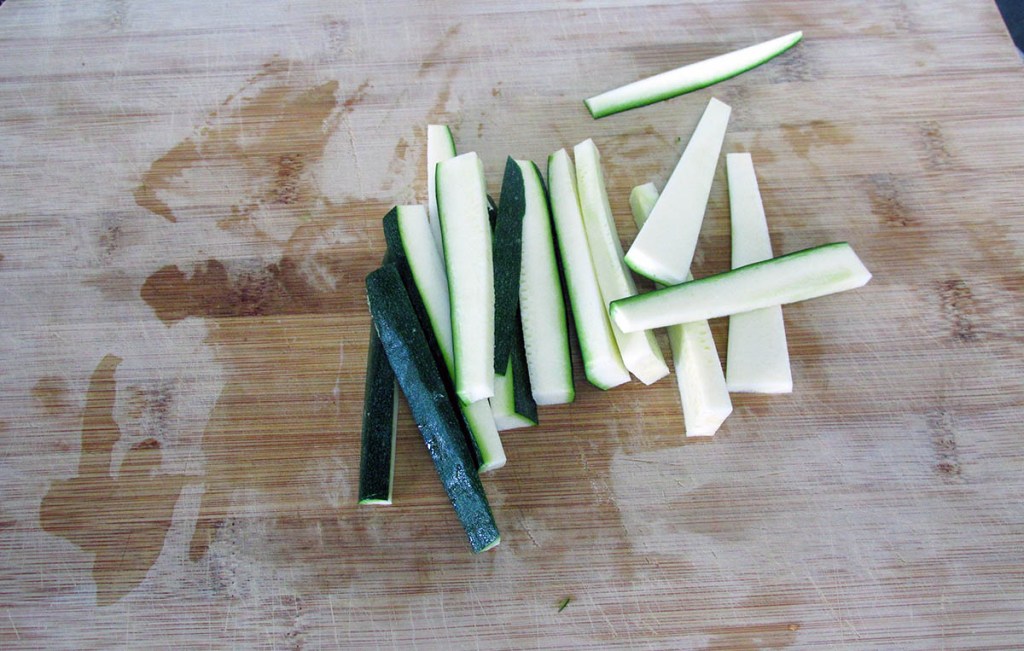
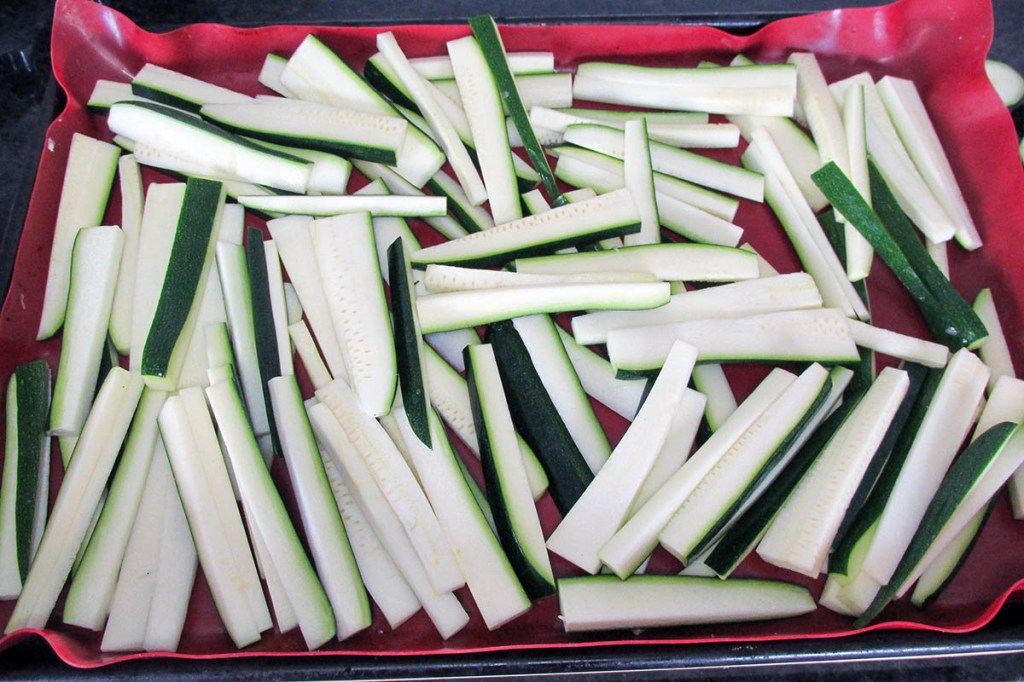
4 courgettes
1/2 cup parmesan cheese, grated
1/2 tsp. thyme
1/2 tsp. basil
1/4 tsp. garlic powder
salt and pepper
Equipment
Knife
Chopping board
Mixing bowl
Baking tray
Baking paper or a silicone liner
Nutritional disclaimer
Nutrition information is provided as an estimate based on the ingredients used and available in my area (New Zealand). The nutritional information is here to help you understand the recipe; I use MyFitnessPal to generate my estimates. For more accurate nutritional information, please use a nutritional calculator with the ingredients in your area.
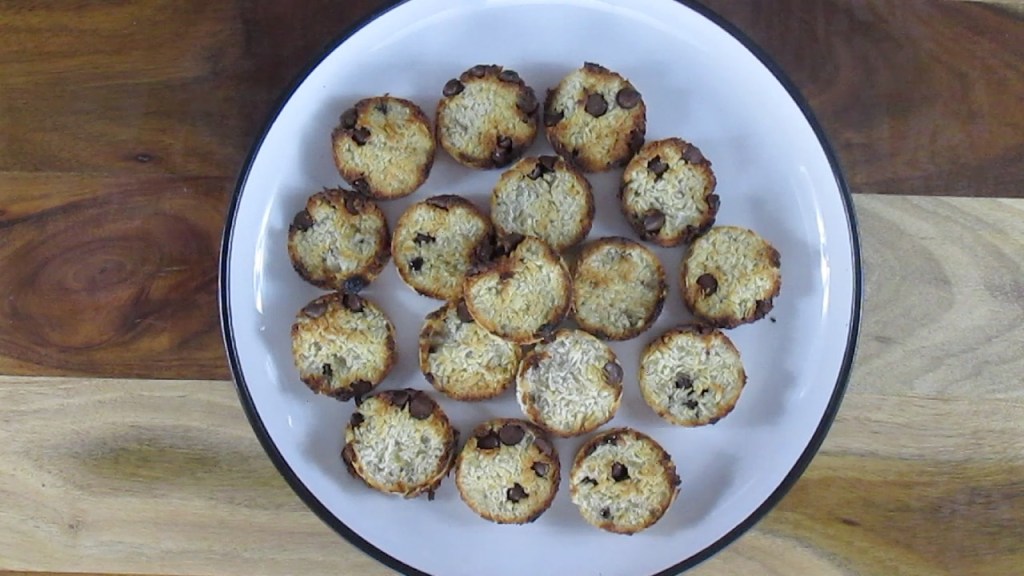
Generally speaking, I don’t post a lot of dessert and sweet recipes. It isn’t because I don’t like them; it is more because I don’t make a lot of them. When it comes to making cookies, cakes and desserts what I make for the family rarely last past the day I bake them on. I’m told the family eat everything in one go because they love what I make so much; in reality, I think they are all sweet fiends.
Banana and coconut cookies
Morning tea anyone
I work in a place that has a lot of morning tea. Usually, the deal is for you to bring a plate for everyone to share. I try to avoid the grain and sugar-filled offering that usually provided at morning tea, but on occasion, I want something to go with my coffee. These cookies are something I came up with when I had to take something to morning tea and no time to shop before hitting the kitchen. A few very ripe bananas in the fruit bowl and some coconut threads in the cupboards was all I needed to get started.
Quick, easy and versatile
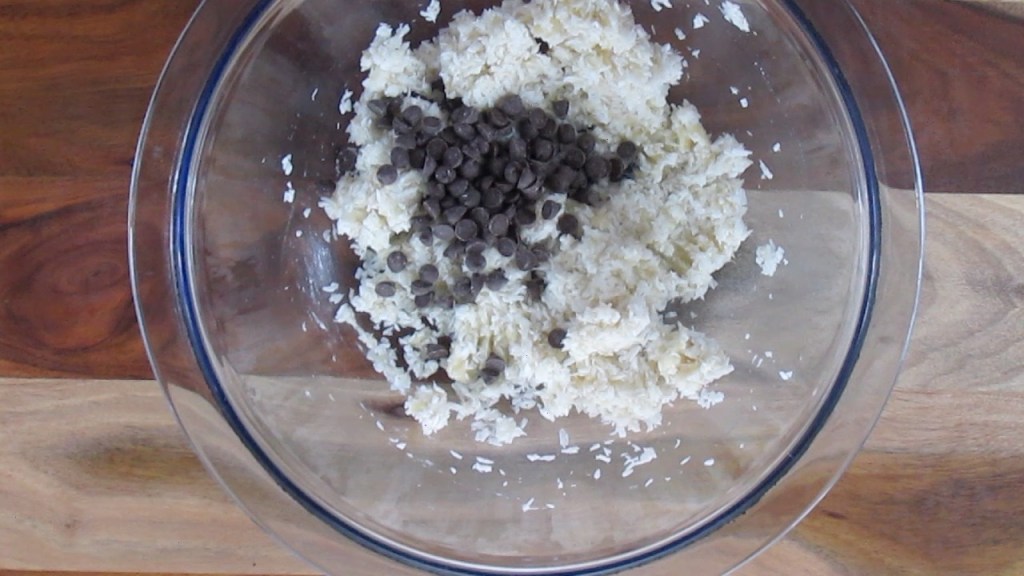
This recipe is quick and easy to make, and the options of what you can add into them are unlimited. All you have to do is decide what extras you want:
chocolate chips
chopped bacon
chopped nuts
dried fruit
ground cinnamon
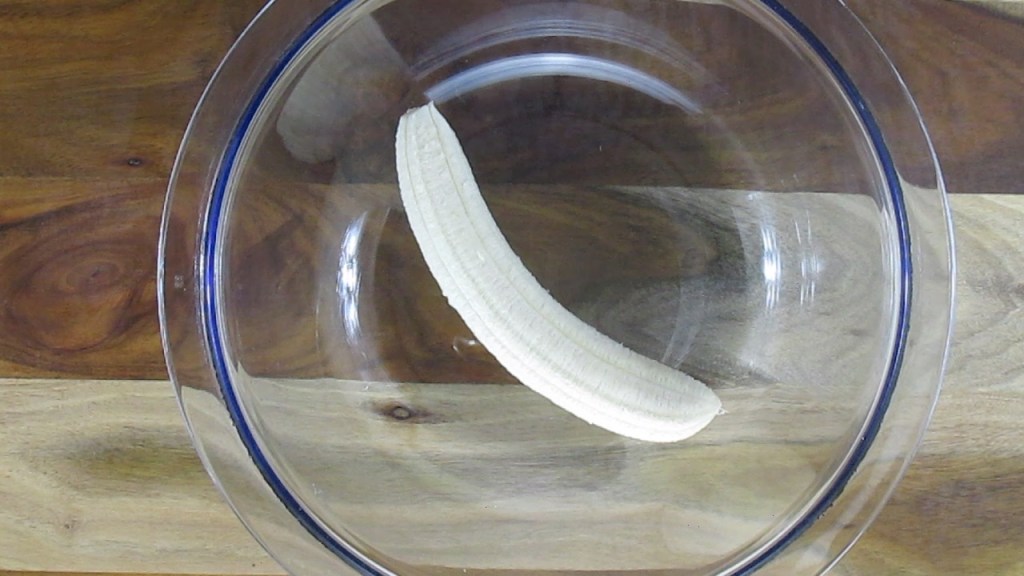
Banana and coconut cookies recipe
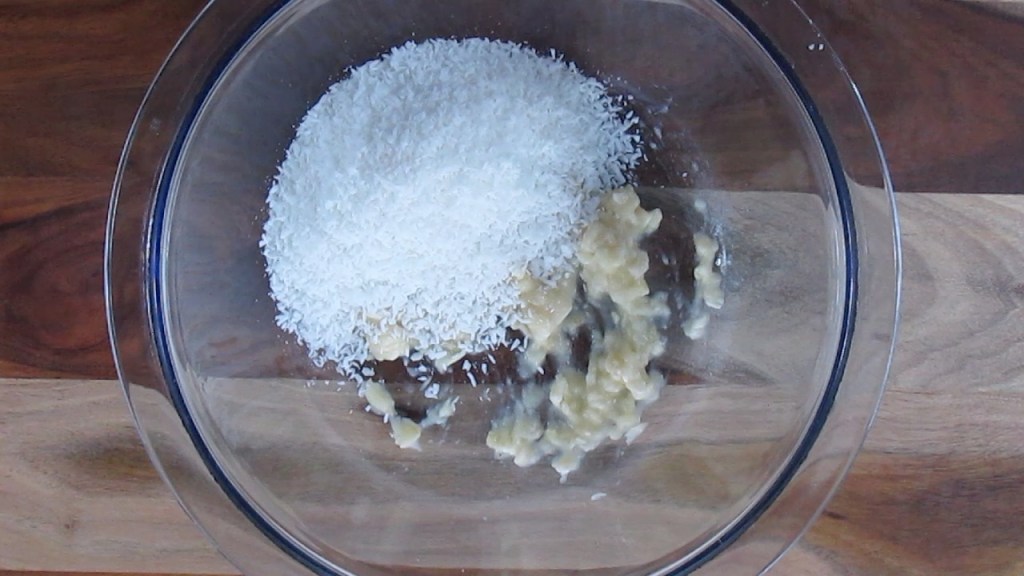
Banana and coconut cookies ingredients
Ingredients
1 banana
3/4 cup shredded coconut
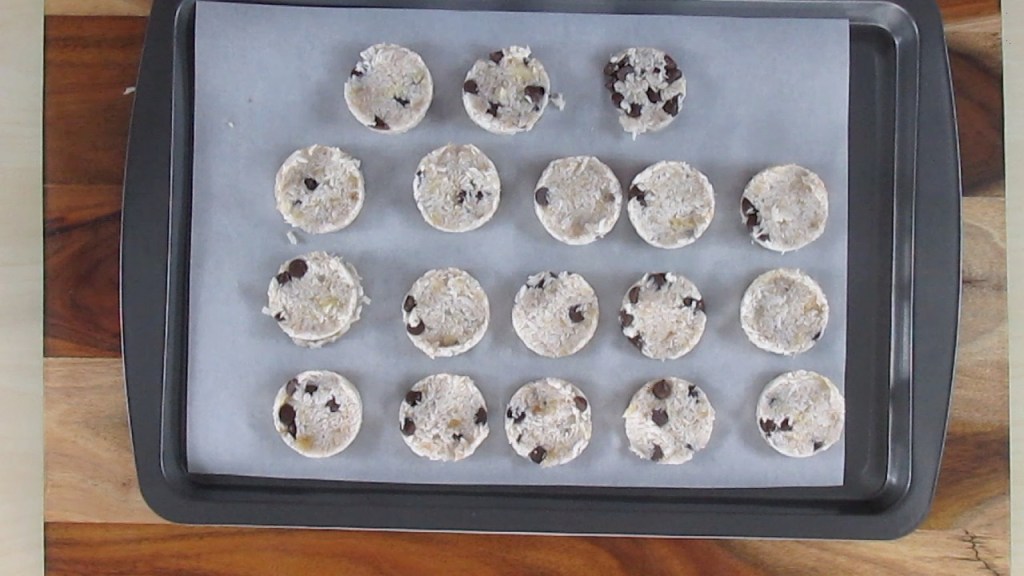
Place the banana in a bowlMash the banana with a forkAdd the coconut to the panMix wellOnce combined add any additional ingredientsMix in the additional ingredientsReady to make cookiesTake a baking sheetTake a cookie cutterAdd one teaspoon of the cookie mixture to the cookie cutterNow you have a cookie, repeat with the remaining cookie mixtureTray of cookies ready for the ovenCookies ready to eat
This recipe is quick and easy to make, and the options of what you can add into them are unlimited. All you have to do is decide what extras you want:
Credit: Cath @ easycleaneats
Ingredients
1 banana
3/4 cup shredded coconut
Directions
Preheat the oven to 180 degrees C/ 350 degrees F
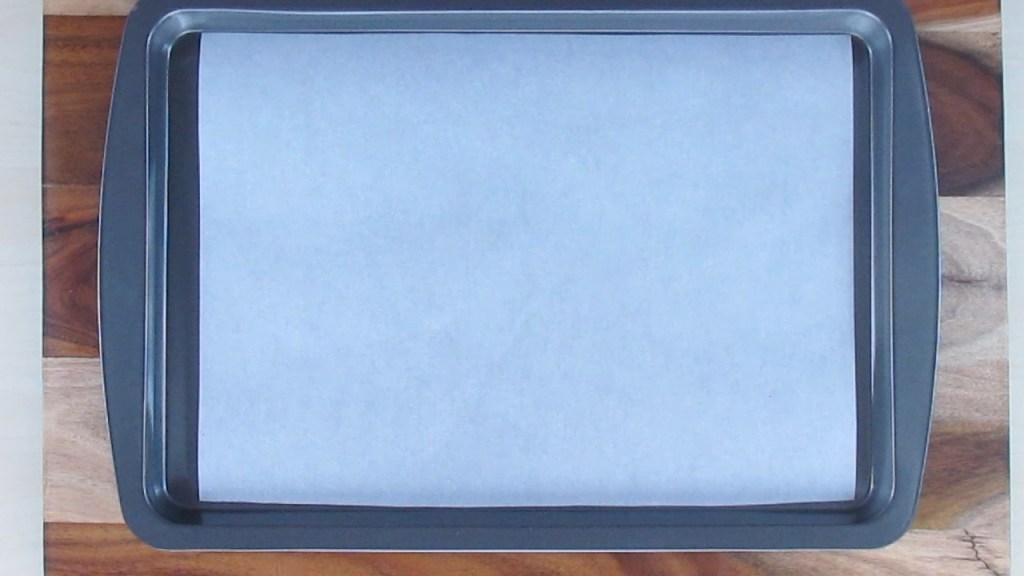
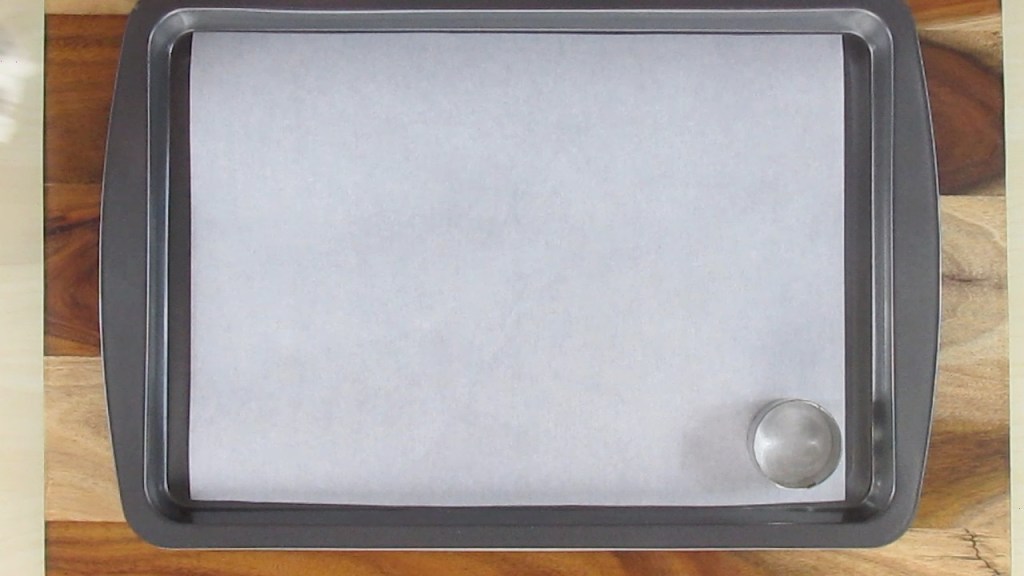
Line a baking tray with baking paper or a silicone liner and set aside.
Place the banana into a bowl and mash it with a fork.
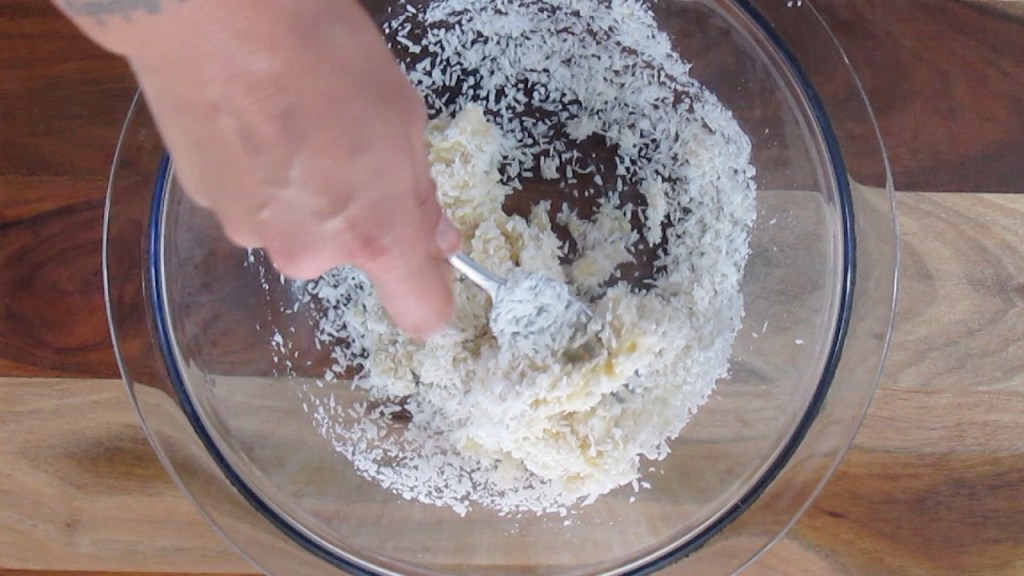
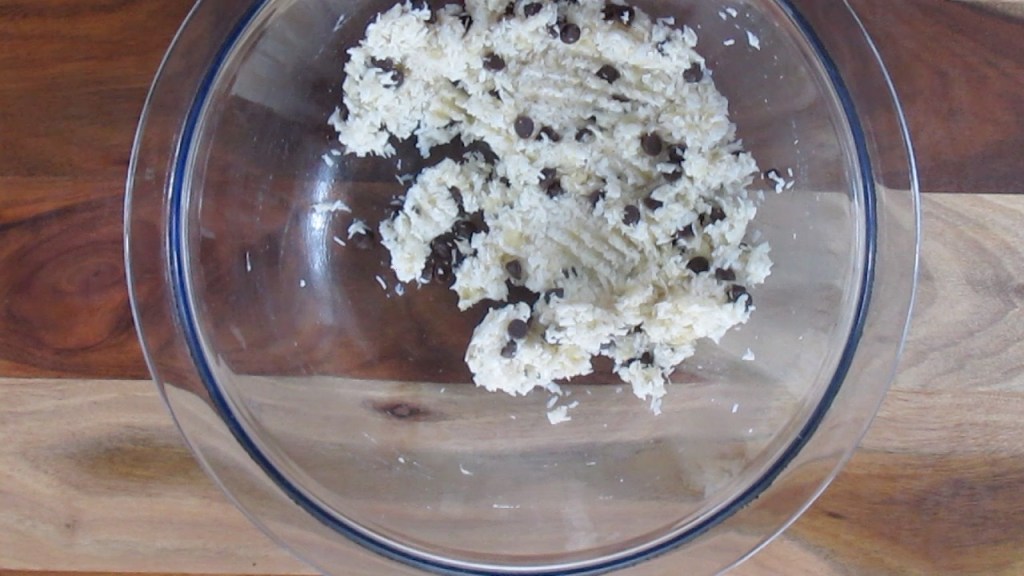
Add the coconut to the banana and mix them together with the fork.
If you want to add anything extra do it now and mix well.
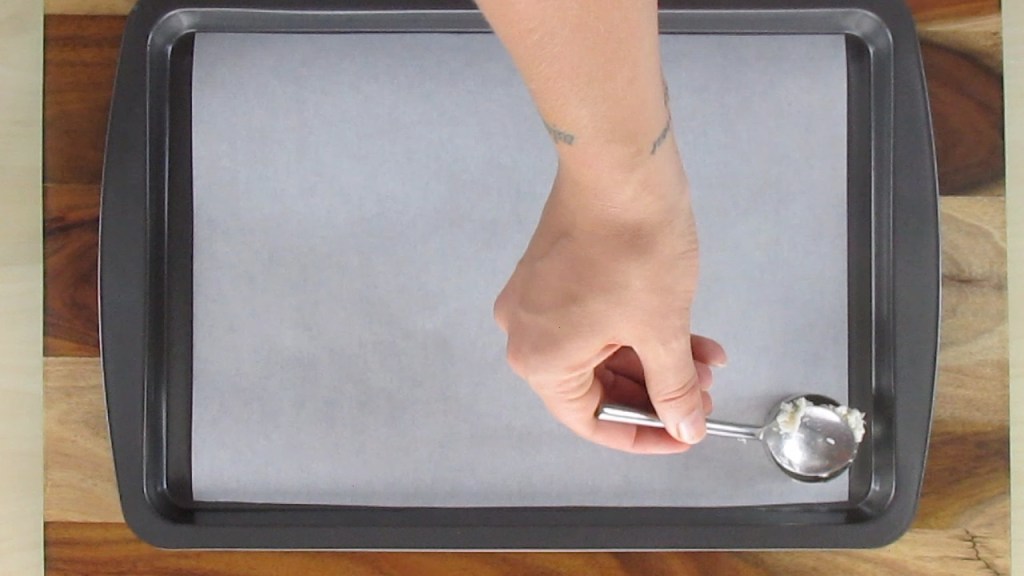
Portion the mixture onto the baking tray using an ice cream scoop or use a cookie cutter and a spoon.
Flatten down the mixture and shape into cookies on the baking tray.
Bake the cookies for 15 to 20 minutes or until they are golden brown.
Remove the tray from the oven and let the cookies cool on a wire rack.
Nutrition
Per Serving: 132 calories; 9 g fat; 14 g carbohydrates; 1.9 g protein
Equipment
Mixing bowl
Fork
Ice cream scoop
Baking tray
Baking paper or silicone liner
Cooling rack
Nutritional disclaimer
Nutrition information is provided as an estimate based on the ingredients used and available in my area (New Zealand). The nutritional information is here to help you understand the recipe; I use MyFitnessPal to generate my estimates. For more accurate nutritional information, please use a nutritional calculator with the ingredients in your area.