Beef and onions

Slow cooker season

Cards on the table: I hate coming home from a busy day and knowing I have to walk into the kitchen at 7 pm, cook a full meal, and then clean up. Don’t get me wrong; I love cooking. It gives me joy to create a beautiful and healthy. After a 10-hour day at work, an hour commute home, and a heavy workout, cooking is not much joy; it is a chore. I’m usually borderline hangry at the end of a long day, and I want my food as fast as possible. 

This is where having a slow cooker comes into its own. I know that I can walk in and find a meal that is cooked, hot, and ready to serve. That means food is served as soon as I want it, not 30 to 60 minutes later.

Beef and onions on a bed of cauliflower rice
Beef and onions

Putting the slow cooker on the counter

It has been getting a bit cold in the mornings and evenings here in the southern hemisphere, and the cost of salad is going through the roof. Yes, it means winter is upon us. It also means that the slow cooker is coming out of the cupboard and taking up residence on the kitchen counter again. My slow cooker is my favourite kitchen appliance when the weather cools down. To celebrate the slow cooker taking its place on the countertop, I decided to make brisket and onions. 

A little bit of effort, a lot of reward

This slow-cooker meal isn’t a dump-and-go recipe; it requires some prep work, but it is worth the effort. Making a bed of caramelised onions for the brisket to sit on in the slow cooker gives the meat an extra level of flavour that kicks ass and takes names. The bone broth helps to make a rich sauce that can easily be turned into a gravy. If you want to kick things up on the comfort-food front, whisk a tablespoon of tapioca flour into a small amount of the bone broth, then return it to the slow cooker and mix well. I love combining my brisket and onions with cauliflower rice, but it also goes well with mashed sweet potatoes or cauliflower mash. 

Sear in the flavour

I spent some time experimenting with this recipe to create a deeper flavour; I finally landed on the seared meat to make this recipe extra special. The extra step of searing the meat adds a beautiful caramelised flavour to the meat and, more importantly, to the gravy. 

Brisket and onions Recipe

Ingredients

Beef and onions ingredients
  • 1 tbsp. olive oil
  • 4 onion, sliced
  • 1.5kg beef roast
  • 6 cloves garlic, minced
  • 2 cups beef bone broth
  • 2 tbsp. Worcestershire sauce
  • 1 tbsp. coconut aminos
  • Salt and pepper

Instructions

slice the onions
slice the onions

In a large frying pan, heat the olive oil over a medium heat.

In a large frying pan, heat the olive oil over a medium heat.
Add the sliced onions to the pan and let them cook for about 15 minutes
Be sure to stir the onion now and then
Be sure to stir the onion now and then.

Add the onions to the pan and let them cook for about 15 minutes, stirring them now and then.

When the onions are caramelised, spread them on the bottom of your slow cooker.

When the onions are caramelised, spread them out on the bottom of your slow cooker.

Return the frying pan to the heat.

Season the brisket before searing it in the pan where the onions were cooked.

Season the beef well.
Sear the beef in the pan the onions were cooked in.

When the meat is browned, place it on top of the onions in the slow cooker.

Sear the beef on all slides.
When the meat is browned all over, place it on top of the onions in the slow cooker.

Put half of the onions on top of the brisket.

Pour the Worcestershire sauce, coconut aminos and broth over the meat.

Pour the Worcestershire sauce, coconut aminos and broth over the meat.
Cook the beef on a low heat setting for 6 to 8 hours.

Cook the brisket on low heat for 6 to 8 hours. 

The meat should pull apart with a fork.

Let the meat rest for 20 minutes before serving.

Use two forks to pull the brisket apart and mix it well with the onions and cooking juices.

Serve on a bed of cauliflower rice.

Beef and onions

  • Servings: 10
  • Rating: ★★★★★
  • Print

This slow cooker meal is one of my favourites and delivers so much flavour.


Credit: Cath @ easycleaneats

Ingredients

  • 1 tbsp. olive oil
  • 4 onion, sliced
  • 1.5kg beef brisket
  • 6 cloves garlic, minced
  • 2 cups beef bone broth
  • 2 tbsp. Worcestershire sauce
  • 1 tbsp. coconut aminos
  • Salt and pepper

Directions

  1. In a large frying pan, heat the olive oil over medium heat.
  2. Add the onions to the pan and let them cook for about 15 minutes, stirring them now and then.
  3. When the onions are caramelised, spread them on the bottom of your slow cooker.
  4. Return the frying pan to the heat.
  5. Season the brisket before searing it in the pan where the onions were cooked.
  6. When the meat is browned, place it on top of the onions in the slow cooker.
  7. Put half of the onions on top of the brisket.
  8. Pour the Worcestershire sauce, coconut aminos and broth over the meat.
  9. Cook the brisket on low heat for 6 to 8 hours.
  10. The meat should pull apart with a fork.
  11. Let the meat rest for 20 minutes before serving.
  12. Use two forks to pull the brisket apart and mix it well with the onions and cooking juices.
  13. Serve on a bed of cauliflower rice.

Nutrition

Per Serving: 259 calories; 8 g fat; 6 g carbohydrates; 38 g protein

Equipment

  • Knife
  • Chopping board
  • Measuring jug
  • Measuring spoons
  • Frying pan
  • Wooden spoon
  • Tongs
  • Whisk

Nutritional disclaimer

Nutrition information is provided as an estimate based on the ingredients used and available in my area (New Zealand). The nutritional information is here to help you understand the recipe; I use MyFitnessPal to generate my estimates. For more accurate nutritional information, please use a nutritional calculator with the ingredients in your area.


Italian roast chicken

Something fancy

It’s been a busy few weeks; I’ve been keeping my meals simple and relying on freezer staples while operating in survival mode. I have a little bit of breathing room now and an intense craving for something fancier for dinner.

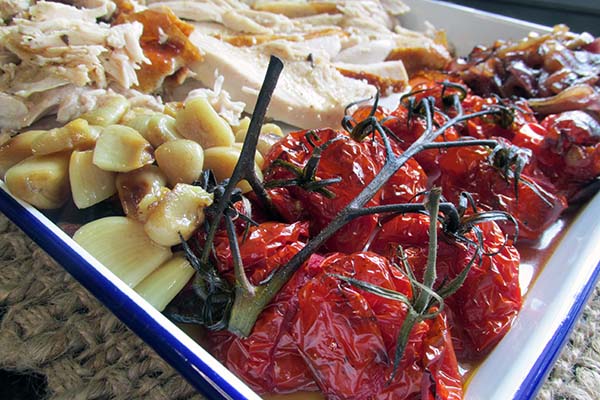
Italian roast chicken tray

Fancy but easily

In my book, fancy doesn’t have to mean spending hours in the kitchen boiling to death over a hot stove. This recipe delivers a very fancy meal with minimal effort; it is all cooked on a single tray, which makes it perfect.

The roasted garlic is the star of this meal for me. The bed of garlic under the chicken means you get great flavour throughout the meat, while the roast garlic cloves have a deep, rich flavour that complements the rest of the dish.

The quick prep and hands-off cooking mean you can get on with other things and come back to a perfectly roasted chicken that can satisfy any desire for a fancy dinner. 

Dinner ready without effort

While living in survival mode, I try to make life easier for myself by multitasking so that life admin and essential tasks don’t take away from much-needed rest and relaxation. In the spirit of multitasking, I combined a trip home from the office with a pit stop at the supermarket to get everything I needed for my fancy dinner and did the prep (putting everything on a tray) while I waited for the kettle to boil. Knowing I would be ready for dinner after my workout, I smashed dinner in the oven before heading downstairs to throw around some weights. By the time I finished my workout, the chicken was ready for the foil and baking paper to be removed, and there was plenty of time for me to shower before sitting down to a flavourful, filling and fancy dinner.

Italian roast chicken recipe

Italian roast chicken ingredients

Ingredients 

  • 2 large tomatoes thickly sliced
  • 250g cherry tomatoes
  • 1 red onion thinly sliced
  • 1 garlic bulb peeled and bruised
  • 1/3 cup flat-leaf parsley chopped
  • 1/3 cup red wine vinegar
  • 1/4 cup olive oil
  • 3 sprigs rosemary
  • 1.6 kg chicken
Large chicken

Take a large baking tray.

Take a large baking tray.

Place one garlic bulb on the baking tray.

Place one garlic bulb on the baking tray.

Lay the chicken on top of the garlic.

Lay the chicken on top of the garlic.

Spread out the onion next to the chicken.

Spread out the onion next to the chicken.

Add the remaining garlic bulbs on top of the onions.

Add the remaining garlic bulbs on top of the onions.

Add the tomatoes on top of the garlic.

Add the tomatoes on top of the garlic.

Drizzle the vinegar and olive oil over the chicken and vegetables.

Drizzle the vinegar and olive oil over the chicken and vegetables.

Place the rosemary sprigs on top of the chicken and the vegetables.

Cover the baking tray with baking paper.

Cover the baking tray with baking paper.

Cover the baking paper with foil.

Cover the baking paper with foil.

Bake for 1 hour.

Check the chicken to make sure the meat is cooked and the juices are running clear before removing the baking paper and foil, this will depend on the size of the chicken.

Check the chicken to make sure the meat is cooked and the juices are running clear

Return the chicken to the oven uncovered for another 20 minutes or until the skin is golden brown.

Return the chicken to the oven uncovered for another 20 minutes

Slice the chicken, squeeze out the garlic and serve while hot.

Slice the chicken, squeeze out the garlic and serve while hot.

Italian roast chicken

  • Servings: 6
  • Rating: ★★★★★
  • Print

This one tray meal a great option for busy week nights or an action packed weekend.


Credit: Cath @ easycleaneats

Ingredients

  • 2 tomatoes thickly sliced
  • 250g cherry tomatoes
  • 1 red onion thinly sliced
  • 1 garlic bulb peeled and bruised
  • 1/3 cup flat leaf parsley chopped
  • 1/3 cup red wine vinegar
  • 1/4 cup olive oil
  • 3 sprigs rosemary
  • 1.6 kg chicken

Directions

  1. Preheat the oven to 200 degrees C/ 400 degrees F.  
  2. Take a large baking tray.
  3. Place one garlic bulb on the baking tray.
  4. Lay the chicken on top of the garlic.
  5. Spread out the onion next to the chicken.
  6. Add the remaining garlic bulbs on top of the onions.
  7. Add the tomatoes on top of the garlic.
  8. Drizzle the vinegar and olive oil over the chicken and vegetables.
  9. Place the rosemary sprigs on top of the chicken and the vegetables.
  10. Cover the baking tray with baking paper.
  11. Cover the baking paper with foil.
  12. Bake for 1 hour.
  13. Check the chicken to make sure the meat is cooked and the juices are running clear before removing the baking paper and foil, this will depend on the size of the chicken.
  14. Return the chicken to the oven uncovered for another 20 minutes or until the skin is golden brown.
  15. Slice the chicken, squeeze out the garlic and serve while hot.

Nutrition

Per Serving: 349 calories; 14 g fat; 9 g carbohydrates; 53 g protein

Equipment

  • Roasting tin
  • Baking paper 
  • Aluminium foil
  • Measuring cups
  • Scales 

Nutritional disclaimer

Nutrition information is provided as an estimate based on the ingredients used and available in my area (New Zealand). The nutritional information is here to help you understand the recipe; I use MyFitnessPal to generate my estimates. For more accurate nutritional information, please use a nutritional calculator with the ingredients in your area.


Slow-roast leg of lamb

A treat for me

Last weekend, I gave myself a treat for Easter and made myself a kick-ass roast dinner. I’m not a lover of chocolate, but I wanted something nice to enjoy over the long weekend. After braving the supermarket, seriously, I never get over the mad panic when the supermarket is closed for one day. I managed to get everything I needed for slow-roasted leg of lamb with all the fixings and didn’t lose my mind in the process.

Fall apart perfect meat

For me, the perfectly roasted leg of lamb falls off the bone and melts in your mouth. In my experience, the best way to get meat that falls apart perfectly is to cook it low and slow. This recipe is a foolproof way to cook a leg of lamb perfectly, and it takes minimal effort, which is also perfect. The bonus of cooking lamb this way is that you also have everything you need to make a rich gravy to go with your meat.

Cook once, eat twice

In my sad little life, if I can cook once and get a couple of meals out of it, I’m winning. This recipe is a great option for cooking once and eating many times.

Slow roast leg of lamb recipe

Ingredients

  • 1.5-2kg Leg of Lamb
  • 1 carrot, roughly chopped
  • 1 onion, roughly chopped
  • 2 celery stalks, roughly chopped
  • 1 sweet potato, roughly chopped
  • 2 garlic cloves minced
  • 3 tsp. rosemary
  • 500ml water

Instructions

Preheat the oven to 200 degrees C/ 400 degrees F. 

Take a large roasting tin and lightly grease it.

Lay the chopped vegetables out at the bottom of the tray.

Pour the water into the roasting tin.

Place the leg of lamb on top of the vegetables.

Rub the lamb with the garlic and rosemary.

Cover the tin with baking paper and then foil, ensuring the roasting tin is completely covered to keep the moisture in.

Put the roasting tin into the preheated oven.

Cook for 30 minutes at 200 degrees C/ 400 degrees F.

Reduce the heat to 120 degrees C/ 250 degrees F and cook for 6 to 8 hours, depending on the weight of the lamb.

Check the meat after 6 to 8 hours. If the lamb is falling off the bone, take it out and let it rest. 

Remove the vegetables from the tray and use the remaining liquid to make gravy.

“Slow

  • Rating: ★★★★★
  • Print


Credit: Cath @ easycleaneats

Ingredients

  • 1.5-2kg Leg of Lamb
  • 1 carrot, roughly chopped
  • 1 onion, roughly chopped
  • 2 celery stalks, roughly chopped
  • 1 sweet potato, roughly chopped
  • 2 garlic cloves minced
  • 3 tsp. rosemary
  • 500ml water

Directions

  1. Preheat the oven to 200 degrees C/ 400 degrees F.
  2. Take a large roasting tin and lightly grease it.
  3. Lay the chopped vegetables out at the bottom of the tray.
  4. Pour the water into the roasting tin.
  5. Place the leg of lamb on top of the vegetables.
  6. Rub the lamb with the garlic and rosemary.
  7. Cover the roasting tin with baking paper and then foil, ensuring it is completely covered to keep the moisture in.
  8. Put the roasting tin into the preheated oven.
  9. Cook for 30 minutes at 200 degrees C/ 400 degrees F.
  10. Reduce the heat to 120 degrees C/ 250 degrees F and cook for 6 to 8 hours, depending on the weight of the lamb.
  11. Check the meat after 6 to 8 hours. If the lamb is falling off the bone, take it out and let it rest.
  12. Remove the vegetables from the tray and use the remaining liquid to make gravy.

Nutrition

Per Serving: 181 calories; 11.8g fat; 5.8g carbohydrates; 15.2g protein

Equipment

  • Measuring spoons
  • Measuring jug
  • Knife
  • Chopping board
  • Roasting tin
  • Baking paper
  • Aluminium foil

Nutritional disclaimer

Nutrition information is provided as an estimate based on the ingredients used and available in my area (New Zealand). The nutritional information is here to help you understand the recipe; I use MyFitnessPal to generate my estimates. For more accurate nutritional information, please use a nutritional calculator with the ingredients in your area.


Hawaiian pork chops

Slow cooker

Cards on the table, I hate coming home from a busy day and knowing I have to walk into the kitchen at 7 pm, cook a full meal, and then clean up. Don’t get me wrong; I love cooking, and it gives me the joy of creating a beautiful meal for myself and not having to turn to Uber Eats. After a 10-hour day at work, an hour-long commute home, and a heavy workout, cooking is not much of a joy. I am usually borderline hangry at the end of a long day, and I want my food as fast as possible. 

This is where having a slow cooker comes into its own; I know that I can walk in and find a meal that is cooked, hot and ready to serve. That means food is served as soon as I am ready to sit down, not 30 to 60 minutes later.

Ready for a comfort meal

It has been a bit frantic at work of late, I knew that this week was going to be a rough one so I planned something comforting for dinner today to help wind down for the week. Before starting work today I put my pork chops and sauce in the slow cooker and set it up for a long slow cook. Don’t you love the delayed start function on slow cookers? Coming home to perfectly cooked chops ready to serve up was just what was needed.

Hawaiian pork chops recipe

Ingredients 

  • 1 kg Pork chops
  • 2 cloves garlic, minced
  • 3 cups cauliflower rice
  • 1 tbsp. coriander chopped
  • 1/4 cup tomato puree
  • 1/2 cup coconut aminos
  • 1/3 cup honey
  • 3 tbsp. coconut vinegar
  • 1/2 cup water
  • 1 tbsp. tapioca flour
  • 1 can pineapple slices in juice

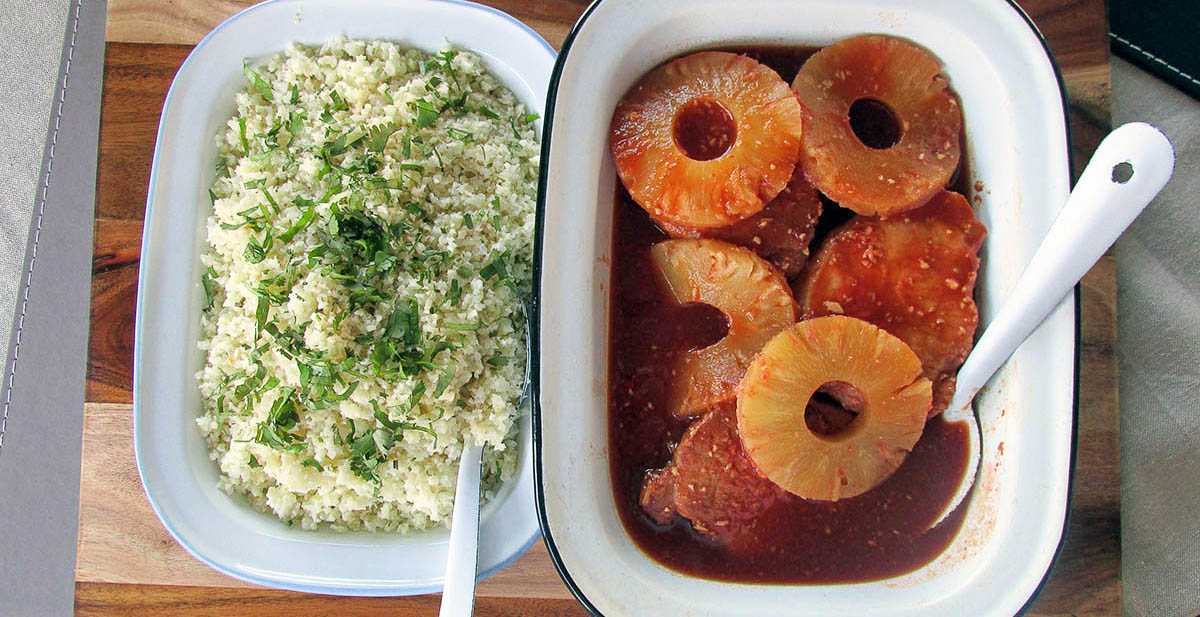
Whisk together the coconut aminos, honey, tomato puree, coconut vinegar, garlic, and pineapple juice.

In a separate bowl mix together the tapioca flour and water, whisk well so that there are no lumps in the liquid.

Add the flour mixture to the sauce and whisk well.

Pour half of the sauce into the bottom of your slow cooker.

Place the pork chops into the sauce and place the pineapple slices on top of the chops.

Pour the remaining sauce over the chops and pineapple slices.

Cook the chops for 3-4 hours on high or 6-8 hours on low setting.

Serve hot over the cauliflower rice and garnish with the chopped coriander.

Hawaiian pork chops

  • Rating: ★★★★★
  • Print

“Hawaiian


Credit: Cath @ easycleaneats

Ingredients

  • 1 kg Pork chops
  • 2 cloves garlic, minced
  • 3 cups cauliflower rice https://easycleaneats.co.nz/2016/08/19/cauliflower-rice/
  • 1 tbsp. coriander chopped
  • 1/4 cup tomato puree
  • 1/2 cup coconut aminos
  • 1/3 cup honey
  • 3 tbsp. coconut vinegar
  • 1/2 cup water
  • 1 tbsp. tapioca flour
  • 1 can pineapple slices in juice

Directions

  1. Whisk together the coconut aminos, honey, tomato puree, coconut vinegar, garlic, and pineapple juice.
  2. In a separate bowl mix together the tapioca flour and water, whisk well so that there are no lumps in the liquid.
  3. Add the flour mixture to the sauce and whisk well.
  4. Pour half of the sauce into the bottom of your slow cooker.
  5. Place the pork chops into the sauce and place the pineapple slices on top of the chops.
  6. Pour the remaining sauce over the chops and pineapple slices.
  7. Cook the chops for 3-4 hours on high or 6-8 hours on low setting.
  8. Serve hot over the cauliflower rice and garnish with the chopped coriander.

Nutrition

Per Serving:325 calories; 7 g fat; 31 g carbohydrates; 36 g protein

Equipment

  • Measuring spoons
  • Measuring cups
  • Whisk
  • Mixing bowl
  • Spoon

Nutritional disclaimer

Nutrition information is provided as an estimate based on the ingredients used and available in my area (New Zealand). The nutritional information is here to help you understand the recipe; I use MyFitnessPal to generate my estimates. For more accurate nutritional information, please use a nutritional calculator with the ingredients in your area.


Chicken stew and dumplings

Comfort food 

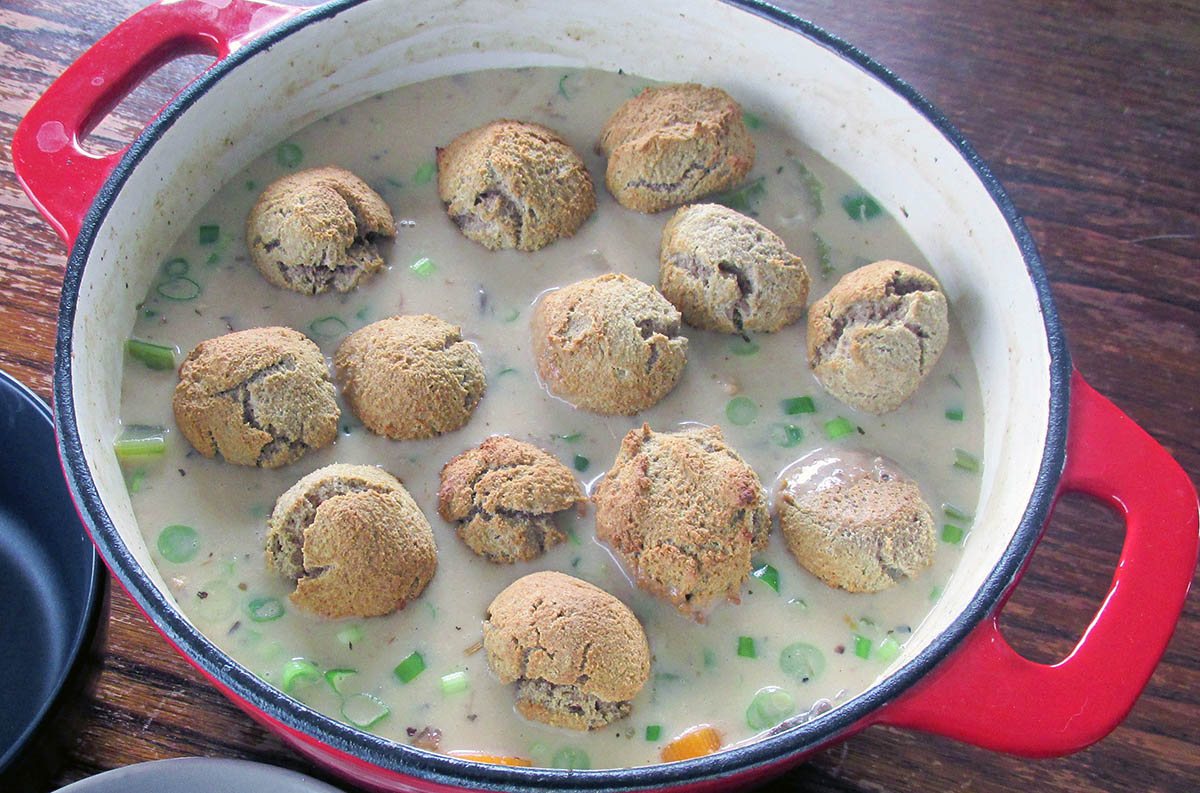
When the weather starts to get cold, I look forward to a hot meal that makes me feel safe and warm. Nothing is more comforting than a big pot of hot chicken stew with homemade dumplings. 

What kind of dumplings? 

When I ask the question, ‘who wants dumplings?’ The response is usually ‘What kind of dumplings?’ There is a slight obsession with dumplings that go well with coconut aminos. My cabbage and prawn dumplings are a firm favourite but probably not the best thing to put in a stew. The dumplings I like to put in my stew are grain free and reasonably high in protein, thanks to a healthy dose of egg whites. 

This chicken stew and dumplings might actually be the ultimate in comfort food. If you want a good for you meal on the table for the family, give this a go. 

Freezer meal

Hands up if you are busy. Who is way too tired to get in the kitchen to cook at the end of the day? Definitely not me.

My days are filled with meetings, to-do lists, emails and telling people what to do, by the time I finish work the last thing I want to do is get stuck into cooking a meal and then cleaning up afterwards. I want to work out and spend some time with Jaime. That is why freezer meals are my favourite solutions to the challenge of a busy life. A few hours on the weekend, and you find yourself with a stack of options for dinner that can be thawed and cooked for a healthy, delicious meal for the family.

Chicken stew and dumplings recipe 

Ingredients 

For stew 

  • 500g chicken breast, cubed 
  • 3 tbsp. coconut oil 
  • 1 onion, chopped 
  • 2 garlic cloves, minced 
  • 1/4 cup tapioca flour 
  • 2 cups chicken broth 
  • 2 carrots, chopped 
  • 2 celery stalks, chopped 
  • 3 portabella mushrooms, sliced 
  • 1/2 cup coconut cream 
  • 2 spring onions, sliced 
  • Salt and pepper to taste 
  • 1/2 tsp. Italian seasoning 

For dumplings 

  • 1/3 cup buckwheat flour 
  • 1/3 cup coconut flour 
  • 1/2 tsp. baking powder 
  • 1/4 cup coconut cream 
  • 2 tbsp coconut oil, softened 
  • 5 egg whites 

Chicken stew and dumplings 

  • Servings: 6
  • Rating: ★★★★★
  • Print

Nothing is more comforting than a big pot of hot chicken stew with homemade dumplings.


Credit: Cath @ easycleaneats

Ingredients

  • 500g chicken breast, cubed 
  • 3 tbsp. coconut oil 
  • 1 onions, chopped 
  • 2 garlic cloves, minced 
  • 1/4 cup tapioca flour 
  • 2 cups chicken broth 
  • 2 carrots, chopped 
  • 2 celery stalks, chopped 
  • 3 portabella mushrooms, sliced 
  • 1/2 cup coconut cream 
  • 2 spring onions, sliced 
  • Salt and pepper to taste 
  • 1/2 tsp. Italian seasoning 
  • 1/3 cup buckwheat flour 
  • 1/3 cup coconut flour 
  • 1/2 tsp. baking powder 
  • 1/4 cup coconut cream 
  • 2 tbsp coconut oil, softened 

Directions

  1. Place a large saucepan or Dutch oven over a medium heat, melt the coconut oil. 
  2. Add in half of the chicken pieces and cook until golden brown on all sides when golden brown remove from the pan and put to one side. 
  3. Cook the other half of the chicken until golden brown and put it with the other chicken to rest. 
  4. Add the onions to the pan the chicken was cooked in, you may need to add more coconut oil. 
  5. Sautee the onions, when they begin to brown add in the garlic and cook for 2 minutes. 
  6. Have the chicken broth warm and ready to use. 
  7. Add tapioca flour to the pan and stir well to coat bottom of pan and onions 
  8. Slowly pour in the chicken broth and whisk together the stock and the onions, be sure to scrape the bottom of the pan as you are whisking to get all of the flour and flavours from the pan. 
  9. Once all of the stock has been whisked in add in the vegetables and chicken to the pan. 
  10. Season and add in the Italian seasoning. 
  11. Bring the liquid up to a gentle simmer then cover the pan, you want the heat low, but the liquid should still be simmering. 
  12. Cook for 20-30minutes, this will depend on how large your vegetables are. 
  13. While the stew is simmering, you can make the dumplings. 
  14. Preheat the oven to 200 degrees C/ 400 degrees F. 
  15. Line a baking tray with baking paper or a silicone liner. 
  16. In a large bowl mix together the buckwheat flour, coconut flour and baking powder. 
  17. Mix in a 1/4 cup of coconut cream and the softened coconut oil, you should end up with a crumbly mix 
  18. In a separate bowl, beat the egg whites until stiff peaks form. 
  19. Fold the egg whites into the flour mixture, this takes a little time, but you should end up with a wet-looking combination. 
  20. Using a spoon divide the mixture into 12 portions onto the baking tray. 
  21. Bake for 12-15 minutes, or until the dumplings are golden. 
  22. Once the dumplings are cooked 
  23. Stir in the remaining coconut cream and spring onions into the stew and take it off the heat. 
  24. Add the dumplings to the pan and serve. 

Nutrition

Per Serving: 337 calories; 16 g fat; 16 g carbohydrates; 23 g protein

Equipment 

  • Knife 
  • Chopping board 
  • Saucepan or Dutch oven 
  • Wooden spoon 
  • Whisk 
  • Large bowl 
  • Baking tray
  • Baking paper or a silicone liner
  • Scales
  • Measuring cups
  • Measuring spoons

Nutritional disclaimer

Nutrition information is provided as an estimate based on the ingredients used and available in my area (New Zealand). The nutritional information is here to help you understand the recipe; I use MyFitnessPal to generate my estimates. For more accurate nutritional information, please use a nutritional calculator with the ingredients in your area.