Slow-roast leg of lamb

A treat for me

Last weekend, I gave myself a treat for Easter and made myself a kick-ass roast dinner. I’m not a lover of chocolate, but I wanted something nice to enjoy over the long weekend. After braving the supermarket, seriously, I never get over the mad panic when the supermarket is closed for one day. I managed to get everything I needed for slow-roasted leg of lamb with all the fixings and didn’t lose my mind in the process.

Fall apart perfect meat

For me, the perfectly roasted leg of lamb falls off the bone and melts in your mouth. In my experience, the best way to get meat that falls apart perfectly is to cook it low and slow. This recipe is a foolproof way to cook a leg of lamb perfectly, and it takes minimal effort, which is also perfect. The bonus of cooking lamb this way is that you also have everything you need to make a rich gravy to go with your meat.

Cook once, eat twice

In my sad little life, if I can cook once and get a couple of meals out of it, I’m winning. This recipe is a great option for cooking once and eating many times.

Slow roast leg of lamb recipe

Ingredients

  • 1.5-2kg Leg of Lamb
  • 1 carrot, roughly chopped
  • 1 onion, roughly chopped
  • 2 celery stalks, roughly chopped
  • 1 sweet potato, roughly chopped
  • 2 garlic cloves minced
  • 3 tsp. rosemary
  • 500ml water

Instructions

Preheat the oven to 200 degrees C/ 400 degrees F. 

Take a large roasting tin and lightly grease it.

Lay the chopped vegetables out at the bottom of the tray.

Pour the water into the roasting tin.

Place the leg of lamb on top of the vegetables.

Rub the lamb with the garlic and rosemary.

Cover the tin with baking paper and then foil, ensuring the roasting tin is completely covered to keep the moisture in.

Put the roasting tin into the preheated oven.

Cook for 30 minutes at 200 degrees C/ 400 degrees F.

Reduce the heat to 120 degrees C/ 250 degrees F and cook for 6 to 8 hours, depending on the weight of the lamb.

Check the meat after 6 to 8 hours. If the lamb is falling off the bone, take it out and let it rest. 

Remove the vegetables from the tray and use the remaining liquid to make gravy.

“Slow

  • Rating: ★★★★★
  • Print


Credit: Cath @ easycleaneats

Ingredients

  • 1.5-2kg Leg of Lamb
  • 1 carrot, roughly chopped
  • 1 onion, roughly chopped
  • 2 celery stalks, roughly chopped
  • 1 sweet potato, roughly chopped
  • 2 garlic cloves minced
  • 3 tsp. rosemary
  • 500ml water

Directions

  1. Preheat the oven to 200 degrees C/ 400 degrees F.
  2. Take a large roasting tin and lightly grease it.
  3. Lay the chopped vegetables out at the bottom of the tray.
  4. Pour the water into the roasting tin.
  5. Place the leg of lamb on top of the vegetables.
  6. Rub the lamb with the garlic and rosemary.
  7. Cover the roasting tin with baking paper and then foil, ensuring it is completely covered to keep the moisture in.
  8. Put the roasting tin into the preheated oven.
  9. Cook for 30 minutes at 200 degrees C/ 400 degrees F.
  10. Reduce the heat to 120 degrees C/ 250 degrees F and cook for 6 to 8 hours, depending on the weight of the lamb.
  11. Check the meat after 6 to 8 hours. If the lamb is falling off the bone, take it out and let it rest.
  12. Remove the vegetables from the tray and use the remaining liquid to make gravy.

Nutrition

Per Serving: 181 calories; 11.8g fat; 5.8g carbohydrates; 15.2g protein

Equipment

  • Measuring spoons
  • Measuring jug
  • Knife
  • Chopping board
  • Roasting tin
  • Baking paper
  • Aluminium foil

Nutritional disclaimer

Nutrition information is provided as an estimate based on the ingredients used and available in my area (New Zealand). The nutritional information is here to help you understand the recipe; I use MyFitnessPal to generate my estimates. For more accurate nutritional information, please use a nutritional calculator with the ingredients in your area.


Fried not rice

Master the basics

Eating clean gets a lot easier once you have mastered a few essential recipes. This recipe is basic- not like basic unicorn basic, but more like beard and flannel basic. Back to the point (which isn’t Unstable unicorns), having basic skills and recipes in your arsenal means you will never be left with only UberEats as your weeknight options. Once you master this recipe, the possibilities are endless.

Make the most of leftovers

This is a great way to use up leftovers (if you ever have any) or a quick and easy dinner that will fill up the family. You can add pretty much anything you want, and it will still taste awesome.

Fried rice recipe

Ingredients

  • 1 head cauliflower, finely grated
  • 1/2 onion, minced
  • 2 garlic cloves, finely minced
  • 2 spring onions
  • 1 cup vegetables
  • 2 eggs
  • 1 chicken breast
  • 1 cup prawns
  • Handful of ham
  • 1 tbsp. coconut oil
  • 1/4 cup coconut aminos

Instructions

In a large frying pan, heat coconut oil over a medium heat

Add the chicken and cook for about 3 – 5 minutes until it is cooked most of the way.

Keep the meat moving around the pan.

Add the garlic and cook for 1 minute.

Add the vegetables and keep everything moving.

Add the ham and make sure it is well mixed in.

Push the meat and vegetables to the side of the wok and pour the egg into the space you have made. 

Use chopsticks or a spatula to keep the egg moving and cooking.

Mix the egg into the veggies and meat.

Add the cauliflower rice and the prawns to the wok and mix well. 

Keep everything moving in the wok and cook for 3 minutes.

Add the coconut aminos to the wok and mix well to ensure everything gets covered.

Serve with a topping of sliced spring onions and some sesame seeds.

Fried non-rice

  • Servings: 4
  • Rating: ★★★★★
  • Print

Your healthy alternative to fried rice. Made with cauliflower rice for a low carb option for this take away favourite.


Credit: Cath @ easycleaneats

Ingredients

  • 1 head cauliflower, finely grated
  • 1/2 onion, minced
  • 2 garlic cloves, finely minced
  • 2 spring onions, sliced
  • 1 cup vegetables
  • 2 eggs
  • 1 chicken breast
  • 1 cup prawns, cooked
  • Handful of ham
  • 1 tbsp. coconut oil
  • 1/4 cup coconut aminos

Directions

  1. In a large frying pan heat coconut oil over a medium heat
  2. Add the chicken and cook for about 3 – 5 minutes until it is cooked most of the way.
  3. Keep the meat moving around the pan.
  4. Add the garlic and cook for 1 minute.
  5. Add the vegetables and keep everything moving.
  6. Add the ham and make sure it is well mixed in.
  7. Push the meat and vegetables to the side of the wok and pour the egg into the space you have made.
  8. Use chopsticks or a spatula to keep the egg moving and cooking.
  9. Mix the egg into the veggies and meat.
  10. Add the cauliflower rice and the prawns to the wok and mix well.
  11. Keep everything moving in the wok and cook for 3 minutes.
  12. Add the coconut aminos to the wok and mix well to ensure everything gets covered.
  13. Serve with a topping of sliced spring onions and some sesame seeds.

Nutrition

Per Serving: 231 calories; 7 g fat; 12 g carbohydrates; 26 g protein

Equipment

  • Measuring cup
  • Grater
  • Chopping board
  • Knife
  • Frying pan
  • Spatula 
  • Small bowl
  • Whisk  

Nutritional disclaimer

Nutrition information is provided as an estimate based on the ingredients used and available in my area (New Zealand). The nutritional information is here to help you understand the recipe; I use MyFitnessPal to generate my estimates. For more accurate nutritional information, please use a nutritional calculator with the ingredients in your area.


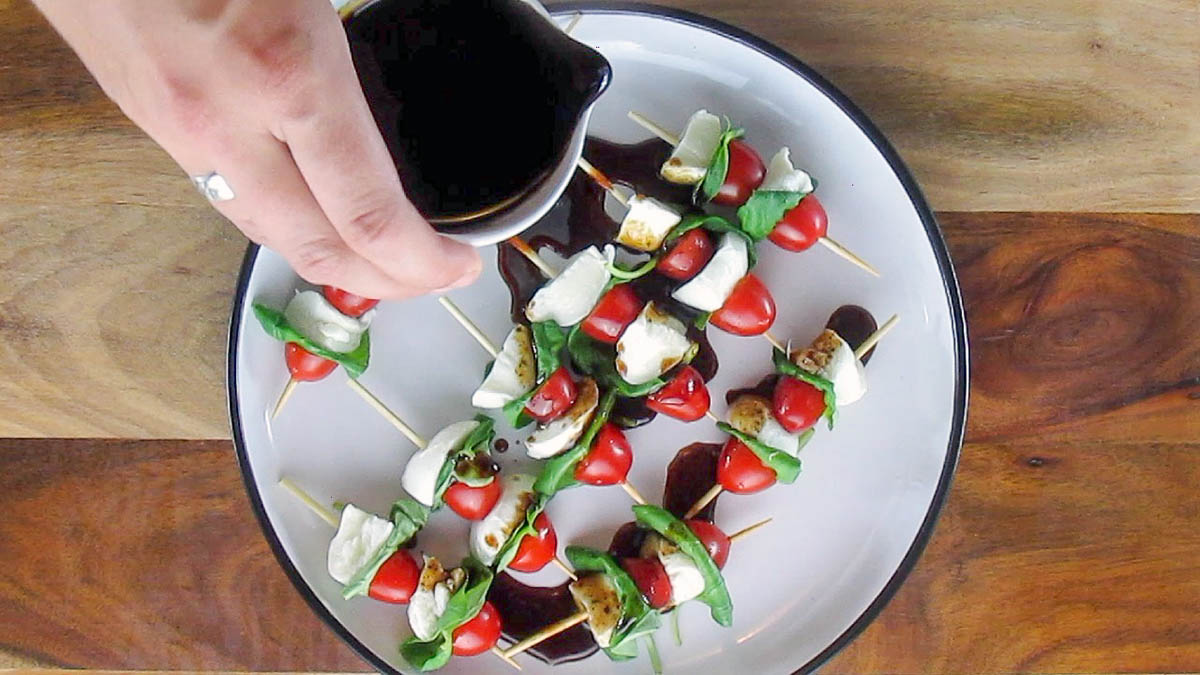
Balsamic glaze

Make your own

If you are like us and you try to avoid mass-produced processed foods, the best option is to make your own. When you make your own, you get to control which ingredients you use and how much or how sweet you want it to be. Once you have a go at making your own and realise how easy it is, you will never go back to store-bought again.

Easy to make

Most store-bought balsamic glaze comes with added ingredients like colouring, preservatives and sweeteners, which none of us wants. This glaze is simple to make, has only two ingredients, and can be used on salads, pizzas, chicken, and anything else you think needs a flavour elevation. 

Quality ingredients make a difference

To ensure you get the best balsamic glaze, you want to start with the best quality vinegar you can; this can significantly impact the flavour. If you have good-quality vinegar, you can make the glaze without adding any sweetener. 

Balsamic glaze recipe

Ingredients

  • 1 cup balsamic vinegar
  • 2 tbsp. honey

Instructions

In a saucepan over medium heat, mix together the honey and vinegar.

Mix until the honey is dissolved.

Bring the liquid to a boil, then reduce the heat to a simmer.

Stir the vinegar occasionally to check how much it has reduced.

The glaze is ready when it coats the back of a spoon. 

Take it off the heat and transfer it to a glass jar as soon as possible.

The glaze will thicken as it cools.

  • Rating: ★★★★★
  • Print

“This


Credit: Cath @ easycleaneats 

Ingredients

  • 1 cup balsamic vinegar
  • 2 tbsp. honey

Directions

  1. In a saucepan over medium heat, mix together the honey and vinegar.
  2. Mix until the honey is dissolved.
  3. Bring the liquid to a boil, then reduce the heat to a simmer.
  4. Stir the vinegar occasionally to check how much it has reduced.
  5. The glaze is ready when it coats the back of a spoon. 
  6. Take it off the heat and transfer it to a glass jar as soon as possible.
  7. The glaze will thicken as it cools.

Nutrition

Per Serving: 24 calories; 0g fat; 6.9g carbohydrates; 0g protein

Equipment

  • Saucepan
  • Whisk 
  • Spoon

Nutritional disclaimer

Nutrition information is provided as an estimate based on the ingredients used and available in my area (New Zealand). The nutritional information is here to help you understand the recipe; I use MyFitnessPal to generate my estimates. For more accurate nutritional information, please use a nutritional calculator with the ingredients in your area.


No Sugar Meringue

What are Meringues?

The meringue started as little cookies that were crispy on the outside and chewy inside. There are a few different types of meringues from across Europe that have slightly different ingredients and techniques. Meringue has been used for cookies, pavlova, Eton mess, and lemon meringue pies.

Big on sugar

There is one thing that all meringues have in common is a considerable amount of sugar, which isn’t my bag. Some recipes take a long time to get right from a technical cooking perspective and others from a flavour perspective, it is usually one thing or another, but in this instance, it took a long time to get the flavour and the technique right. I will save you the tale of woe and the many failed experiments to get a recipe that gave me silky meringues that once baked were crisp on the outside and chewy on the inside. All you need to know is the best combination of cream of tartar, apple cider vinegar and monkfruit sweetener. 

No sugar meringue recipe

Ingredients

  • 3 egg whites
  • 1/2 tsp. apple cider vinegar
  • 1/4 tsp. Cream of tartar
  • 3 tbsp. Monkfruit sweetener
  • 1/4 tsp. vanilla bean powder

Preheat to 135 degrees C / 275 degrees F.

Crack the eggs and separate the egg whites from the yolks*.

Place the egg whites into a large, clean bowl or a mixer.

Using an electric whisk, start to beat the egg whites, use a medium speed setting on the whisk.

Beat the whites until they become foamy.

Whisk in the apple cider vinegar.

Add the monkfruit sweetener one tablespoon at a time, then whisk in the vanilla bean powder.

Keep beating the egg whites until they are stiff peaks and look glossy.

Line a baking tray with baking paper or a silicone liner.

You can use a spoon to put the whites onto the baking tray; alternatively, you can use a piping bag to create shaped meringues.

Bake at 135 degrees C 275 degrees F for 15 minutes.

After 15 minutes, turn down the oven’s temperature to 100 degrees C 210 degrees F and cook for another hour.

After an hour, turn the oven off and keep the meringues in for another 2 hours.

When the oven has cooled completely, remove the meringues and put them into an airtight container.

You can store the meringues at room temperature until you need them.

*keep the yolks. You can add them to your homemade mayo to make it more creamy

No sugar meringue

  • Servings: 24“
  • Rating: ★★★★★
  • Print

“These


Credit: Cath @ easycleaneats 

Ingredients

– 3 egg whites – 1/2 tsp. apple cider vinegar – 1/4 tsp. Cream of tartar – 3 tbsp. Monkfruit sweetener – 1/4 tsp. vanilla bean powder

Directions

  1. Preheat to 135 degrees C / 275 degrees F.
  2. Crack the eggs and separate the egg whites from the yolks*.
  3. Place the egg whites into a large, clean bowl or a mixer.
  4. Using an electric whisk, start to beat the egg whites, use a medium speed setting on the whisk. Beat the whites until they become foamy.
  5. Whisk in the apple cider vinegar.
  6. Add the monkfruit sweetener one tablespoon at a time, then whisk in the vanilla bean powder.
  7. Keep beating the egg whites until they are stiff peaks and look glossy.
  8. Line a baking tray with baking paper or a silicone liner.
  9. You can use a spoon to put the whites onto the baking tray; alternatively, you can use a piping bag to create shaped meringues.
  10. Bake at 135 degrees C 275 degrees F for 15 minutes.
  11. After 15 minutes, turn down the oven’s temperature to 100 degrees C 210 degrees F and cook for another hour.
  12. After an hour, turn the oven off and keep the meringues in for another 2 hours.
  13. When the oven has cooled completely, remove the meringues and put them into an airtight container.
  14. You can store the meringues at room temperature until you need them.

Nutrition

Per Serving:14 calories; 0.1g fat; 0.3g carbohydrates; 3.3g protein

Equipment

  • Mixing bowl
  • Electric whisk
  • Baking tray
  • Baking paper or silicone liner
  • Piping bag
  • Star piping tip 

Nutritional disclaimer

Nutrition information is provided as an estimate based on the ingredients used and available in my area (New Zealand). The nutritional information is here to help you understand the recipe; I use MyFitnessPal to generate my estimates. For more accurate nutritional information, please use a nutritional calculator with the ingredients in your area.


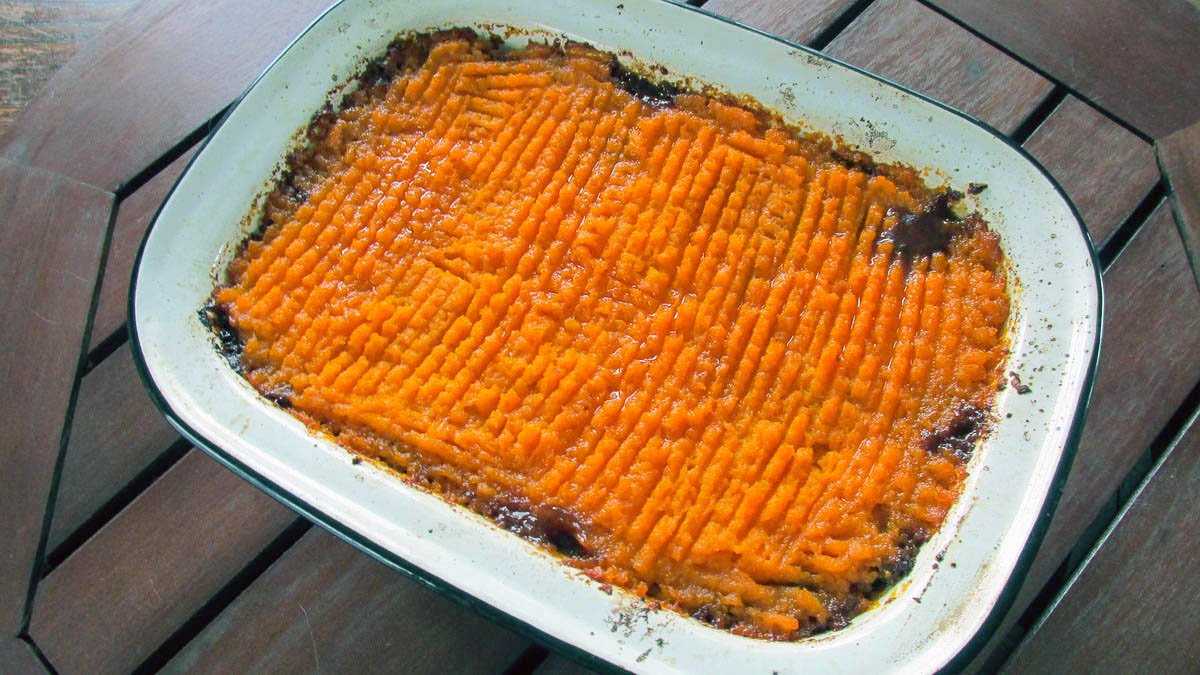
Shepard’s Pie

Freezer meal

Hands up if you are busy. Who is way too tired to get in the kitchen to cook at the end of the day? Definitely not me.

My days are filled with meetings, to-do lists, emails and telling people what to do. By the time I finish work, the last thing I want to do is get stuck into cooking a meal and then cleaning up afterwards. I want to work out and spend some time with Jaime. That is why freezer meals are my favourite solutions to the challenge of a busy life. A few hours on the weekend, and you find yourself with a stack of options for dinner that can be thawed and cooked for a healthy, delicious meal for the family.

Comfort food 

Apparently, being British and growing up with winter warmer meals all year round, you want to share those meals with your kids to make them feel warm and happy in the winter. It helps that my partner grew up with the same comfort foods and loves when I break out a classic. Shepard’s pie is one of our favourite comfort foods, while nowadays I don’t go in for potatoes, that didn’t mean I couldn’t enjoy something I love. To make the traditional recipe for Shepard’s pie a better fit for clean eating, I made a few changes but didn’t take away from the favours.

Shepard’s pie recipe

Ingredients

  • 1 tbsp. olive oil
  • 1 onion, chopped
  • 3 carrots, chopped
  • 500g pack lamb mince
  • 2 tbsp. tomato purée
  • 1 tbsp. Worcestershire sauce
  • 500ml beef stock
  • 900g sweet potatoes, cut into chunks
  • 85g butter
  • 3 tbsp. milk

Heat the oil in a medium frying pan

Add the onion and carrots and cook until they soften.

Turn up the heat on the pan.

Crumble in the lamb mince and brown off the meat.

If you have a lot of fat, pour off the excess.

Add the tomato purée and Worcestershire sauce, and then fry for a few minutes.

Pour over the stock and bring to a simmer.

Cover the pan and keep simmering for 20 minutes when the stock is simmering.

Remove the cover and simmer for another 20 minutes.

Meanwhile, heat the oven to 180 degrees C / 350 degrees F.

Set up a vegetable steamer.

In batches, steam the sweet potatoes chunks until they are tender.

Place the sweet potatoes in a large mixing bowl.

Mash the sweet potatoes with milk and butter to make a smooth mash.

Put the mince into an ovenproof baking dish and spread it out evenly.

Top the mince with the mash and ruffle with a fork.

Bake for 20 minutes or until the top starts to colour and the mince is bubbling through at the edges.

Leave to stand for 5 minutes before serving.

Shepard's pie

  • Rating: ★★★★★
  • Print


Credit: Cath @ easycleaneats 

Ingredients

– 1 tbsp. olive oil – 1 onion, chopped – 3 carrots, chopped – 500g pack lamb mince – 2 tbsp. tomato purée – 1 tbsp. Worcestershire sauce – 500ml beef stock – 900g sweet potatoes, cut into chunks – 85g butter – 3 tbsp. milk

Directions

  1. Heat the oil in a medium frying pan
  2. Add the onion and carrots and cook until they soften.
  3. Turn up the heat on the pan.
  4. Crumble in the lamb mince and brown off the meat.
  5. If you have a lot of fat, pour off the excess.
  6. Add the tomato purée and Worcestershire sauce, and then fry for a few minutes.
  7. Pour over the stock and bring to a simmer.
  8. Cover the pan and keep simmering for 20 minutes when the stock is simmering.
  9. Remove the cover and simmer for another 20 minutes.
  10. Meanwhile, heat the oven to 180 degrees C / 350 degrees F.
  11. Set up a vegetable steamer.
  12. In batches, steam the sweet potatoes chunks until they are tender.
  13. Place the sweet potatoes in a large mixing bowl.
  14. Mash the sweet potatoes with milk and butter to make a smooth mash.
  15. Put the mince into an ovenproof baking dish and spread it out evenly.
  16. Top the mince with the mash and ruffle with a fork.
  17. Bake for 20 minutes or until the top starts to colour and the mince is bubbling through at the edges.
  18. Leave to stand for 5 minutes before serving.

Nutrition

Per Serving: 399 calories; 25.5g fat; 27.5g carbohydrates; 14.7g protein

Equipment

  • Knife
  • Chopping board
  • Saucepan
  • Wooden spoon
  • Vegetable steamer
  • Potato masher or fork
  • Baking dish

Nutritional disclaimer

Nutrition information is provided as an estimate based on the ingredients used and available in my area (New Zealand). The nutritional information is here to help you understand the recipe; I use MyFitnessPal to generate my estimates. For more accurate nutritional information, please use a nutritional calculator with the ingredients in your area.


Cottage Pie

Master the basics

Eating clean gets a lot easier once you have mastered a few essential recipes. This recipe is basic, not like basic unicorn basic, more like beard and flannel basic. Back to the point (which isn’t Unstable unicorns), having basic skills and recipes in your arsenal means you will never be left with only UberEats as your weeknight options. Once you master this recipe, the possibilities are endless. 

A fresh spin on a classic

The traditional cottage pie was a way to use leftover roasted meat from the Sunday dinner and topping the pie with mashed potato to make the leftovers go a little further. Obviously, the person who first came up with the cottage pie didn’t have a hungry family like mine to feed; having leftover meat does not happen in my house often. My version of cottage pie comes with a big helping of beef mince to keep my hungry boys happy.

Lower carbs big flavour

I wanted to make a lower-carb version of the traditional cottage pie by swapping out the mashed potatoes for mashed cauliflower. The cauliflower mash is a great way to reduce carbs without trading off on flavour. 

Cottage pie recipe

Ingredients

  • 750g minced beef
  • 2 tsp. oil
  • 1 onion, finely chopped
  • 1 carrot, finely diced
  • 1 celery stick, finely chopped
  • 1/4 cup tomato sauce
  • 2 tsp. Worcestershire
  • Freshly ground pepper
  • 1 tbsp. butter, melted
  • 1 head cauliflower
  • 2 cups vegetables to serve

Preheat the oven to 180 degrees C/ 350 degrees F.

In a large frying pan, heat the oil over medium-high heat.

Add the onion, carrot and celery to the pan, cook for 5 to 7 minutes or until tender.

Make sure to stir the vegetables often.

Add the mince to the pan and cook for a further 5 minutes or until mince is browned, stir regularly to break up the mince.

Reduce heat to medium-low, add the sauces, and season to taste.

Cover the pan and simmer for 15 minutes.

Remove the mix from the heat and set to one side.

To make your mash topping, chop the cauliflower into chunks and place in a steamer*

Steam the cauliflower until it is tender, remove from the heat and allow it cool a little.

Use a food processor to blend down the cauliflower with the butter until you get a smooth consistency.

Spoon the meat mixture into a large baking dish and top with the cauliflower mash.

Bake for 20 to 25 minutes or until piping hot and the mash is golden.

  • Servings: “6
  • Rating: ★★★★★
  • Print

“A


Credit: Cath @ easycleaneats

Ingredients

  • 750g minced beef
  • 2 tsp. oil
  • 1 onion, finely chopped
  • 1 carrot, finely diced
  • 1 celery stick, finely chopped
  • 1/4 cup tomato sauce
  • 2 tsp. Worcestershire
  • Freshly ground pepper
  • 1 tbsp. butter, melted
  • 1 head cauliflower
  • 2 cups vegetables to serve

Directions

  1. Preheat the oven to 180 degrees C/ 350 degrees F.
  2. In a large frying pan, heat the oil over medium-high heat.
  3. Add the onion, carrot and celery to the pan, cook for 5 to 7 minutes or until tender.
  4. Make sure to stir the vegetables often.
  5. Add the mince to the pan and cook for a further 5 minutes or until mince is browned, stir regularly to break up the mince.
  6. Reduce heat to medium-low, add the sauces, and season to taste.
  7. Cover the pan and simmer for 15 minutes.
  8. Remove the mix from the heat and set to one side.
  9. To make your mash topping, chop the cauliflower into chunks and place in a steamer*
  10. Steam the cauliflower until it is tender, remove from the heat and allow it cool a little.
  11. Use a food processor to blend down the cauliflower with the butter until you get a smooth consistency.
  12. Spoon the meat mixture into a large baking dish and top with the cauliflower mash.
  13. Bake for 20 to 25 minutes or until piping hot and the mash is golden.
  14. *if you don’t have a steamer, you can use a colander over the top of a pan of boiling water

Nutrition

Per Serving:249 calories; 10.1 g fat; 1.1 g carbohydrates; 20.1 g protein

Equipment

  • Frying pan
  • Wooden spoon
  • Vegetable steamer
  • Tongs
  • Food processor
  • Spatula
  • Baking dish 

Nutritional disclaimer

Nutrition information is provided as an estimate based on the ingredients used and available in my area (New Zealand). The nutritional information is here to help you understand the recipe; I use MyFitnessPal to generate my estimates. For more accurate nutritional information, please use a nutritional calculator with the ingredients in your area.


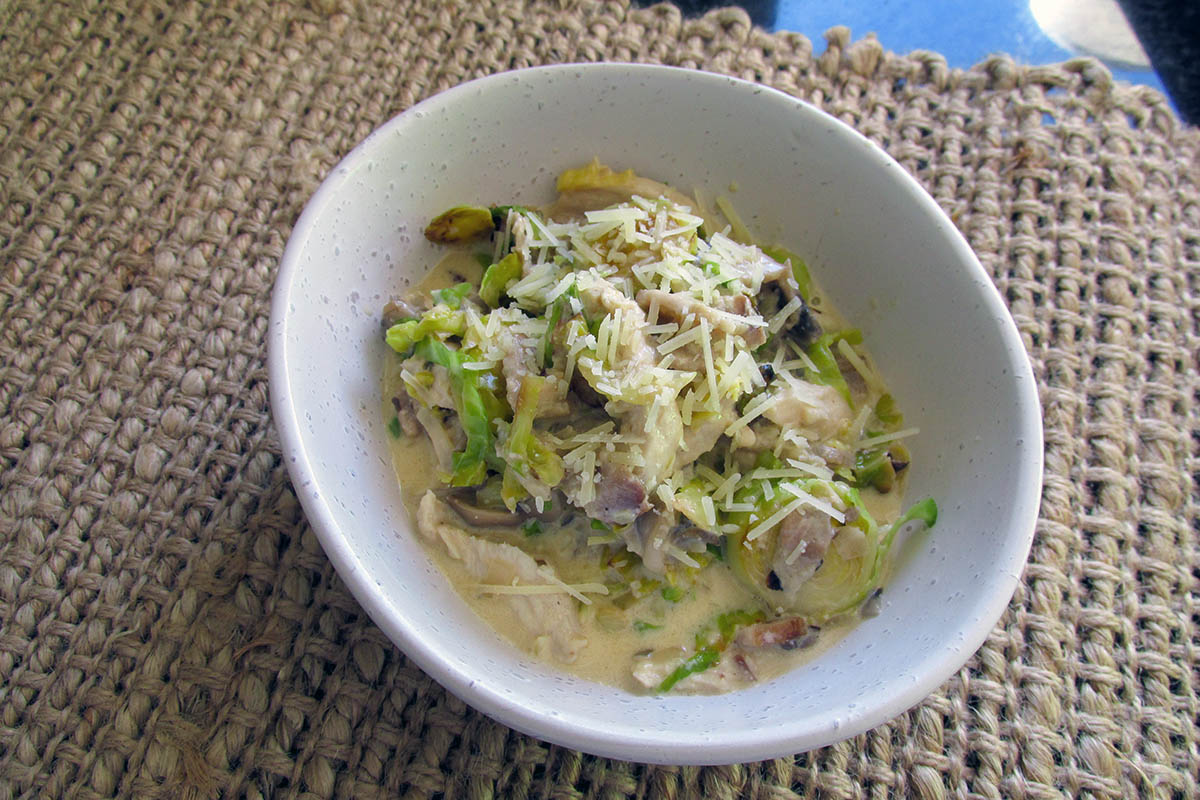
Brussels sprout carbonara

The only reason I like winter 

I’m serious, Brussels sprouts are the only thing I like about winter. I hate the cold; I hate the rain and the wind and the shorter days, sprouts are the only highlight of the season for me. 

Brussels Sprouts are hands down my favourite vegetables; I would have them every day. Sadly, I can’t have them every day, so I just have to make the most of them when they are in season. 

Brussels sprout carbonara

What could be better? 

I like Brussels Sprouts on their own, but if I can sneak them into a meal, I like it more. In my world the combination of Brussels Sprouts and carbonara sauce are perfect. The saltiness of the bacon with the creaminess of the sauce and caramelised Brussels Sprouts make a complete meal. If you don’t like Brussels Sprouts but are willing to give it another go, I would highly recommend you give this recipe a go. 

Brussels sprout carbonara recipe 

Brussels sprout carbonara ingredients

Ingredients

  • 2 eggs
  • 1 cup cream
  • 3/4 cup parmesan cheese, grated
  • 300g mushrooms, sliced
  • 1 cup bacon, chopped
  • 2 garlic cloves, crushed
  • 2 shallots, finely chopped
  • 300g Brussels sprouts, shredded
  • 300g chicken breast, sliced
  • Salt and pepper to taste

Instructions

Take a large bowl and add the eggs.

Take a large bowl and add the eggs

Add the cream and whisk.

Add the cream
Add the cream

Add the salt and pepper and whisk.

Add the salt and pepper and whisk
Add the salt and pepper

Add the parmesan to the eggs and cream.

Add the parmesan to the eggs and cream.

Take a large non-stick pan over a medium heated.

Take a large non-stick pan over a medium heated.

Sauté the bacon.

Sauté the bacon
Sauté the bacon 

Add the shallots to the bacon.

Add the shallots to the bacon

Sauté until the shallots start to colour.

Sauté until the shallots start to colour.

Add the mushrooms to the pan.

Add the mushrooms to the pan and cook for around 3 minutes.

Cook for around 3 minutes.

Add the mushrooms to the pan and cook for around 3 minutes.

Add the garlic to the pan and cook for another minute.

Add the garlic to the pan and cook for another minute.

Transfer the mix to a bowl and set it to one side.

Transfer the mix to a bowl and set it to one side.

Cook the chicken in the pan the bacon was cooked in.

Cook the chicken in the pan the bacon was cooked in.

Keep the chicken moving as it cooks.

Cook the chicken in the pan the bacon was cooked in.

Make sure to cook the chicken through.

Cook the chicken in the pan the bacon was cooked in.

When the chicken is cooked, add the bacon and mushroom mixture back to the pan.

While the chicken is cooking start cooking the sprouts.

When you have cooked the sprouts add them to the pan with the chicken and bacon mixture.

When you have cooked the sprouts add them to the pan with the chicken and bacon mixture.

Mix well.

Mix well
Mix well

Add the cream and egg mixture to the pan and turn off the heat.

Add the cream and egg mixture to the pan and turn off the heat.

Mix well to coat all of the chicken and sprouts in the sauce.

Mix well to coat all of the chicken and sprouts in the sauce.

Serve while hot.

Serve while hot.
Serve while hot.

Brussels sprout carbonara 

  • Servings: 4
  • Rating: ★★★★★
  • Print

A winter take on the classic Italian dish


Credit: Cath @ easycleaneats

Ingredients

  • 2 eggs 
  • 1 cup cream 
  • 3/4 cups parmesan cheese 
  • 1/4 cup loosely packed basil, chopped 
  • 85g bacon, diced 
  • 2 garlic, cloves crushed
  • 1/4 cup shallots, chopped
  • 300g Brussels sprouts, shredded 
  • salt 
  • fresh black pepper, to taste 

Directions

  1. Take a large mixing bowl whisk together the eggs and cream with the salt and pepper.
  2. Take a large non-stick pan over a medium heated.
  3. Sauté the bacon and shallots until the bacon is starting to colour
  4. Add the mushrooms to the pan and cook for around 3 minutes.
  5. Add the garlic to the pan and cook for another minute.
  6. Transfer the mix to a bowl and set it to one side.
  7. Cook the chicken in the pan the bacon was cooked in.
  8. When the chicken is cooked, add the bacon and mushroom mix back to the pan.
  9. While the chicken is cooking start cooking the sprouts.
  10. In a pan over high heat melt a little coconut oil.
  11. When the pan is hot, add the shredded Brussels sprouts.
  12. Keep the sprouts moving in the pan, so they do not burn.
  13. You want the sprouts to develop a deep caramel colour. 
  14. When you have cooked the sprouts add them to the pan with the chicken and bacon mixture.
  15. Add the cream and egg mixture to the pan and turn off the heat.
  16. Mix well to coat all of the chicken and sprouts in the sauce.
  17. Serve while hot.

Nutrition

Per Serving: 442 calories; 35 g fat; 13 g carbohydrates; 22 g protein

Equipment 

  • Bowl 
  • Non-stick pan 
  • Whisk 
  • Wooden spoon 
  • Measuring cups
  • Scales 
  • Knife
  • Chopping board

Nutritional disclaimer

Nutrition information is provided as an estimate based on the ingredients used and available in my area (New Zealand). The nutritional information is here to help you understand the recipe; I use MyFitnessPal to generate my estimates. For more accurate nutritional information, please use a nutritional calculator with the ingredients in your area.


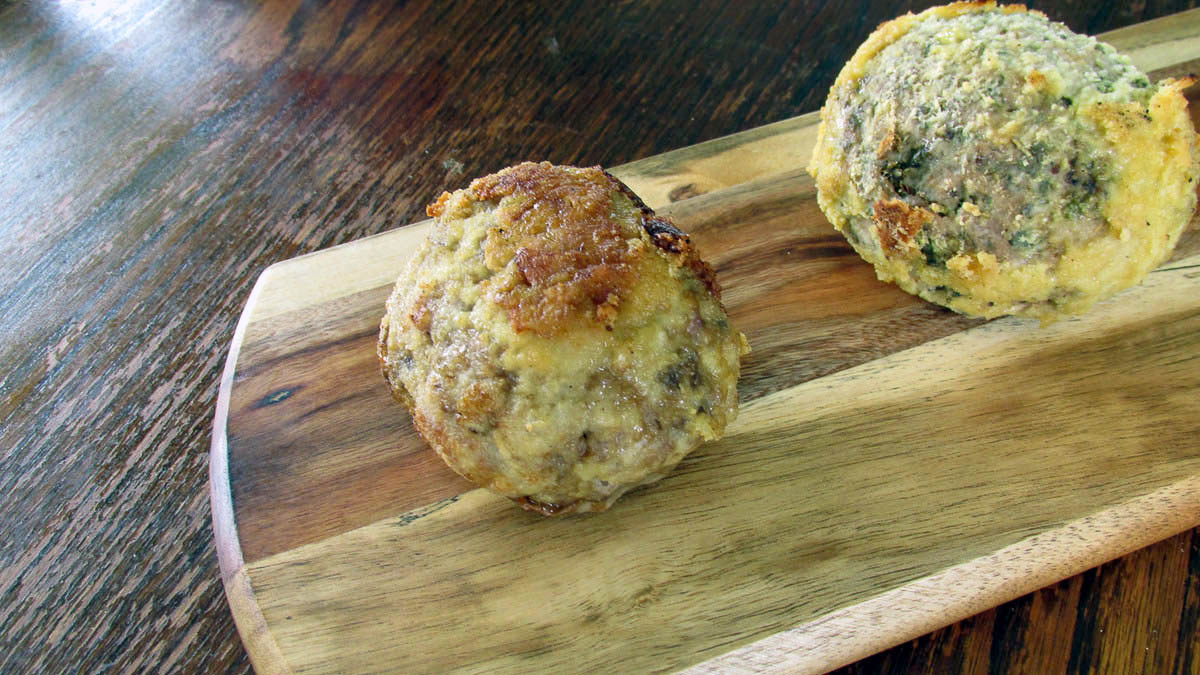
Scotch Eggs

It may surprise you to learn that Scotch eggs aren’t Scottish at all; they are actually English. The traditional Scotch egg is made with sausage meat, coated in breadcrumb and deep-fried until they are crisp on the outside. While I don’t have anything against a deep-fried meal, I was never a fan of the sausage meat that was probably mostly sawdust and the eggs with that horrible sulphur ring; no, thank you.

A new take

I decided to try something a bit different and develop a clean eating take on the traditional recipe. As ever when coming up with clean eating, there are challenges to developing a recipe that tastes great and isn’t awful for you.

Challenges to overcome

The first challenge was getting the perfect boiled egg; the trick is cooking the eggs enough to cook the egg white without overcooking the yolk. For Scotch eggs, go for a slightly runny yolk; this will give you a perfect yolk when the egg is baked. The next challenge is getting the meat to pack a flavour punch. I love having access to good quality pork; thankfully, it isn’t hard to get free-range pork here in Auckland. I find that free-range pork has far more flavour than high intensity farmed meat; it is always best for taste. The right blend of garlic, sage and Worcestershire sauce gives the meat a real step up in flavour. Finally, getting a nice crispy coating that isn’t deep-fried, I find that coconut flour and egg coating is a great alternative to breadcrumbs, and you don’t have to deep-fry it to make it crispy. 

Instant pot

I recently purchased an Instant Pot duo crisp which is a slow cooker, pressure cooker and air fryer, plus more all in one. The last time I made up some Scotch eggs, I decided to bake them in the Instant Pot rather than putting them in the oven. I love the versatility of the Instant Pot, and it is quickly becoming my favourite kitchen appliance.

Scotch egg recipe

Ingredients

  • 4 eggs hard boiled and peeled
  • 500g minced pork
  • 1 tsp. garlic powder
  • 1 tbsp. dried sage
  • 1 tsp. Worcestershire sauce
  • salt and pepper
  • 1 cup coconut flour
  • 2 eggs, beaten
In a bowl add the garlic powder and sage.
Add the pork mince and Worcestershire sauce.
Mix everything together well.
Take a portion of meat and flatten it in between your hands to make a meat patty
Take a portion of meat and flatten it in between your hands to make a meat patty.
Place a boiled egg in the middle
Place a boiled egg in the middle.
Form the meat around the egg.
Make sure the meat completely covers the egg.
Repeat with the remaining meat and eggs.
In another bowl beat the two remaining eggs. Place the flour on a plate and season it with some salt and pepper then mix.
If you are using an Instant Pot place the wire rack inside the pot and put the coated eggs on the rack.
Spread out the eggs in the pot,
Bake for 15 minutes
Bake for 15 minutes
Scotch eggs sliced and ready to eat.

Scotch eggs

  • Servings: 4
  • Rating: ★★★★★
  • Print

This grain free version of Scotch eggs is perfect for protein packed snacking or a trying something different for lunch.


Credit: Cath @ easycleaneats

Ingredients

  • 4 eggs hard boiled and peeled
  • 500g minced pork
  • 1 tsp. garlic powder
  • 1 tbsp. dried sage
  • 1 tsp. Worcestershire sauce
  • salt and pepper
  • 1 cup coconut flour
  • 2 eggs, beaten

Directions

  1. Make four perfect boiled eggs. 
  2. Peel the four eggs and set them to one side.
  3. In a bowl mix the pork mince, garlic powder, sage and Worcestershire sauce.
  4. In another bowl beat the two remaining eggs. 
  5. Place the flour on a plate and season it with some salt and pepper then mix.
  6. Take the meat and divide it into four portions.
  7. Take a portion of meat and flatten it in between your hands to make a meat patty.
  8. Place a boiled egg in the middle of the meat.
  9. Form the meat around the egg.
  10. Make sure the egg is completely covered.by the meat.
  11. Repeat with the remaining eggs.
  12. When the eggs are done start to dip and coat them.
  13. Dip the meat covered egg in the beaten eggs.
  14. Then roll the egg in the coconut flour, be sure the egg is completely coated.
  15. Repeat with the remaining meat and eggs.
  16. If you are going to oven bake your Scotch eggs I recommend frying them off first.
  17. Heat a frying pan and a little olive oil, over a medium heat.
  18. Fry off the meat until it is browned all over.
  19. Transfer the eggs to a baking tray lined with baking paper or a silicone liner.
  20. Bake in a preheated oven at 175 degrees C/ 350 degrees F for 15-20 minutes.
  21. Serve warm or cold.

Nutrition

Per Serving: 371 calories; 14.6 g fat; 18 g carbohydrates; 38.9 g protein

Equipment

  • Saucepan
  • Slotted spoon
  • Mixing bowl x2
  • Plate
  • Frying pan
  • Tongs
  • Baking tray
  • Baking paper or silicone liner

Nutritional disclaimer

Nutrition information is provided as an estimate based on the ingredients used and available in my area (New Zealand). The nutritional information is here to help you understand the recipe; I use MyFitnessPal to generate my estimates. For more accurate nutritional information, please use a nutritional calculator with the ingredients in your area.