Earlier in 2021, I made a move to relocate and update my website. I’ve been making changes and improving all of the things as I go. This recipe is one of the many things I’ve tried to make better.
Protein in a small package
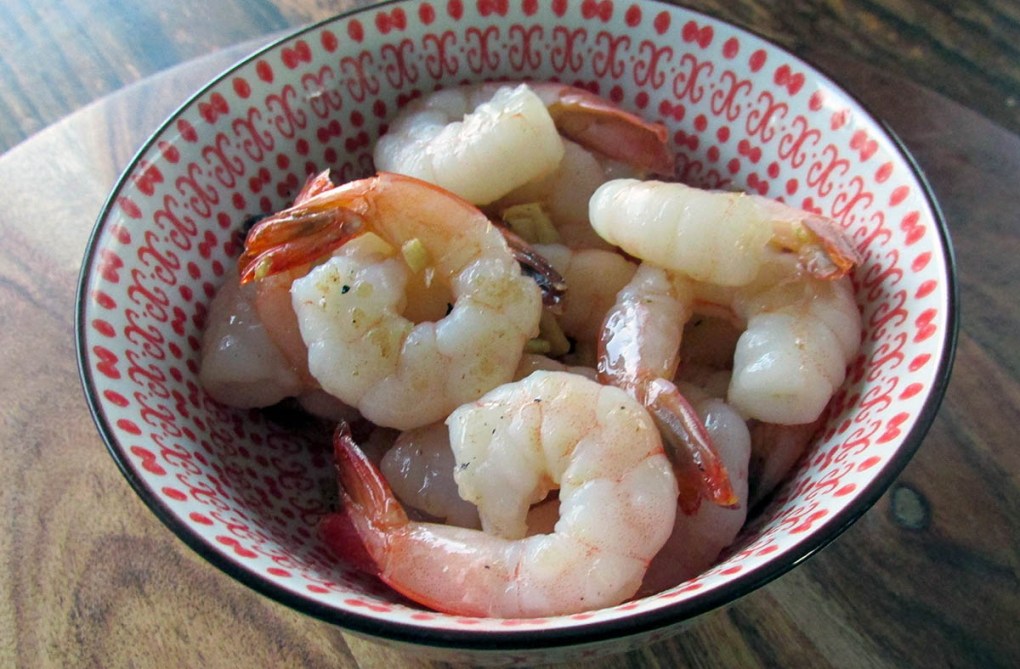
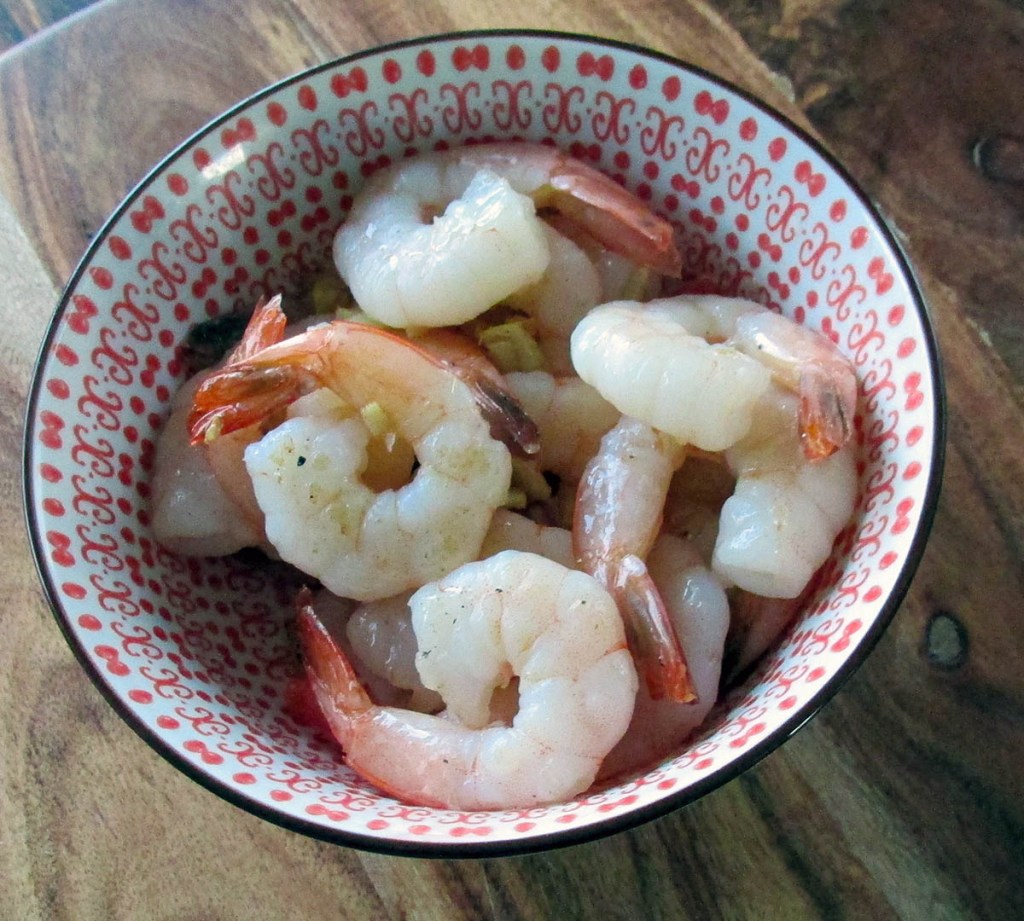
I like prawns; they are small, tasty and simple to make. I like to get a package of prawns to cook up and to have on hand as an easy protein portion that can be added to meals like salads or stir-frys. I like to cook the prawns all at once and portion them out; this means I can have protein in the fridge or the freezer. Prawns last about three days cooked in the fridge, which is excellent when you have an abundance of salad.
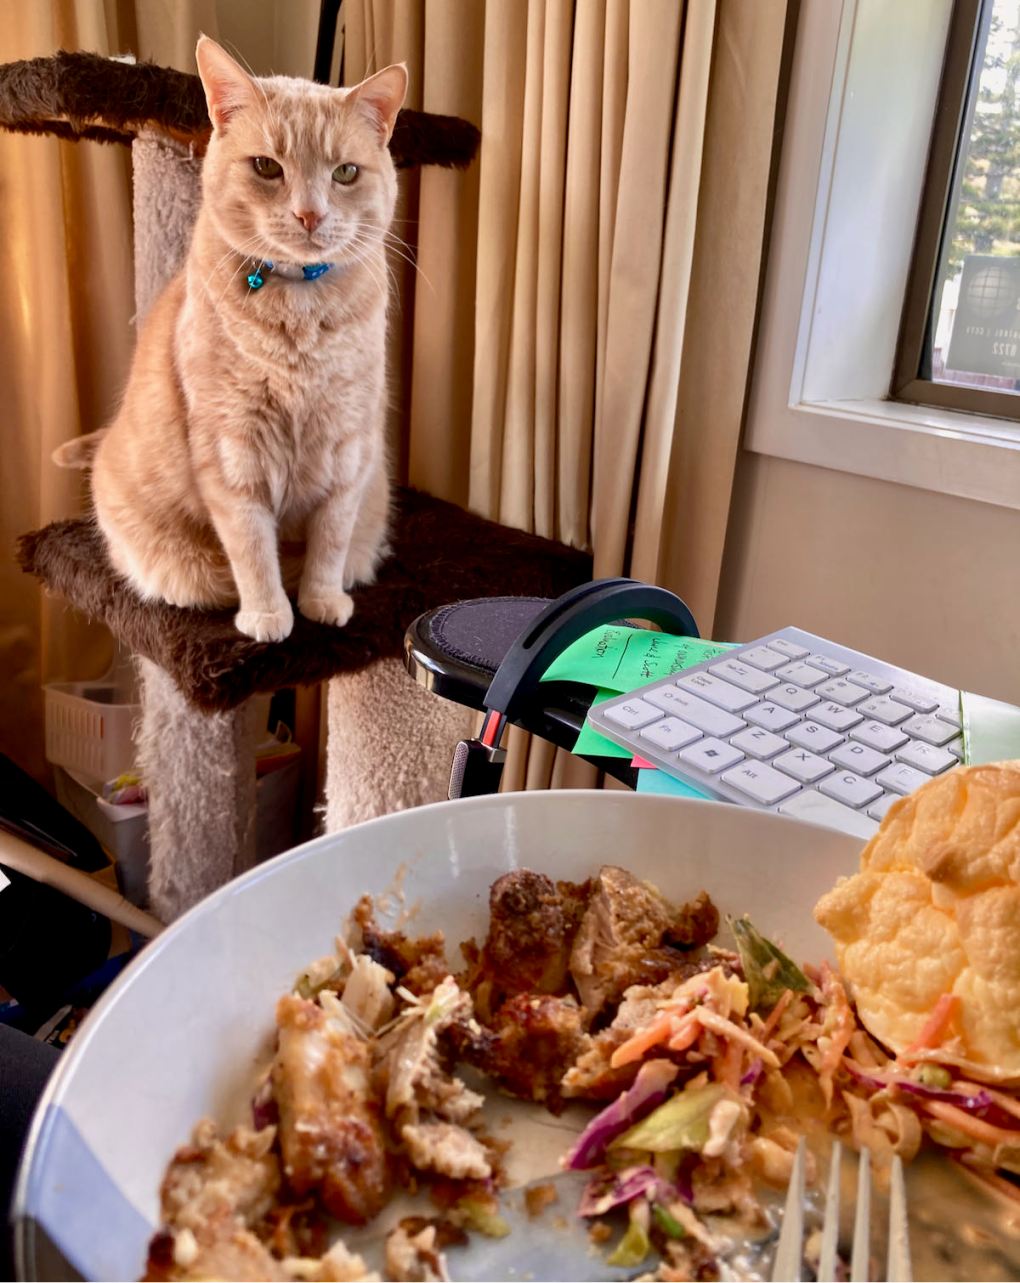
Competition for dinner
Prawns are a favourite of more than just me; my fur baby is a big fan of prawns and loves it when we have them around. Don’t believe me? Check out the face before I even open the bag.
Seared ginger prawns recipe
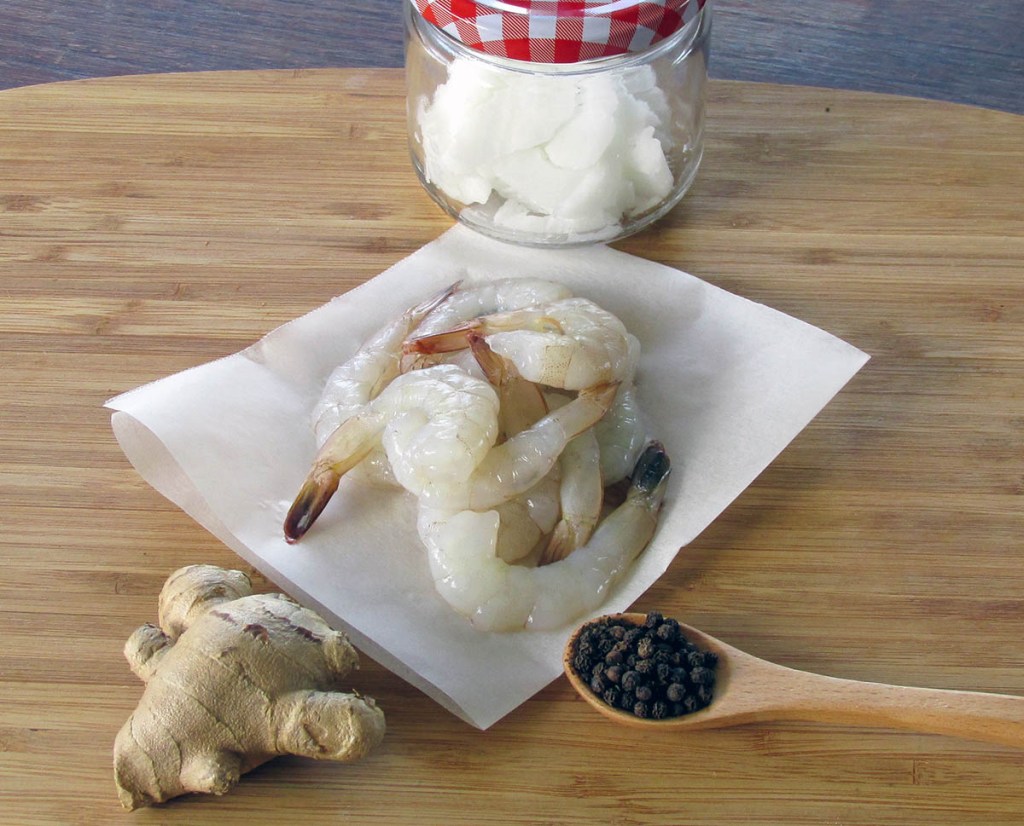
Ingredients
500g prawns
4 tbsp. olive oil
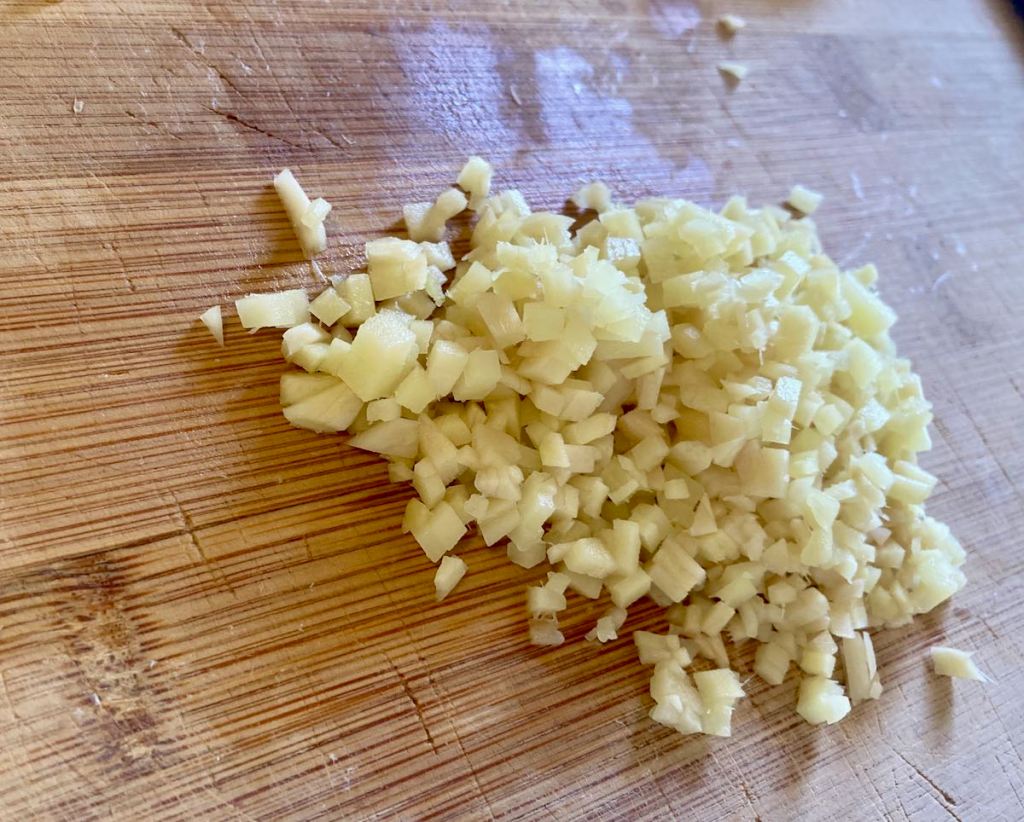
3 cm piece of ginger, thinly sliced
Pinch ground black pepper
Peel the prawns by first removing the head and legs.
Peel off the shell, then squeeze the prawn’s tail to remove it from the body.
Pull the vein through the opening at the head of the prawn and discard.
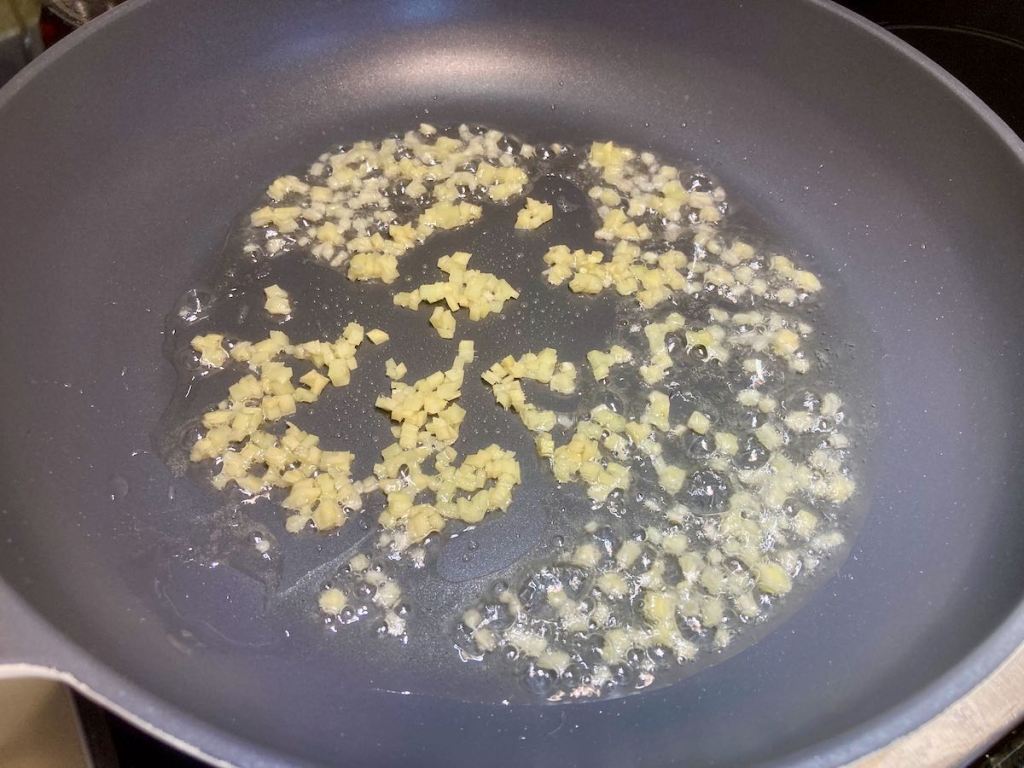
Place a frying pan on medium-high heat with olive oil and ginger.
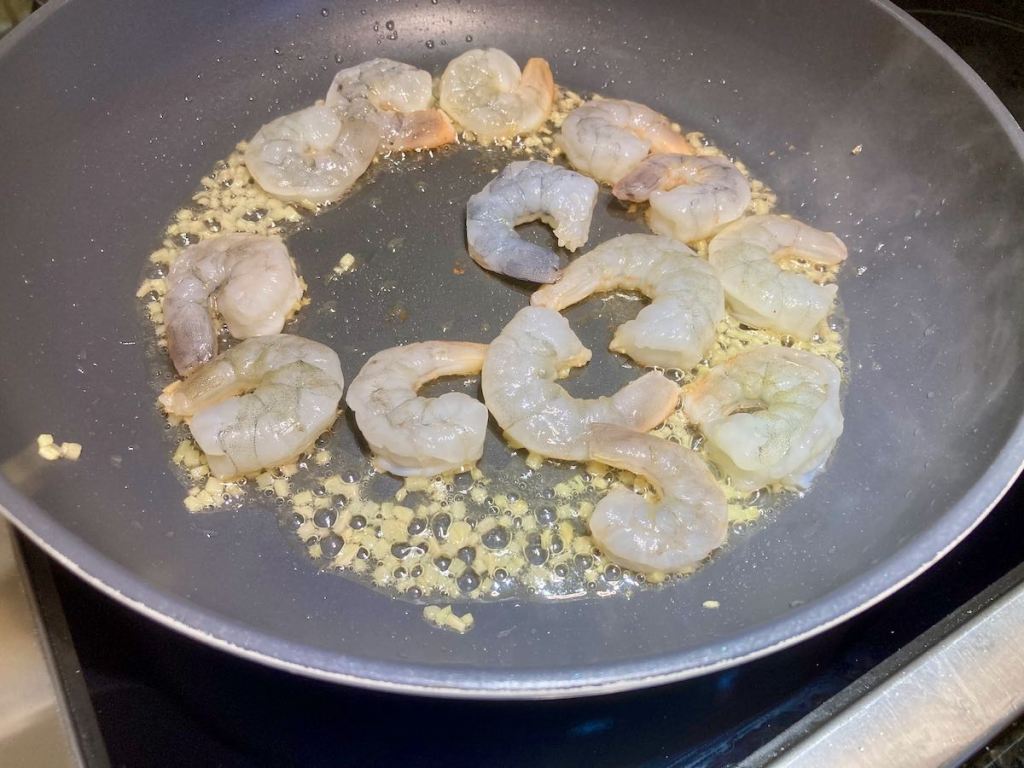
When the ginger starts to colour, add the prawns to the pan.
Be careful not to burn the ginger.
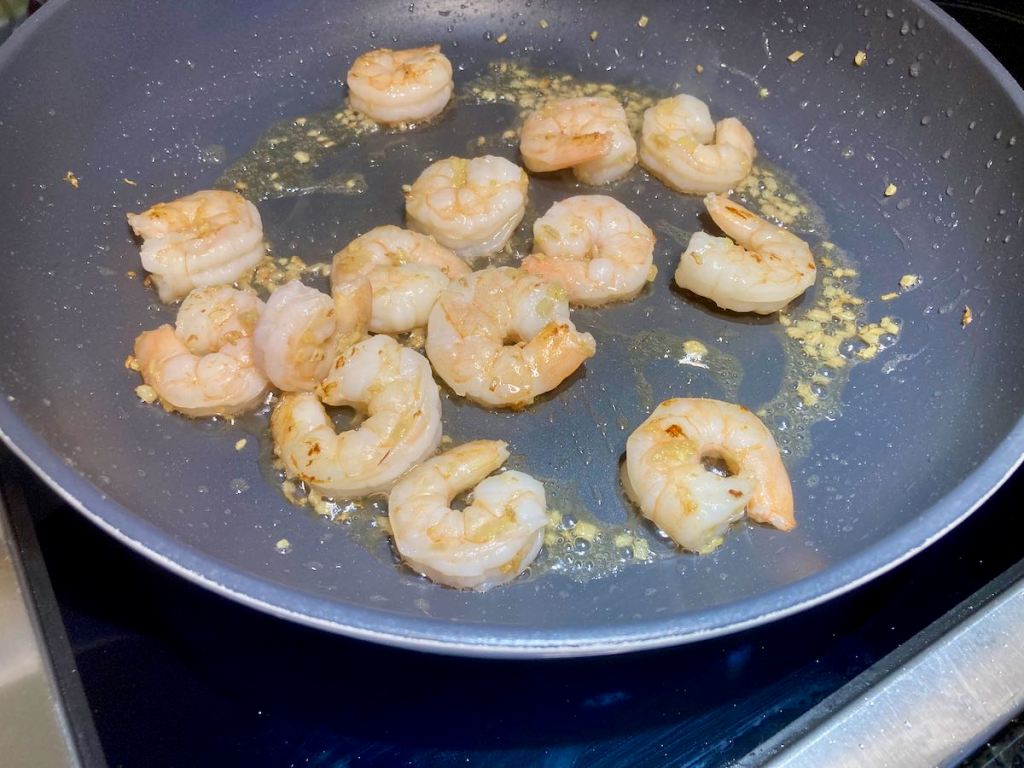
Cook the prawns for 5-6 minutes or until the prawns are cooked.
Peel the prawns by first removing the head and legs.
Peel off the shell, then squeeze the prawn’s tail to remove it from the body.
Pull the vein through the opening at the head of the prawn and discard.
Place a frying pan on medium-high heat with olive oil and ginger.
When the ginger starts to colour, add the prawns to the pan.
Be careful not to burn the ginger.
Cook the prawns for 5-6 minutes or until the prawns are cooked.
Remove the prawns from the pan.
Season with black pepper to serve.
Nutrition
Per Serving:272 calories; 14 g fat; 2 g carbohydrates; 29 g protein
Equipment
Knife
Chopping board
Measuring cups
Scales
Mixing bowl
Frying pan
Tongs
Nutritional disclaimer
Nutrition information is provided as an estimate based on the ingredients used and available in my area (New Zealand). The nutritional information is here to help you understand the recipe; I use MyFitnessPal to generate my estimates. For more accurate nutritional information, please use a nutritional calculator with the ingredients in your area.
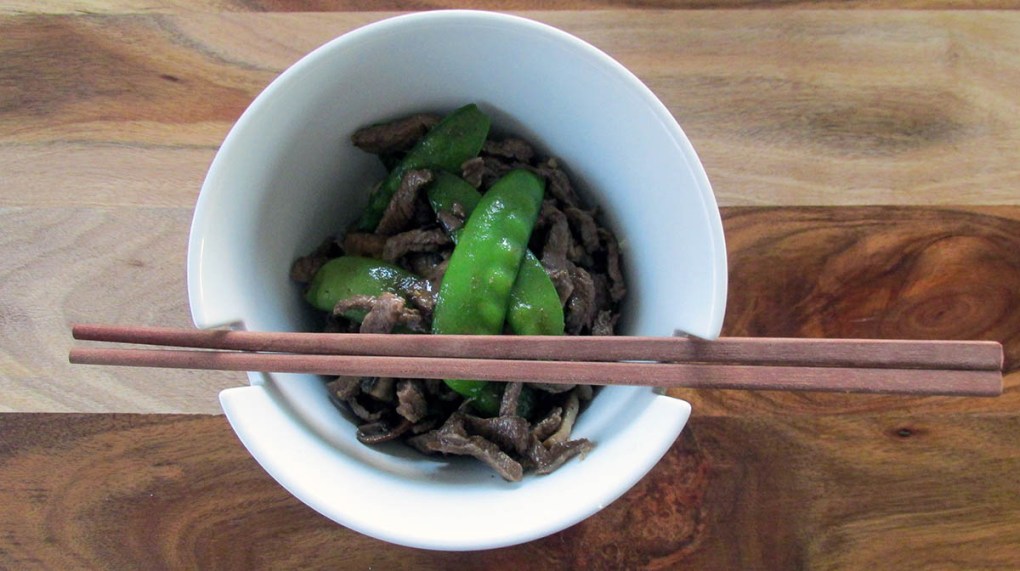
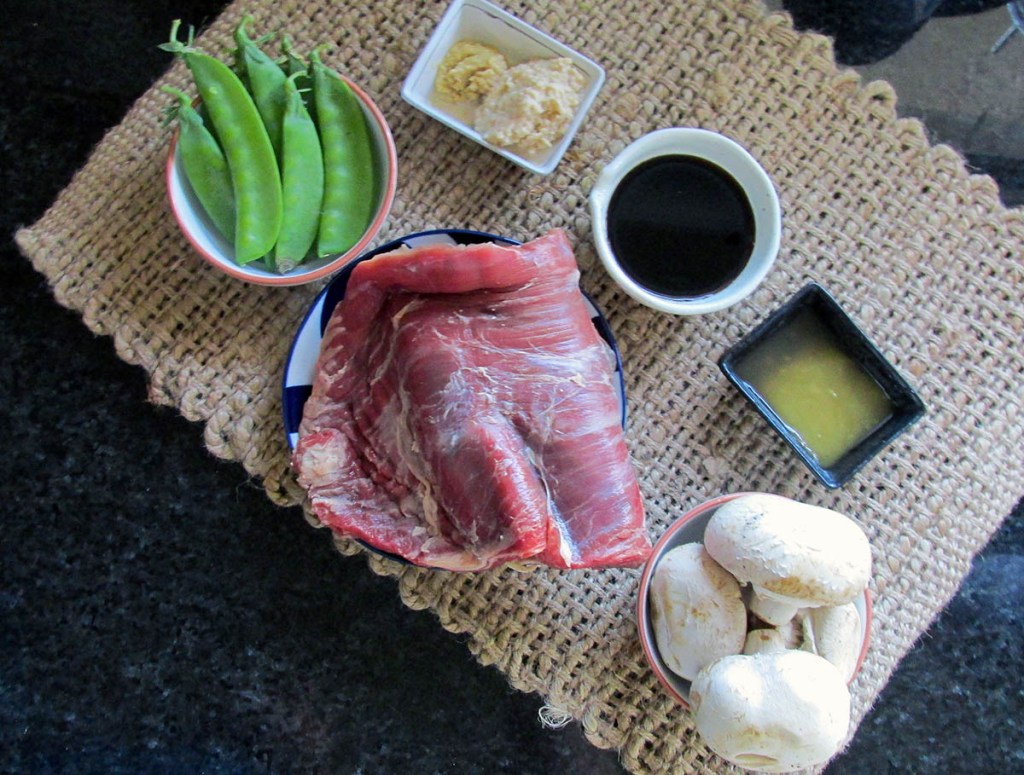
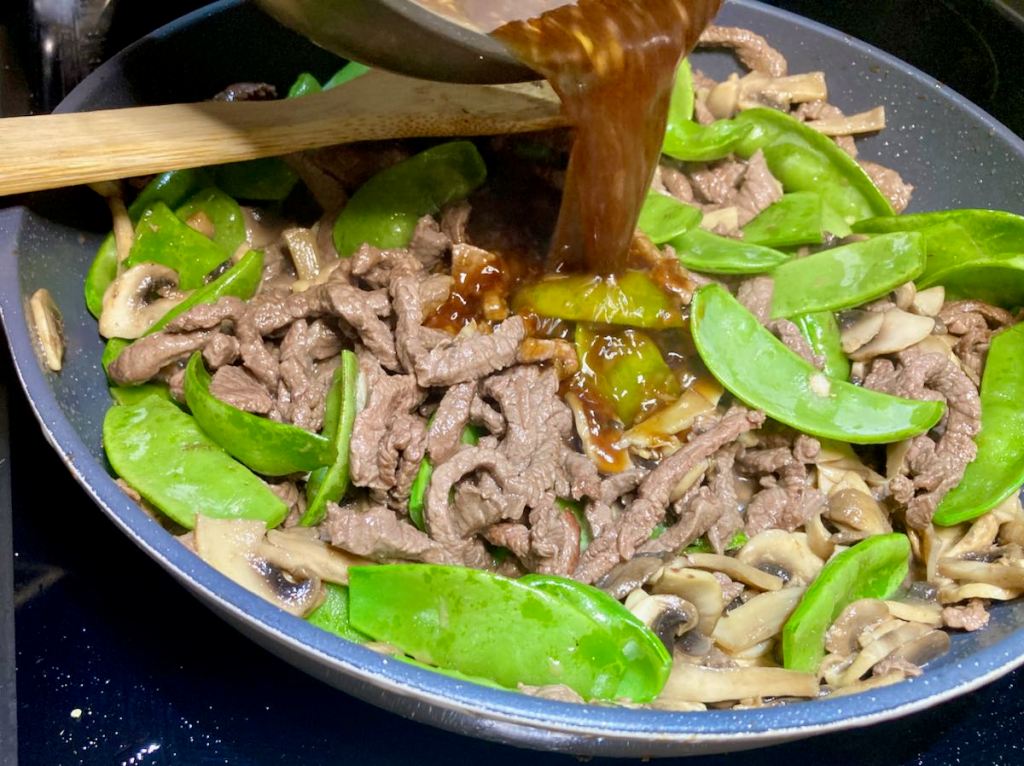
During the summer months, my mother in law has a little veg patch in her garden that keeps the family in spinach, silverbeet, cucumbers, beans, snow peas and spaghetti squash. Some years the haul from the garden is better than others, this year has been very dry, so we have had far less to eat from the garden. The snow peas have been small and kind of dry until recently, which is a shame because I do love them. last week we got a reasonable haul of snow peas to come home with, not wanting to waste the sweet crisp freshness of the snow peas I decided a tasty beef stir-fry would make the best use of the little green treats.
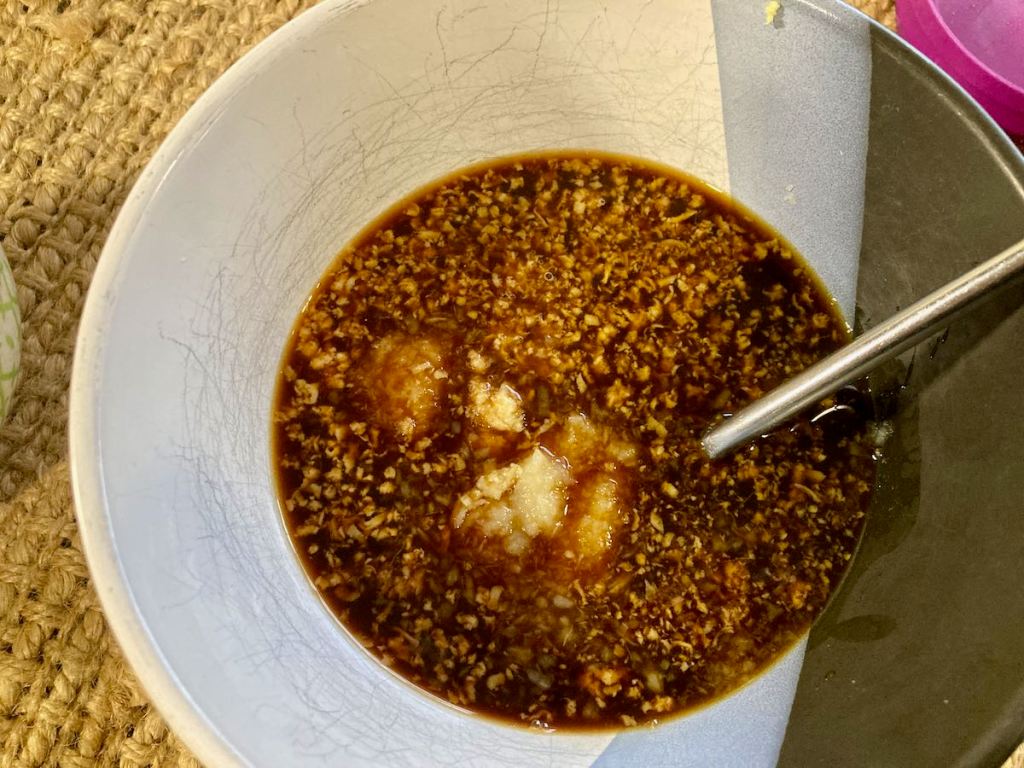
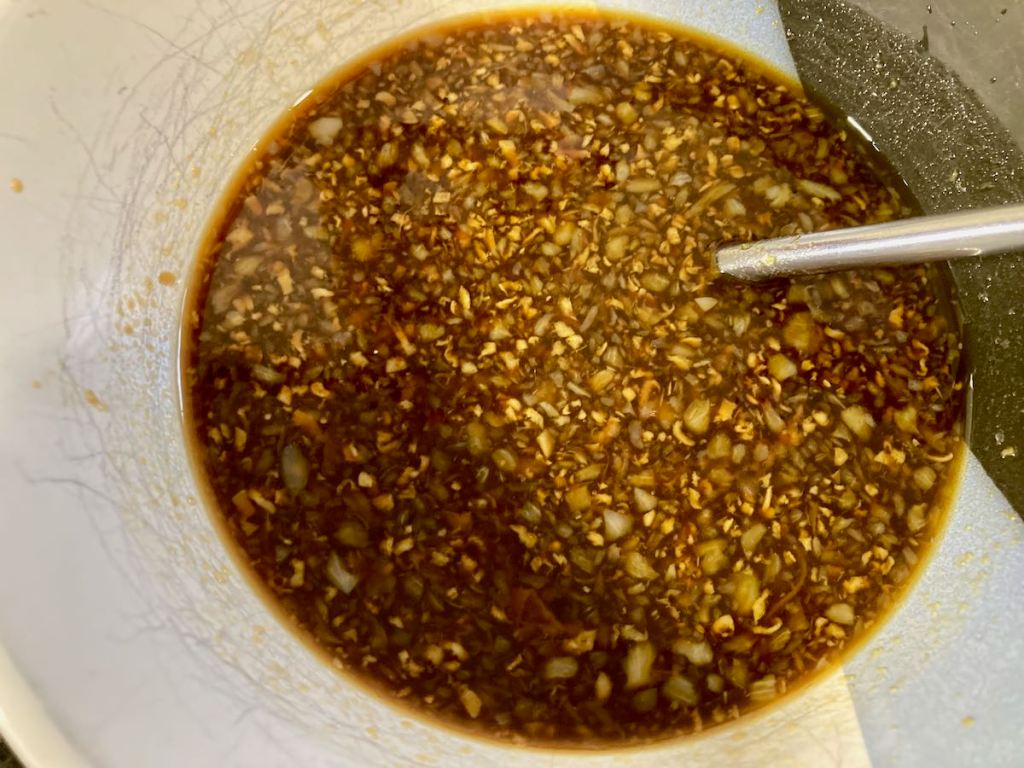
In a bowl, whisk together the coconut aminos, honey, garlic cloves, ginger, and vinegar then set aside.
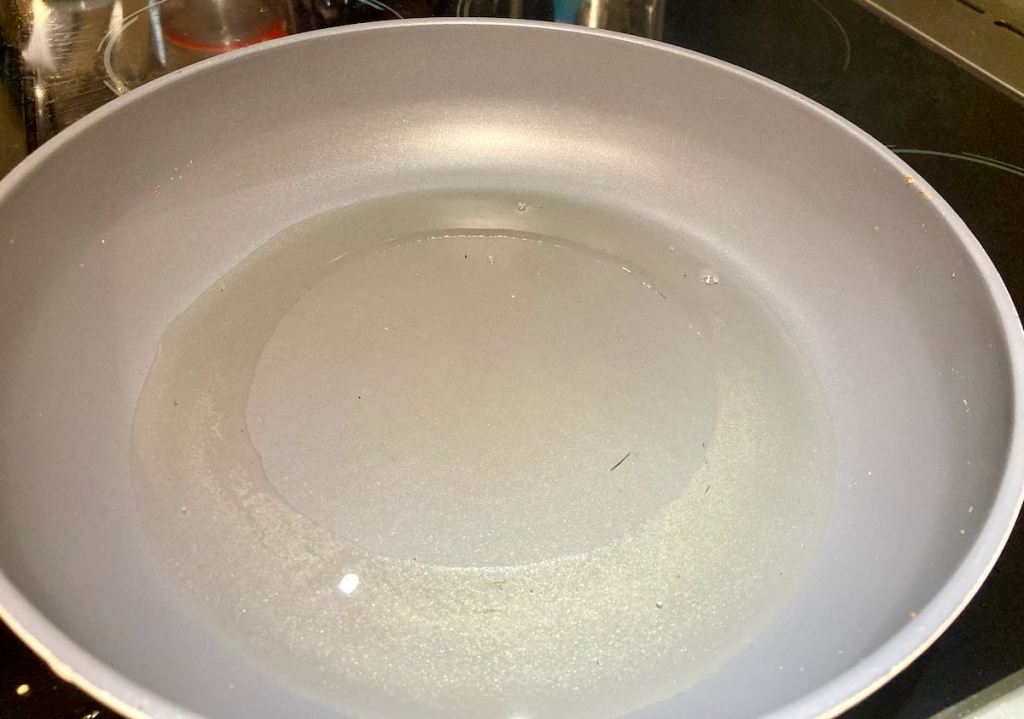
Heat a wok or large frying pan, add two tablespoons of sunflower oil when you add the oil it should be smoking hot.
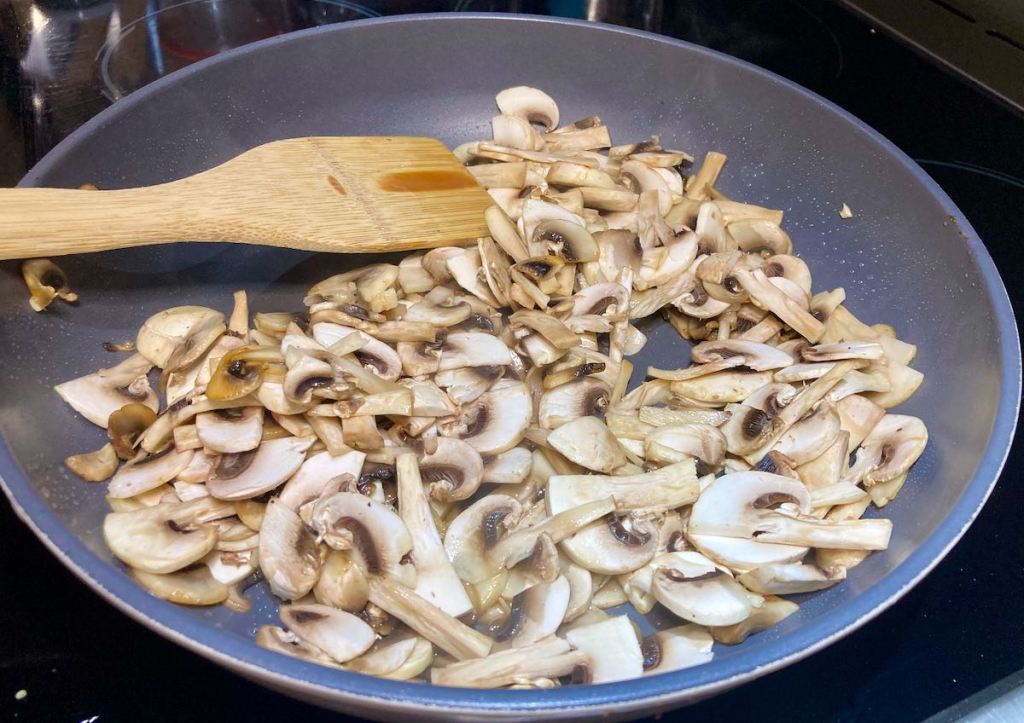
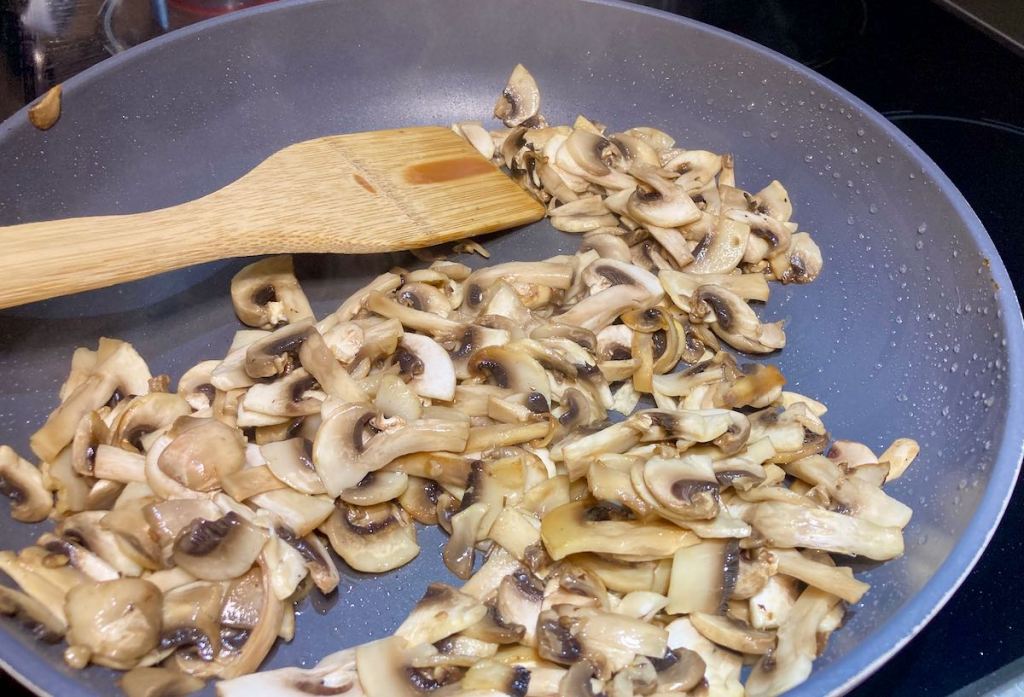
Add the sliced mushrooms to the wok and cook them on a high heat, occasionally stirring, when they start to brown remove them from the pan and set them to one side.
Return the wok to the heat, add the remaining sunflower oil.
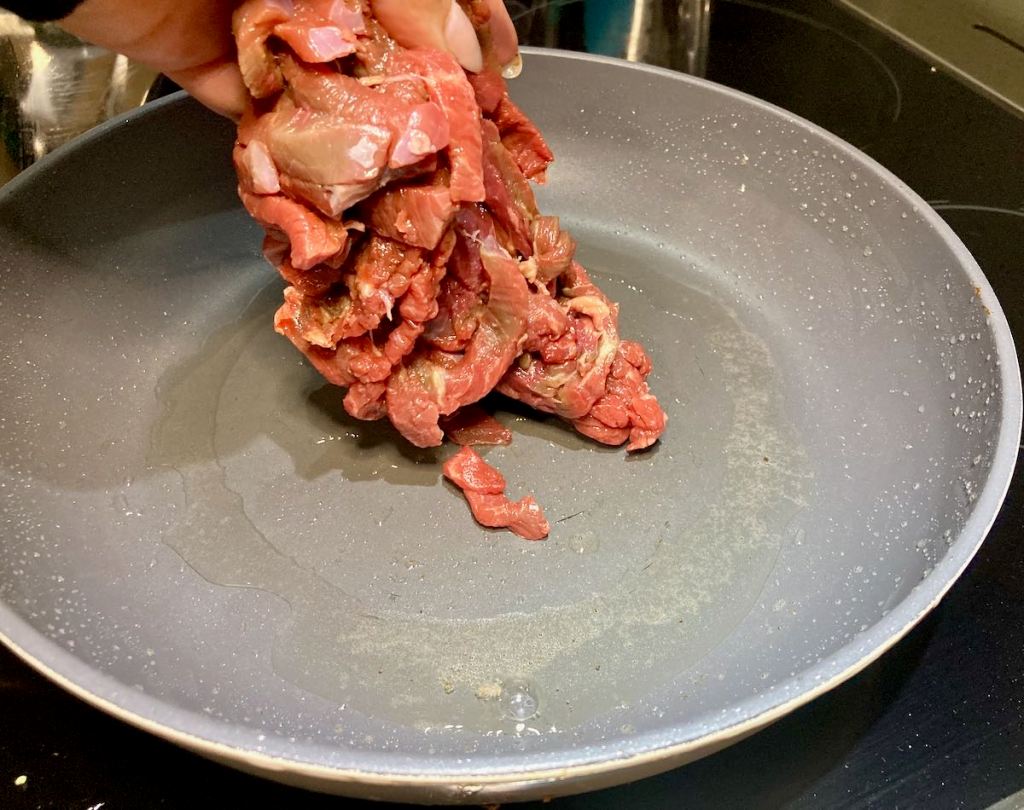
Add half of the beef to the pan.
Stir the meat and cook it until it is browned, remove the cooked meat from the pan and set to one side.
Repeat with the remainder of the meat.
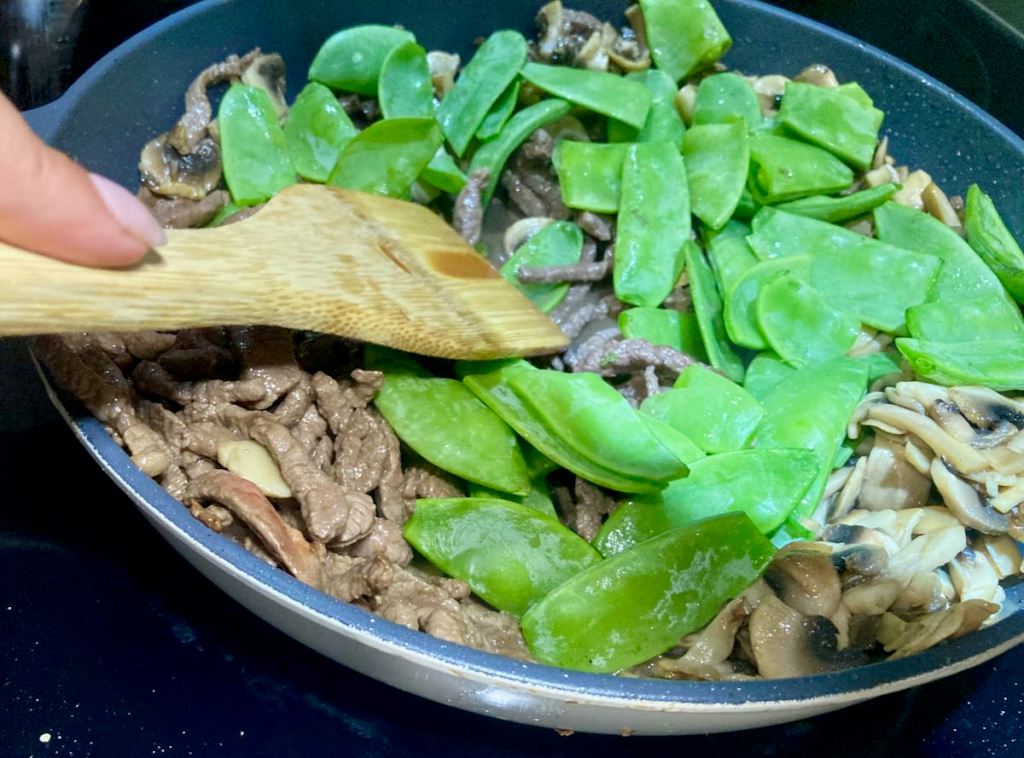
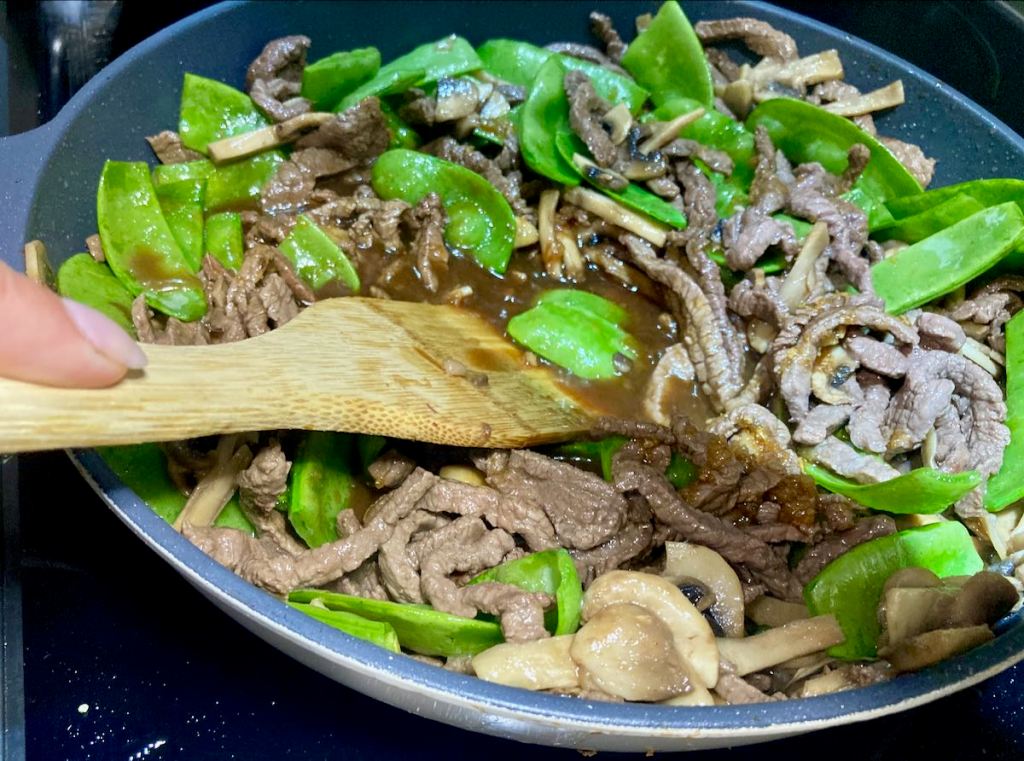
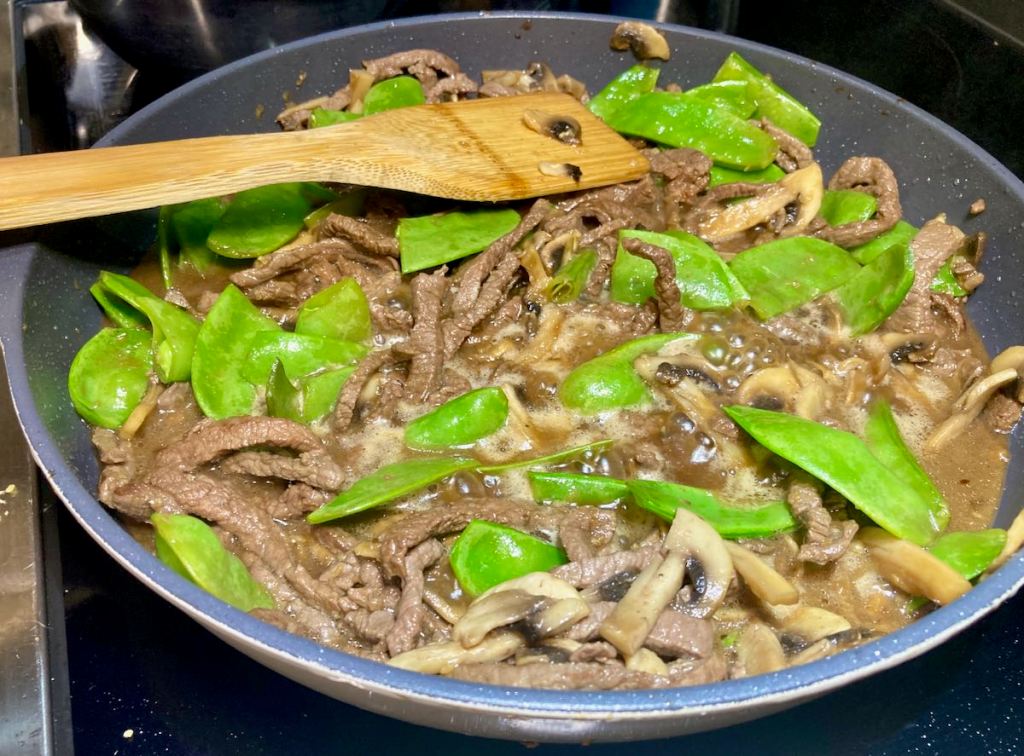
Add all of the meat, mushrooms, and snow peas to the pan with the sauce.
Stir everything together over a high heat for about two minutes.
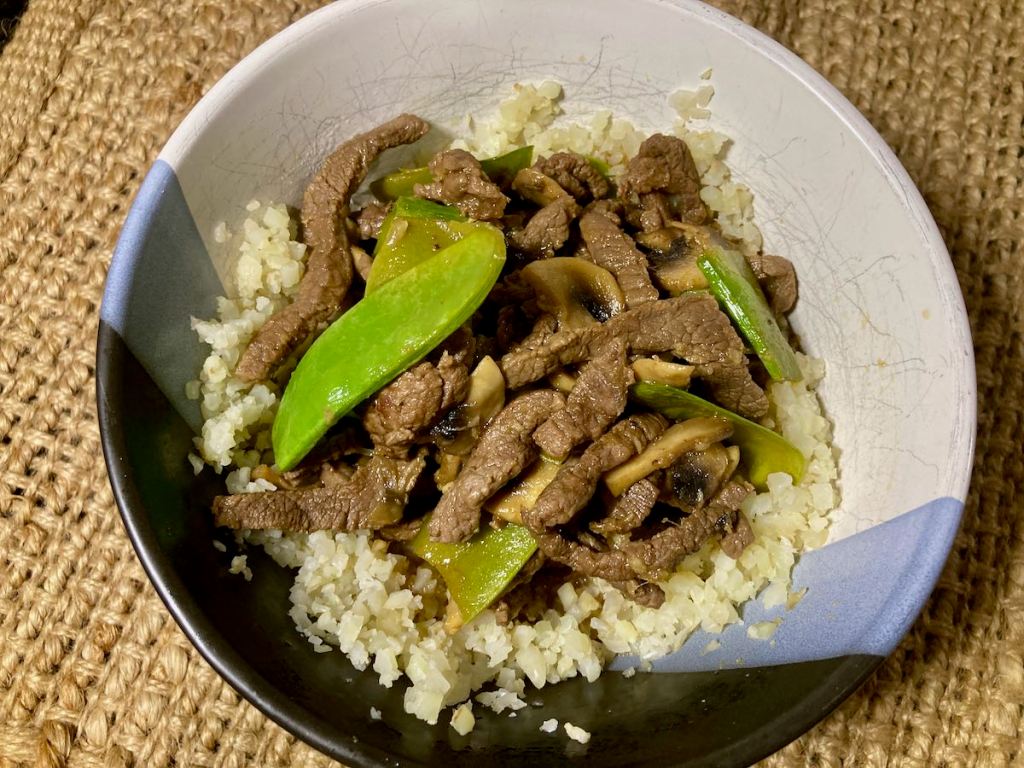
Serve over the cooked cauliflower rice.
Nutrition
Per Serving: 256 calories; 14 g fat; 17 g carbohydrates; 14 g protein
Equipment
Wok or large frying pan
Measuring cups
Scales
Measuring spoons
Knife
Chopping board
Spatula
Nutritional disclaimer
Nutrition information is provided as an estimate based on the ingredients used and available in my area (New Zealand). The nutritional information is here to help you understand the recipe; I use MyFitnessPal to generate my estimates. For more accurate nutritional information, please use a nutritional calculator with the ingredients in your area.
I’ve been revisiting recipes that have been some of my old school recipes and family favourites that were our staples when we got started as clean eaters. I first posted this recipe in 2016; at that time, the kids were fussy, vegetables had to be hidden and disguised, and there was no potential for intense flavours or spice.
Times (thankfully) have changed, the kids have grown (like man-sized grown), and they now enjoy a wide range of foods. Things like vegetables are enjoyed, spice and chilli are consumed without complaint, and new ingredients are tried without tantrums.
As the kids have grown, my recipes have changed organically to meet their palates and preferences. I’ve updated this recipe because of that, but fear not, the original suitable be kids, and less developed palates is at the bottom of the post.
Not KFC
We all love a naughty takeaway, but we can all live without the extra calories and the expanding waistlines. You don’t need to live without your takeaway; swap it out for a delicious and healthier fakeaway. Thankfully, KFC was never on my junk food list, so I have never felt the need to reproduce it. The idea of fried chicken as a replacement for chicken nuggets for little people did appeal when the kids were young. I had a play around with a grain-free coating for some fried chicken that would keep the kids happy back in the day. I managed to come up with a simple coating that was light and crunchy, the coconut gives a great texture, and the flavour is a nice change from your standard heavy batter.
Fried chicken recipe
Ingredients
400ml milk
800g chicken thigh fillets
1 tsp. Garlic powder
1 tsp. paprika
1/2 cup coconut flour
1/2 cup buckwheat flour
1/4 cup parmesan cheese, grated
1 tsp. paprika
Salt and pepper to taste
Instructions
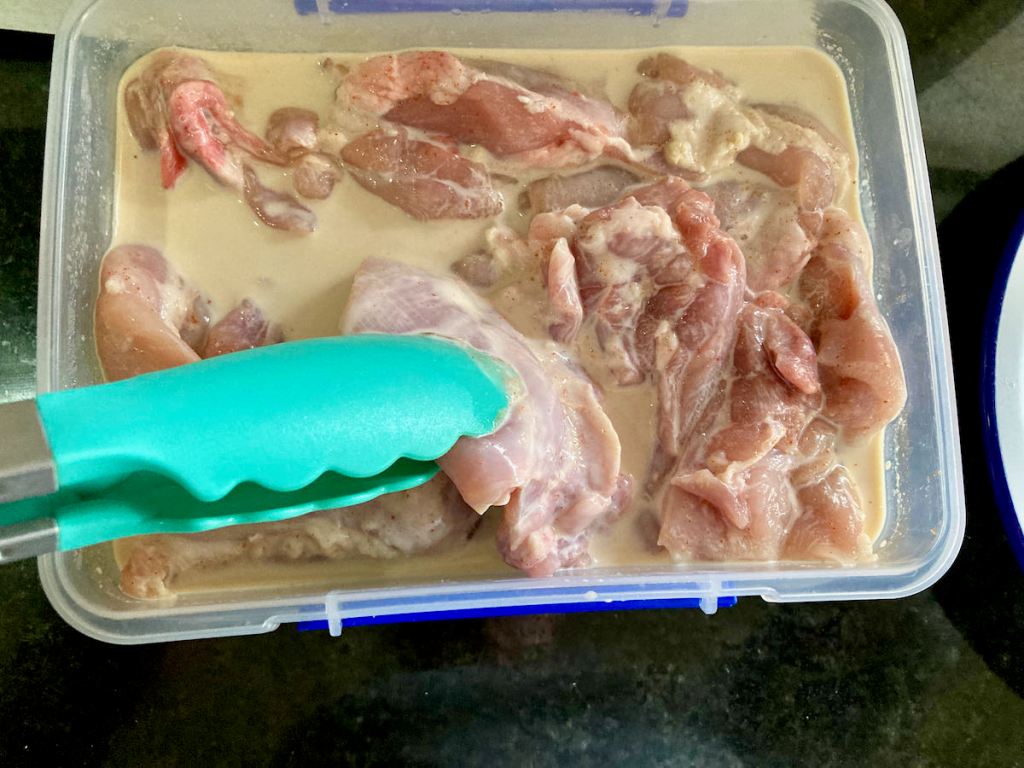
Take the chicken thighs and place them in a large bowl or tub.
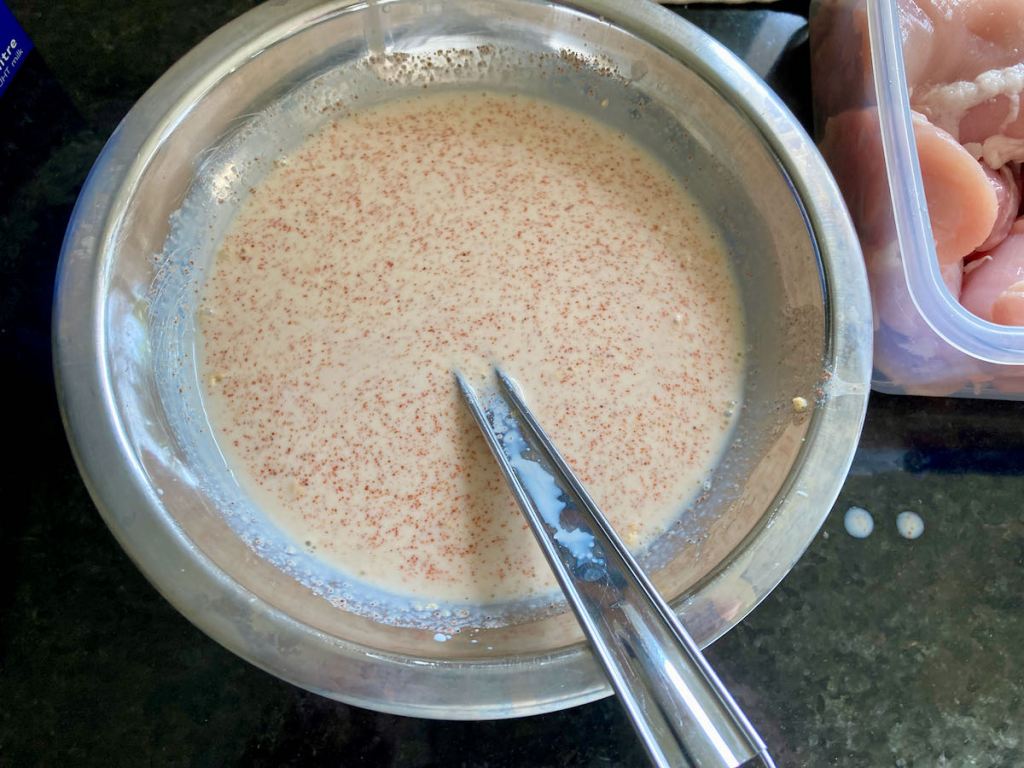
In a bowl, whisk together the milk, paprika and garlic powder.
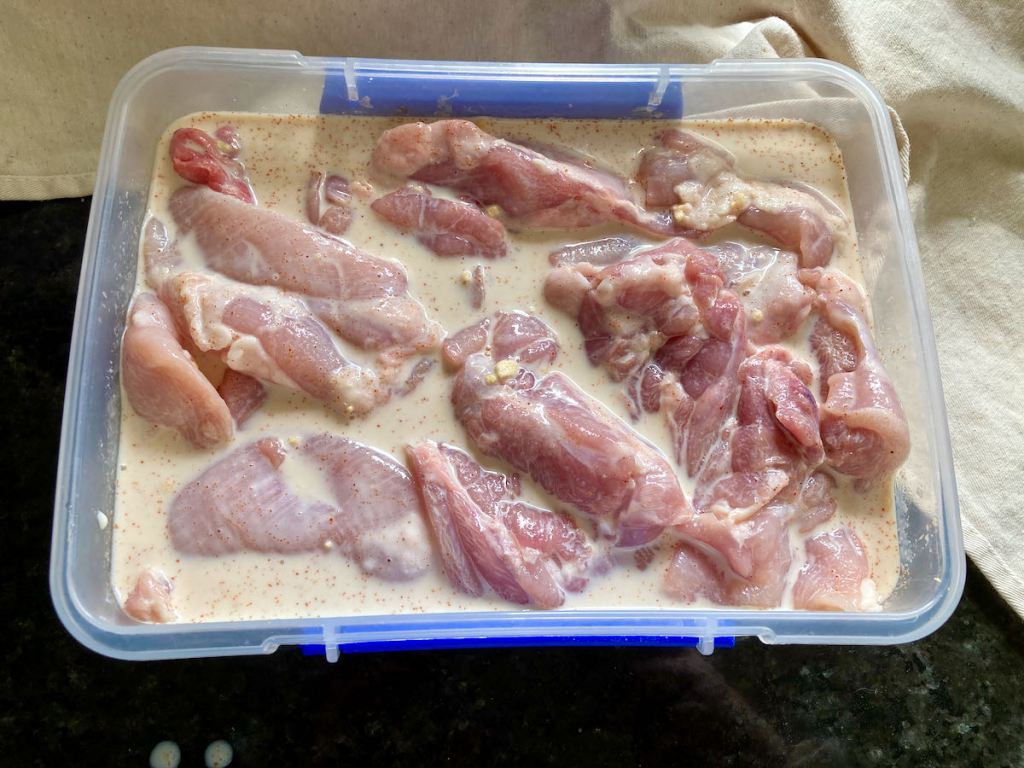
Pour the milk over the chicken thighs.
Cover the bowl or tub and put it in the fridge for a minimum of 2 hours but ideally overnight.
When you are ready to use the chicken, remove the bowl or tub from the fridge.
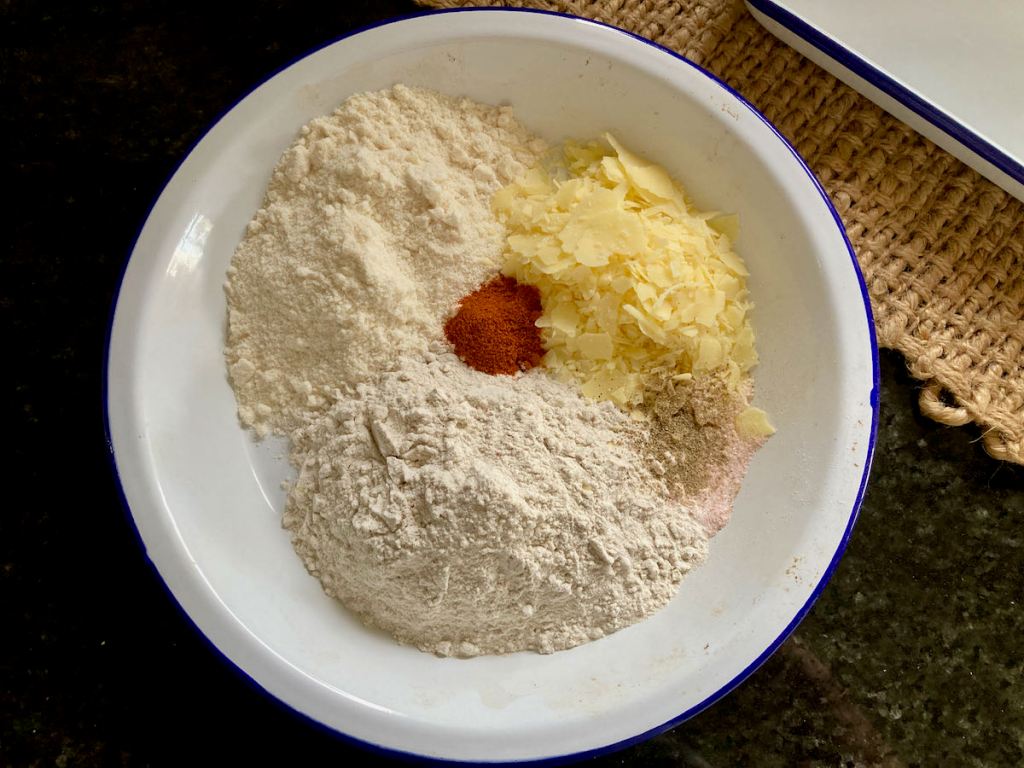
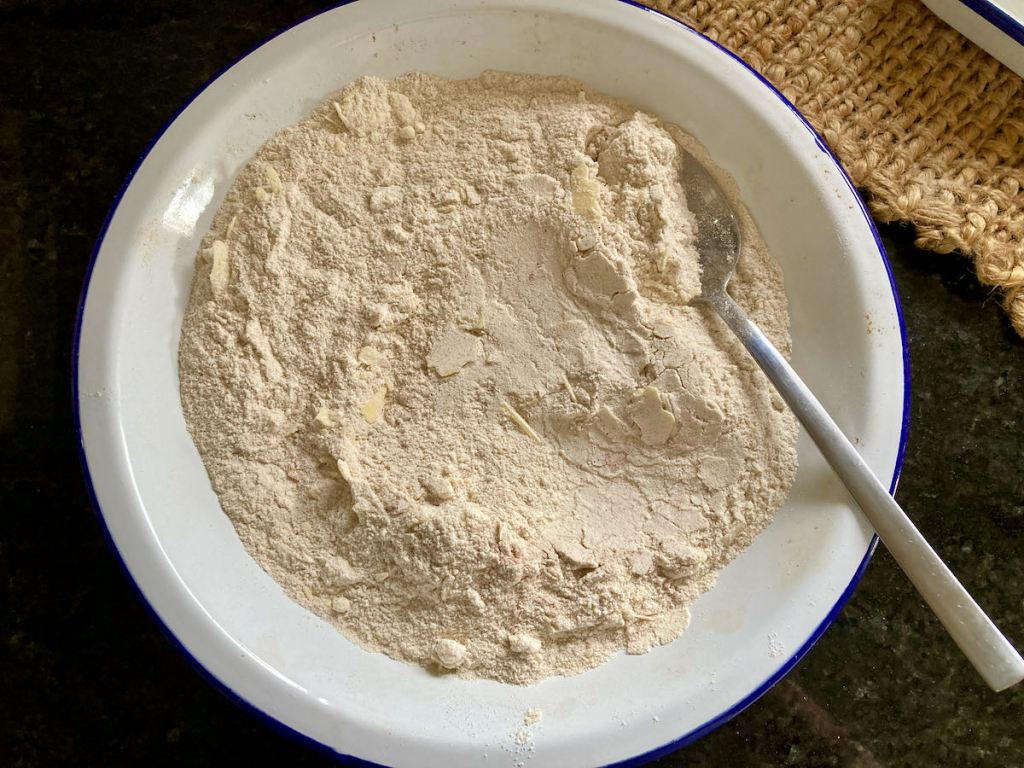
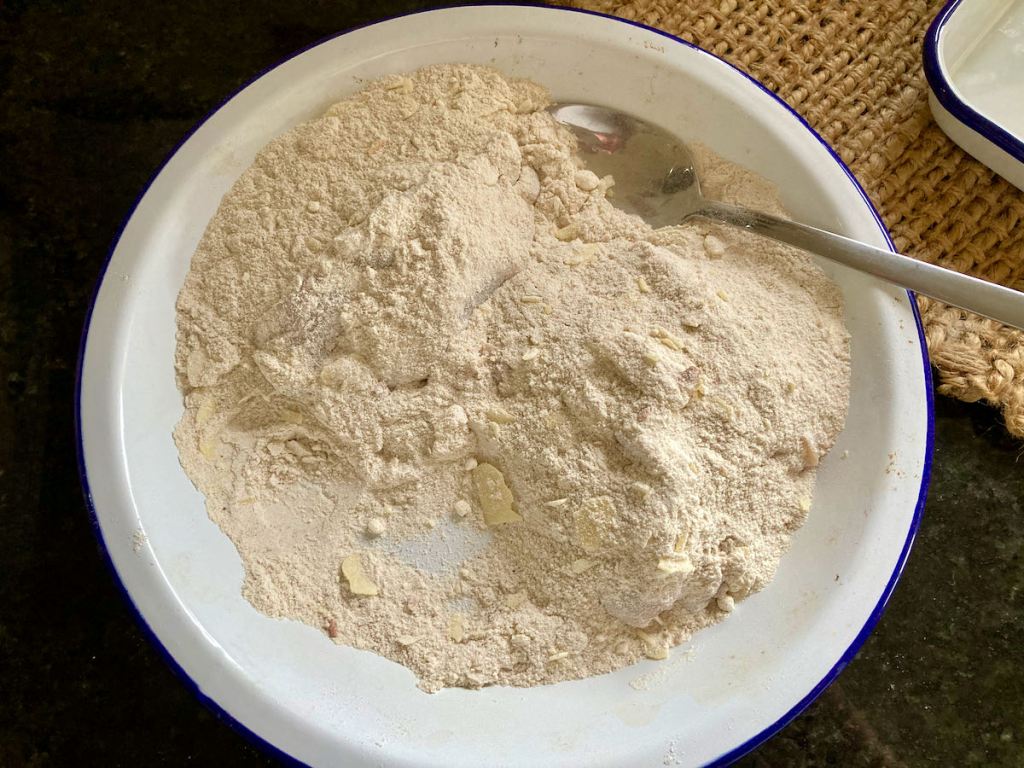
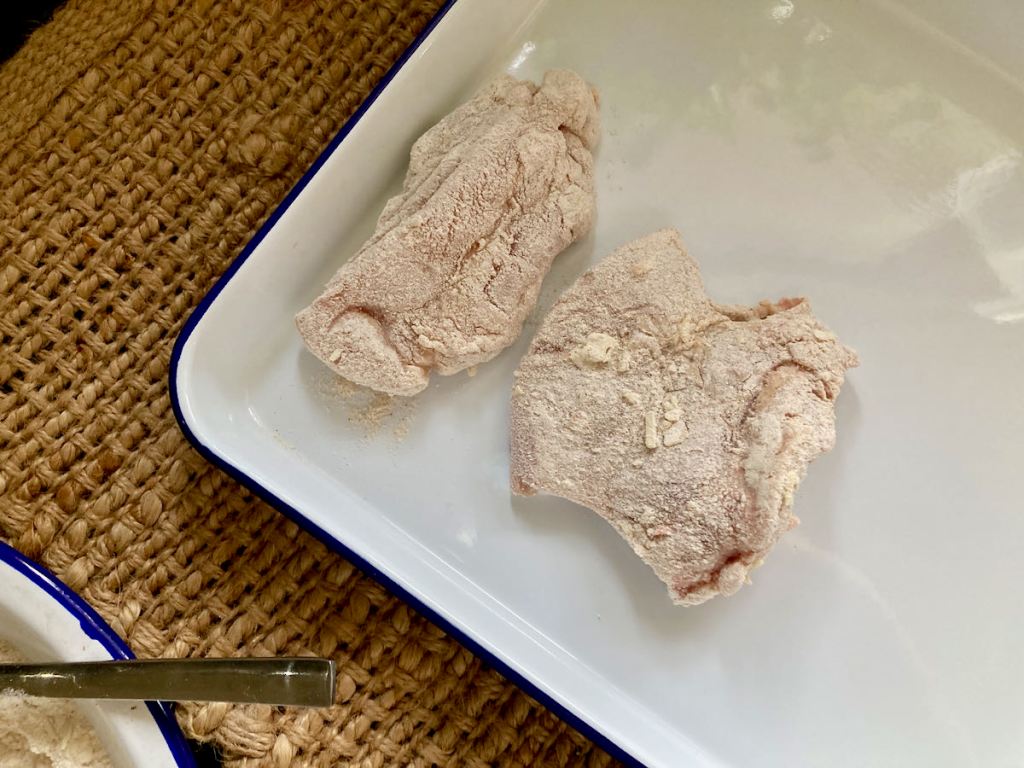
On a plate with tall sides or a bowl, mix together the coconut flour, buckwheat flour, parmesan cheese, paprika, salt and pepper.
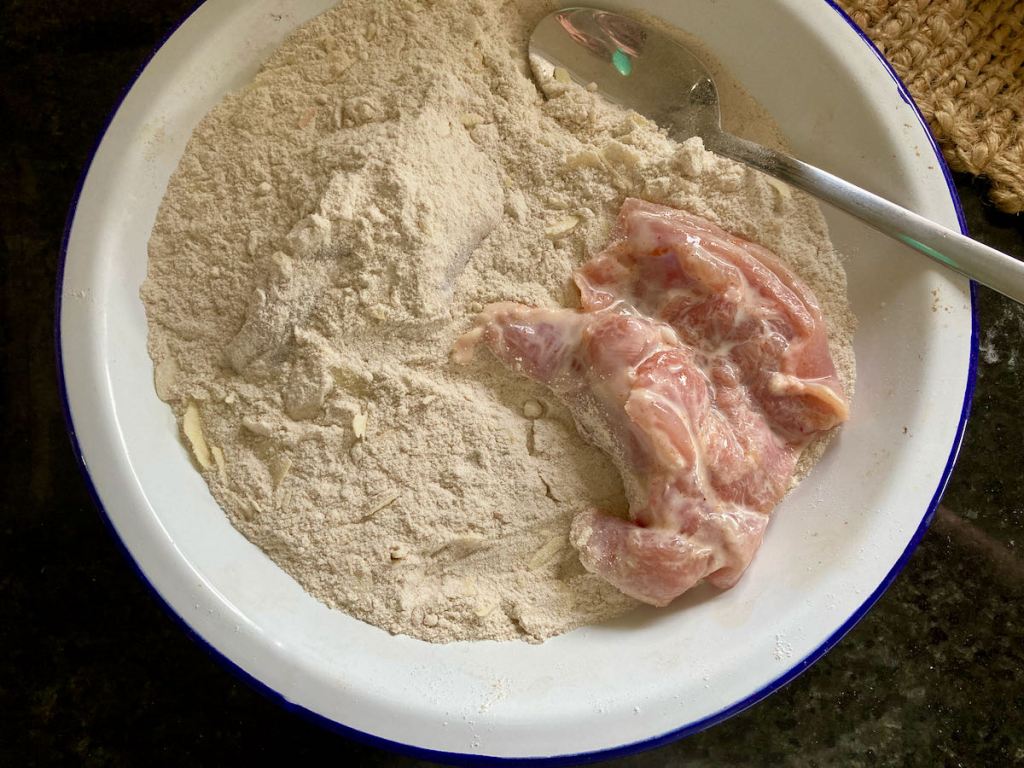
Take a piece of the chicken from the milk mixture and place it into the flour mix.
Spoon the flour over the chicken, making sure to coat the chicken thoroughly.
Lightly shake the excess flour off the chicken and place the chicken on a baking sheet to rest.
Repeat with all of the chicken.
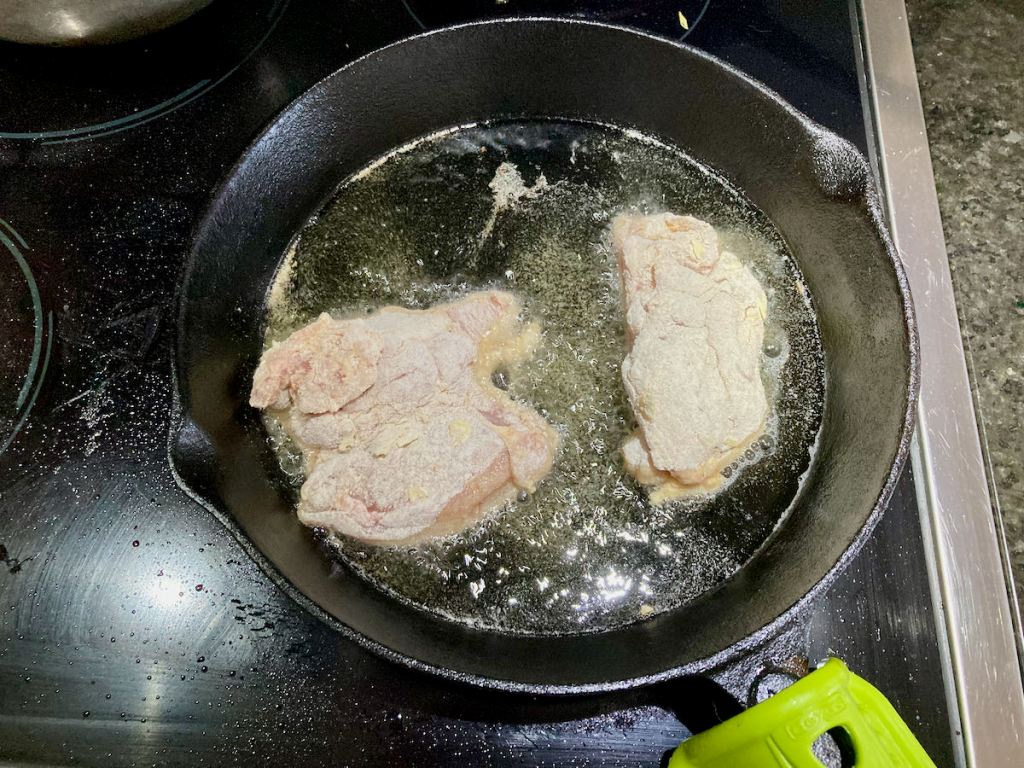
Take a large frying pan and heat a little oil over a medium heat.
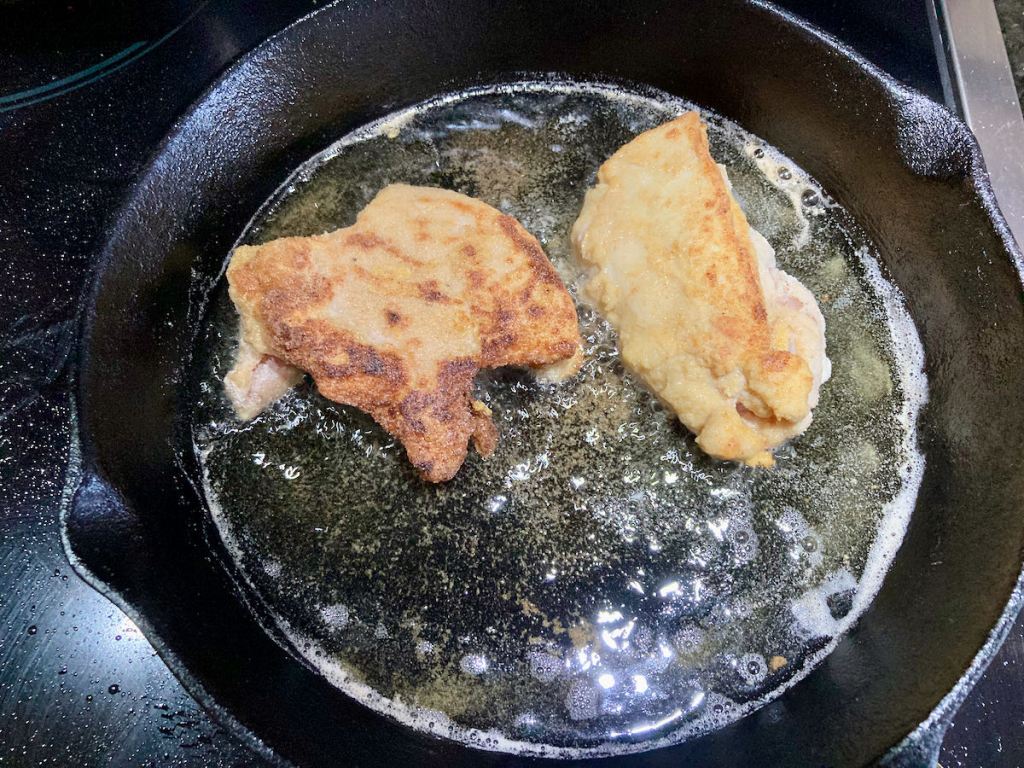
Shallow fry the chicken.
The coating should be a golden brown all over.
Make sure that the chicken is cooked through.
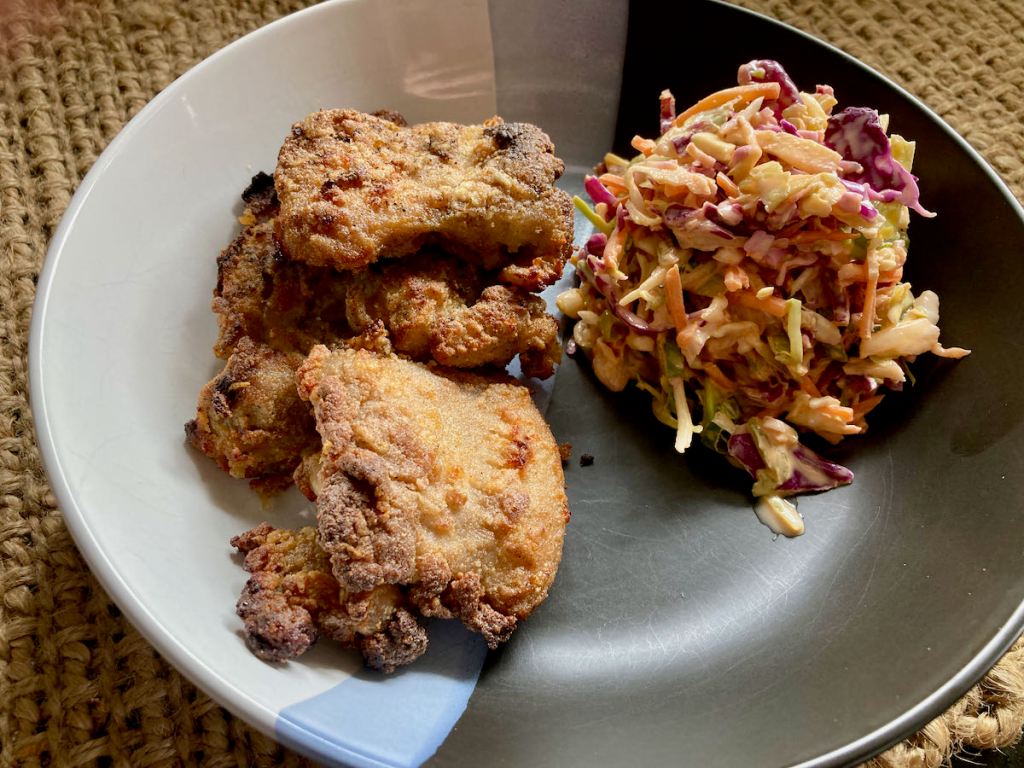
Set the cooked chicken on some kitchen paper to soak up any excess oil.
– 400ml milk
– 800g chicken thigh fillets
– 1 tsp. Garlic powder
– 1 tsp. paprika
– 1/2 cup coconut flour
– 1/2 cup buckwheat flour
– 1/4 cup parmesan cheese, grated
– 1 tsp. paprika
– Salt and pepper to taste
Directions
Take the chicken thighs and place them in a large bowl or tub.
In a bowl, whisk together the milk, paprika and garlic powder.
Pour the milk over the chicken thighs.
Cover the bowl or tub and put it in the fridge for a minimum of 2 hours but ideally overnight.
When you are ready to use the chicken, remove the bowl or tub from the fridge.
On a plate with tall sides or a bowl, mix together the coconut flour, buckwheat flour, parmesan cheese, paprika, salt and pepper.
Take a piece of the chicken from the milk mixture and place it into the flour mix.
Spoon the flour over the chicken, making sure to coat the chicken thoroughly.
Lightly shake the excess flour off the chicken and place the chicken on a baking sheet to rest.
Repeat with all of the chicken.
Take a large frying pan and heat a little oil over a medium heat.
Shallow fry the chicken.
The coating should be a golden brown all over.
Make sure that the chicken is cooked through.
Set the cooked chicken on some kitchen paper to soak up any excess oil.
Serve with a helping of slaw.
Nutrition
Per Serving:387 calories;6 g fat;16 g carbohydrates;53 g protein
Equipment
Mixing bowl
Food tub
Plate x1
Cooling rack/baking tray
Frying pan
Tongs
Kitchen paper
Nutritional disclaimer
Nutrition information is provided as an estimate based on the ingredients used and available in my area (New Zealand). The nutritional information is here to help you understand the recipe; I use MyFitnessPal to generate my estimates. For more accurate nutritional information, please use a nutritional calculator with the ingredients in your area.
Fried chicken recipe
Ingredients
1/2 cup coconut flour
1/2 cup shredded coconut
1 egg beaten
600g chicken breast, large dices
Instructions
In a mixing bowl, mix together shredded coconut and flour; put the flour mix onto a plate.
In a bowl, beat the egg.
Take the chicken pieces, dip each of them in the egg and then roll them in the flour mix.
Put the coated chicken on a cooling rack.
Once all of the chicken has been coated, it is ready to fry.
In a frying pan over medium heat with some coconut oil, shallow fry the chicken.
The coating should be a golden brown all over.
Set the cooked chicken on some kitchen paper to soak up any excess oil.
Sprinkle the cooked chicken with a little paprika before serving.
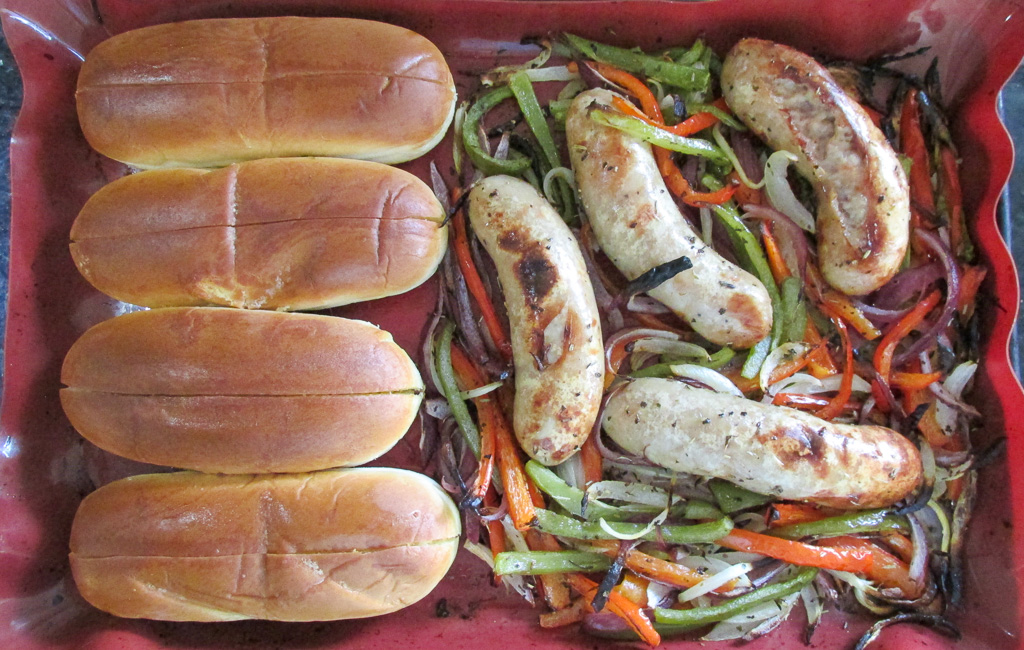
This is one of our favourite Sunday afternoon meals because it is perfect for watching the UFC. Getting to sit down and watch the fights is often the only time we get to sit down and relax. I don’t mind making a spread when we have company over to watch fights, but not so much when it is just two of us. My ideal UFC meal takes minimum effort to prepare, no supervision to cook, and you don’t need to look at it while you eat it. There is nothing worse than taking your eyes off the screen to take a bite and missing a knockout.
Ready for UFC 271
With the Adesanya vs Whittaker 2 fights this weekend, these sausage and pepper roles are most definitely on the menu.
The buns make it perfect
Living in the land of the sausage sizzle, I’ve got used to the idea of sausages in a bread slice; while it isn’t my favourite, I appreciate the simplicity. For this recipe, I decided to upgrade the bread to some gluten-free rolls. The secret to this recipe is baking the rolls and the generous coating of butter. Buttering the inside and outside of the rolls for baking that gives the rolls a fantastic crunch on the outside.
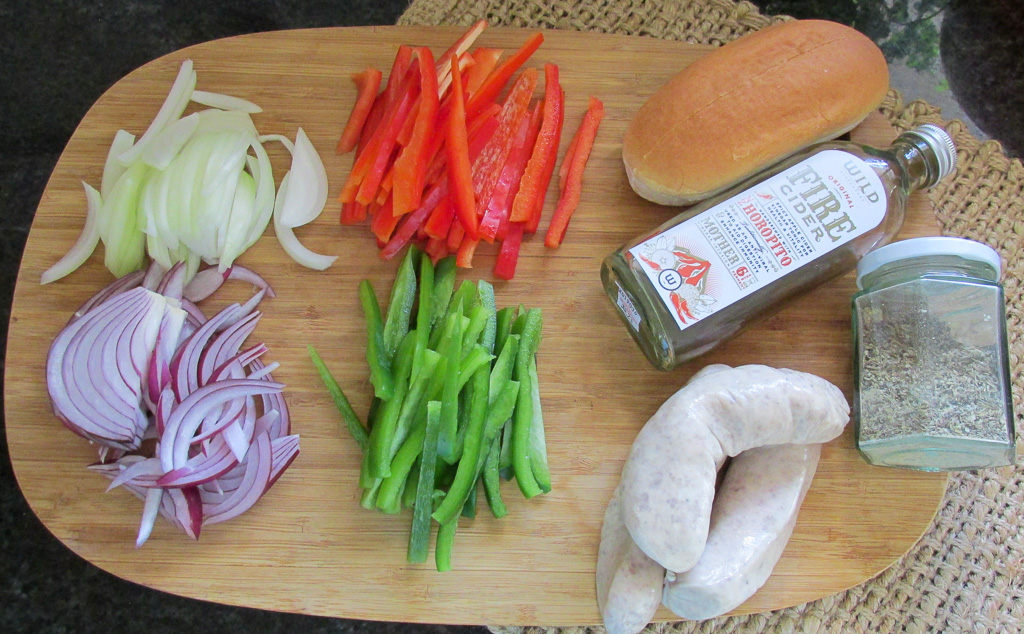
One tray sausage and pepper rolls recipe
Ingredients
4 sausages
1/2 onion, sliced
1 red pepper, sliced
1 green pepper, sliced
1 yellow pepper, sliced
1 tbsp. olive oil
1 tbsp. balsamic vinegar
1/2 tsp. salt
1/4 tsp. pepper
1 tsp. Italian seasoning
4 gluten-free rolls
2 tbsp. butter, melted
Instructions
Preheat oven to 200 degrees C/ 400 degrees F.
Line a baking tray with baking paper or a silicone liner.
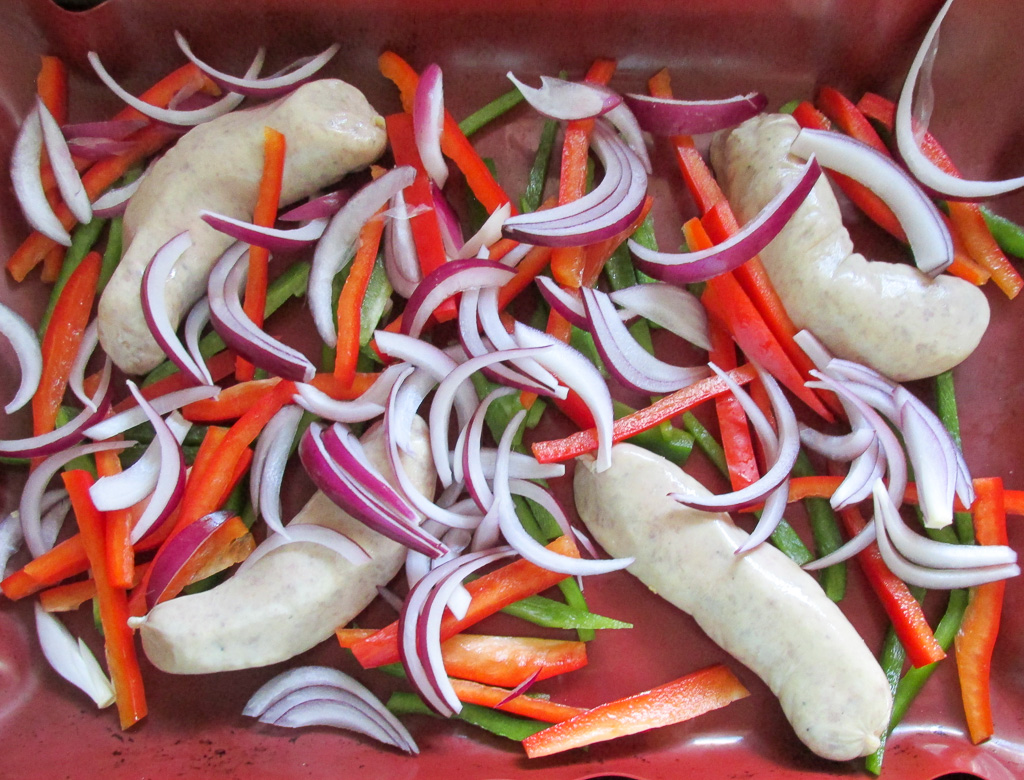
Place the sausages, onions and peppers on the baking tray.
Drizzle the olive oil and vinegar over the tray.
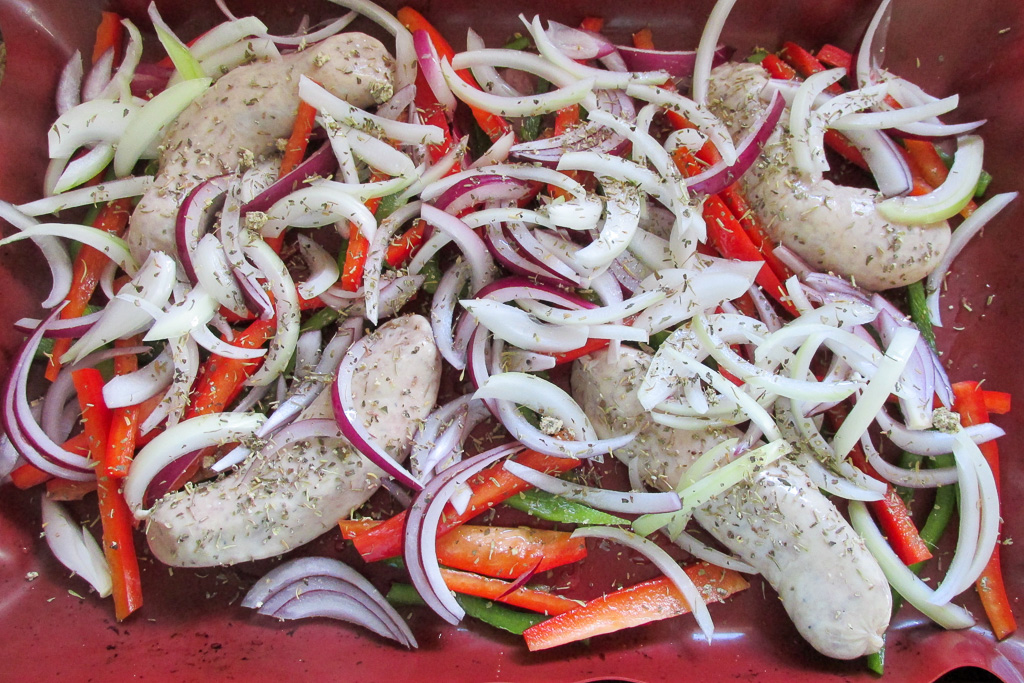
Sprinkle the Italian seasoning over the top before tossing to coat everything.
Bake for 25 minutes.
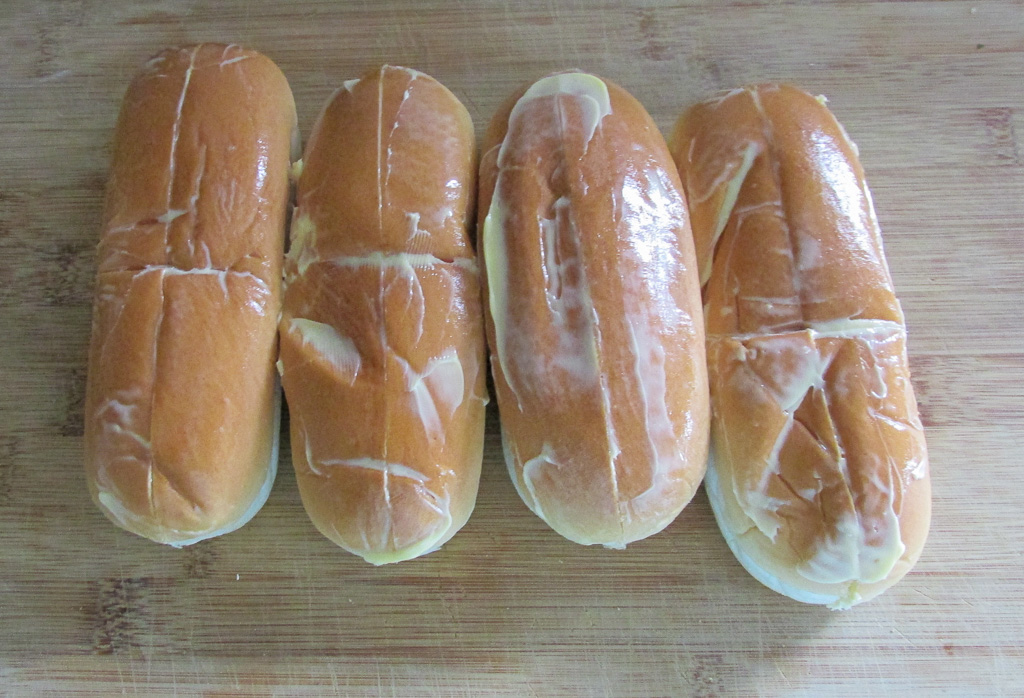
Slice each of the rolls down the centre, then brush the rolls with the melted butter.
After baking for 25 minutes, move the sausages, peppers and onions down the tray and place the rolls on the tray.
Bake for another 10 minutes.
Serve each roll with one sausage and a portion of the vegetables.
Line a baking tray with baking paper or a silicone liner.
Place the sausages, onions and peppers on the baking tray.
Drizzle the olive oil and vinegar over the tray.
Sprinkle the Italian seasoning over the top before tossing to coat everything.
Bake for 25 minutes.
Slice each of the rolls down the centre, then brush the rolls with the melted butter.
After baking for 25 minutes, move the sausages, peppers and onions down the tray and place the rolls on the tray.
Bake for another 10 minutes.
Serve each roll with one sausage and a portion of the vegetables.
Nutrition
Per Serving: 397 calories; 23 g fat; 48 g carbohydrates; 11 g protein
Equipment
Knife
Chopping board
Baking tray
Baking paper or silicone liner
Tongs
Pastry brush
Nutritional disclaimer
Nutrition information is provided as an estimate based on the ingredients used and available in my area (New Zealand). The nutritional information is here to help you understand the recipe; I use MyFitnessPal to generate my estimates. For more accurate nutritional information, please use a nutritional calculator with the ingredients in your area.
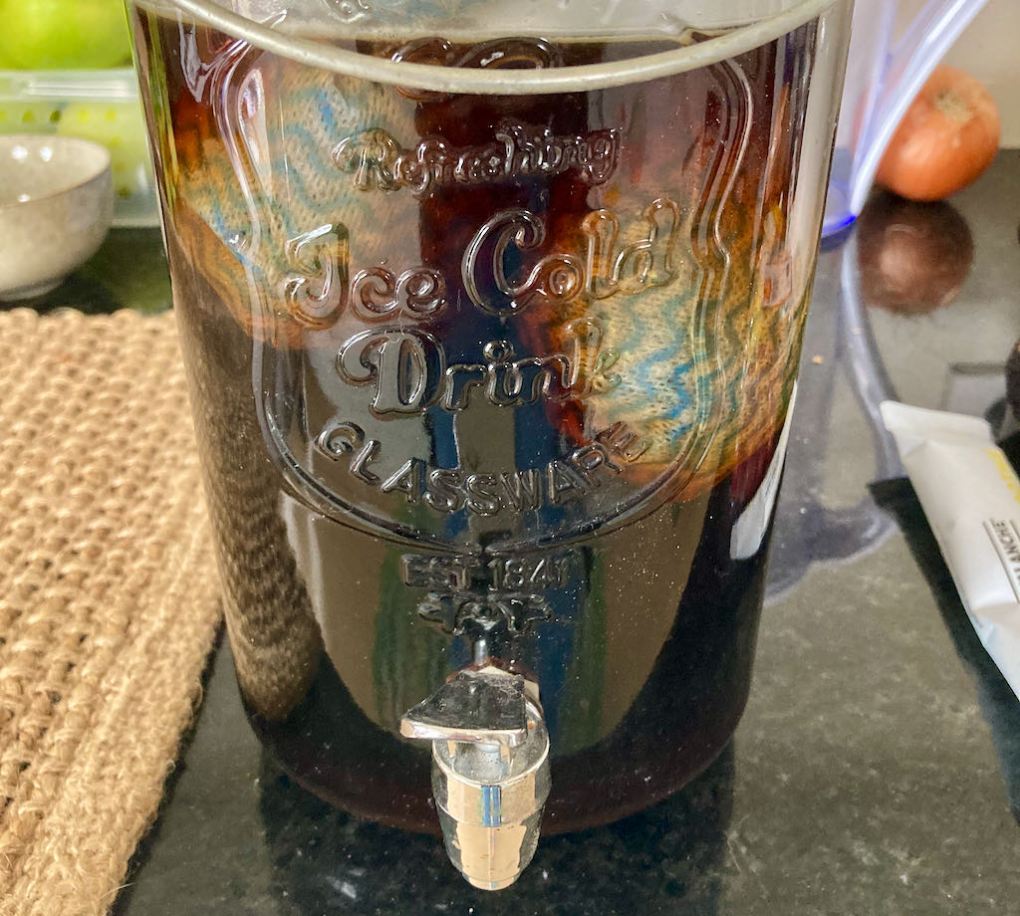
I’m a bit lover of coffee. That is actually an understatement; coffee keeps me going, I may have more coffee than water in my body. It upsets me to say this, but there are times when it is too hot to drink a hot coffee; fear not as the solution is to have cold brew coffee.
So what is cold brew coffee?
I can tell you that cold brew coffee is not an espresso poured over ice or left to go cold. That is bad coffee. It will be bitter and acidic; trust me, you do not want this kind of coffee. What you want is coffee that is made cold and stays that way.
Cold brew coffee is made using cold water and good quality coffee grounds, it takes a long time to brew, but the flavour profile is fantastic.
Interested? Keep reading to find out what you need
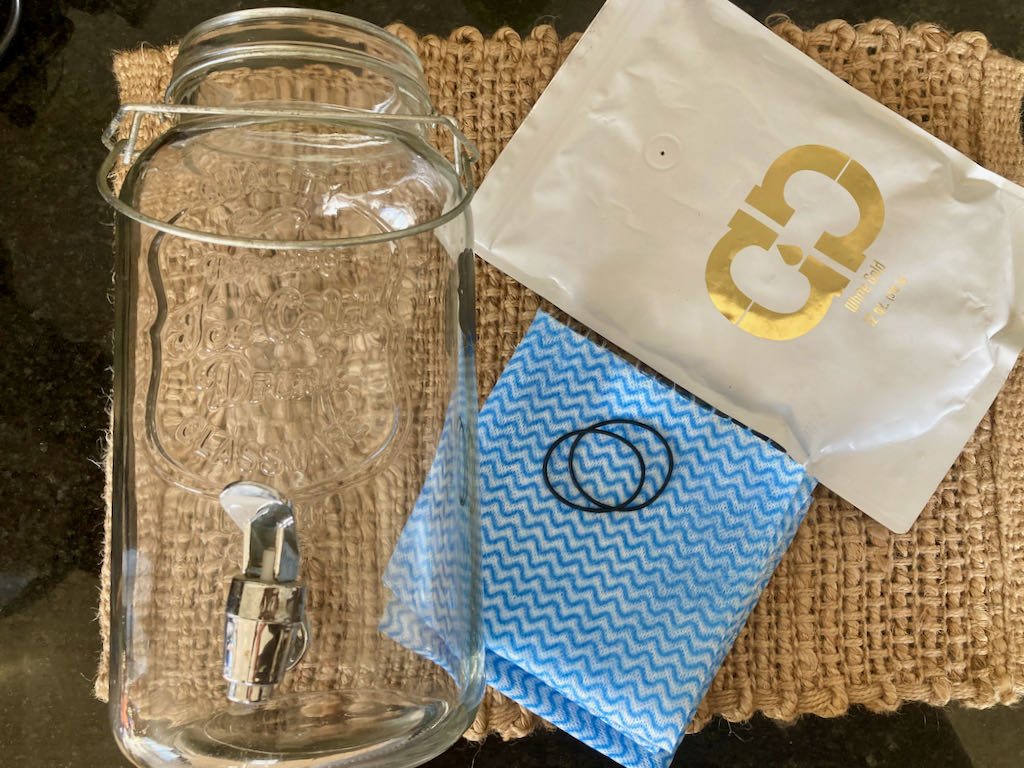
Equipment
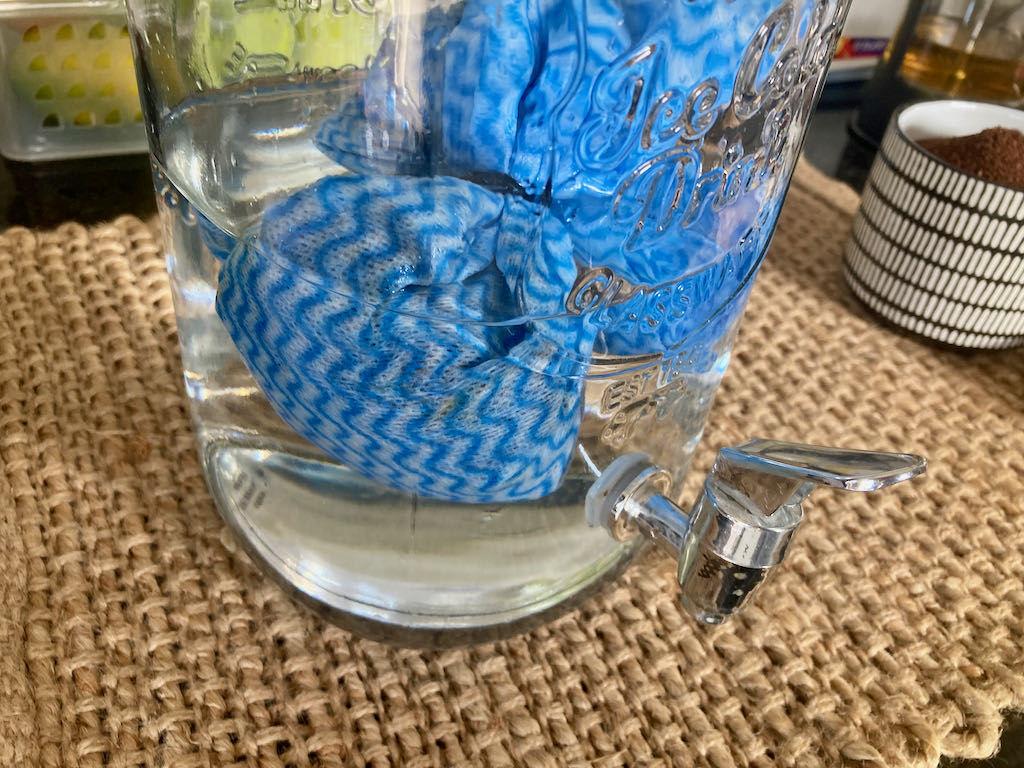
Large jar (2-litre capacity)
2 large coffee filters or two cloths
2 rubber bands
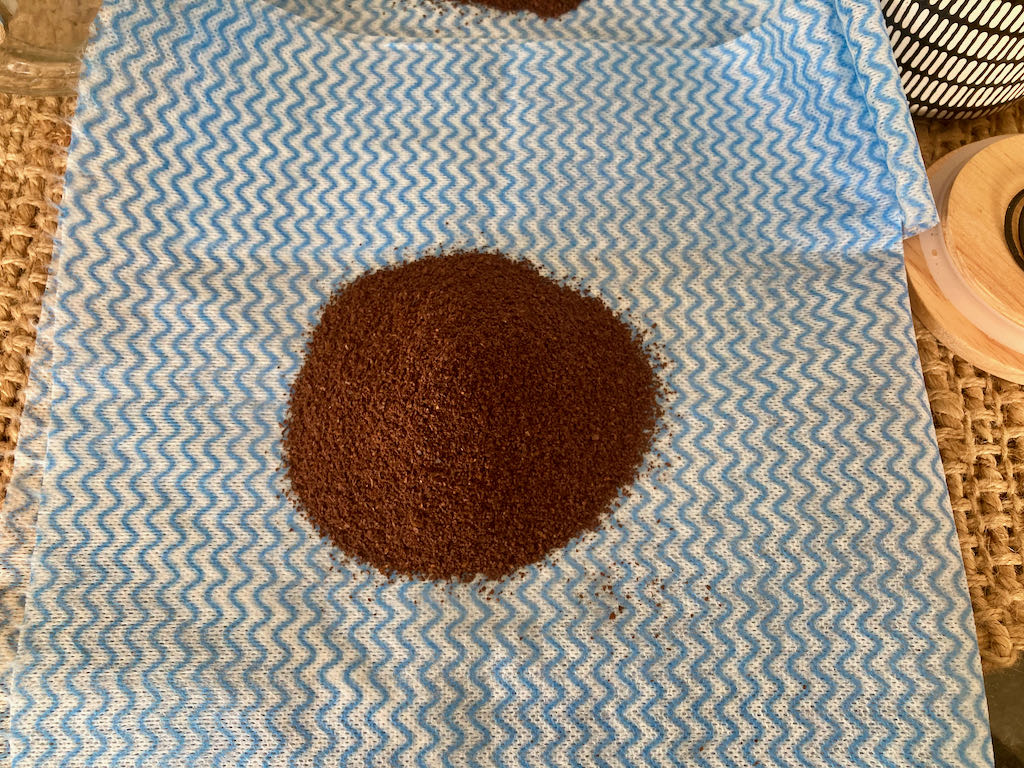
200g Coffee beans/grounds
Instructions
Take your jar and fill it to 3/4 full with cold water, set it to one side.
Take the coffee beans and grind them coarsely; get the plunger ground coffee if you are using pre-ground beans.
Lay out the coffee filters or cloth.
Divide the ground coffee between the two filters or cloths.
Fold the edges of the filter up over the coffee grounds and secure the top with a rubber band.
You should have two coffee bombs.
Place the coffee bombs into the jar with the cold water and top up the jar with more cold water.
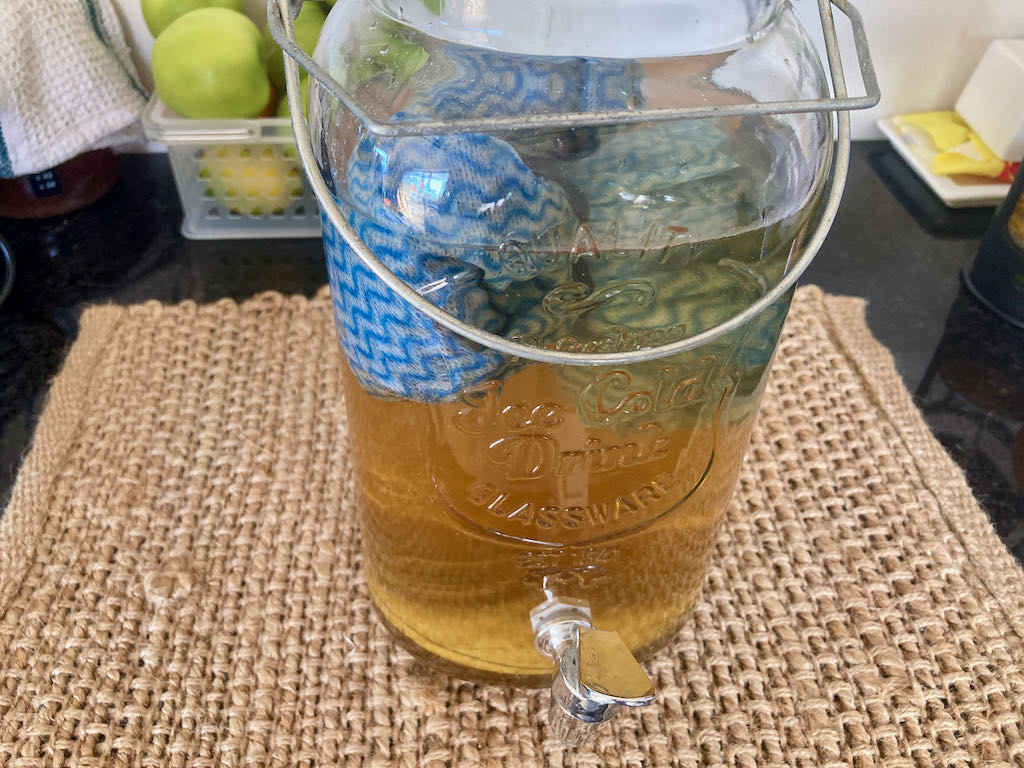
Let the coffee brew for at least 14 hours, but if you want a strong brew to leave it for 24 hours.
When your coffee is at a strength right for you, remove the coffee bombs from the jar.
Store your coffee in the fridge for up to one week; if you don’t drink it all at once.
Serve over ice when you need a cold coffee boost.
Take your jar and fill it to 3/4 full with cold water, set it to one side.
Take the coffee beans and grind them coarsely; get the plunger ground coffee if you are using pre-ground beans.
Lay out the coffee filters or cloth.
Divide the ground coffee between the two filters or cloths.
Fold the edges of the filter up over the coffee grounds and secure the top with a rubber band.
You should have two coffee bombs.
Place the coffee bombs into the jar with the cold water and top up the jar with more cold water.
Let the coffee brew for at least 14 hours, but if you want a strong brew to leave it for 24 hours.
When your coffee is at a strength right for you, remove the coffee bombs from the jar.
Store your coffee in the fridge for up to one week; if you don’t drink it all at once.
Serve over ice when you need a cold coffee boost.
Nutritional disclaimer
Nutrition information is provided as an estimate based on the ingredients used and available in my area (New Zealand). The nutritional information is here to help you understand the recipe; I use MyFitnessPal to generate my estimates. For more accurate nutritional information, please use a nutritional calculator with the ingredients in your area.
It has been a busy few weeks, I’ve been a bit basic with our meals and we have been living off our freezer staples, I have a little bit of breathing room and a strong craving for something fancier for dinner.
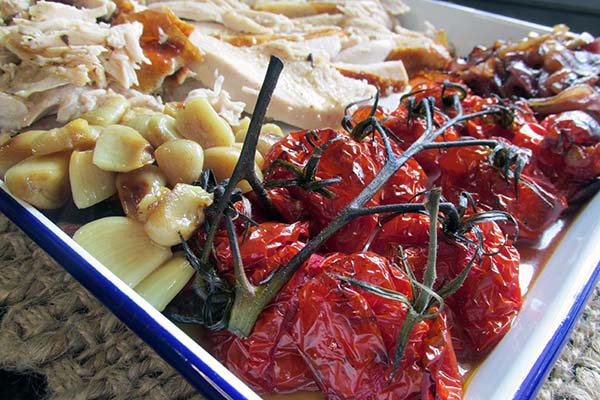
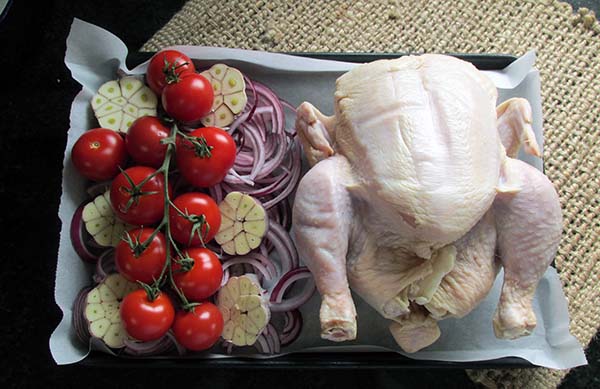
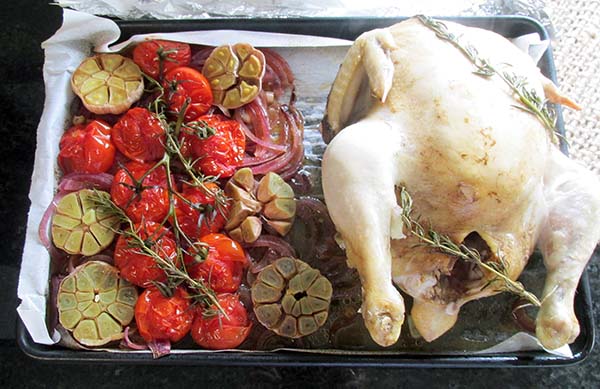
Italian roast chicken tray
Fancy but easily
In my book, fancy doesn’t mean spending hours ‘in the kitchen boiling to death over a hot stove. This recipe is very fancy but is all cooked on a single tray.
The garlic is the star of this meal for me, the bed of garlic under the chicken means you have a suture frae our through the meat while the roast garlic cloves have a deep rich flavour that compliments the rest of the dish.
The quick peep and hands off cooking measures you can get on with other things and come back to a perfectly roasted chicken.
Italian roast chicken recipe
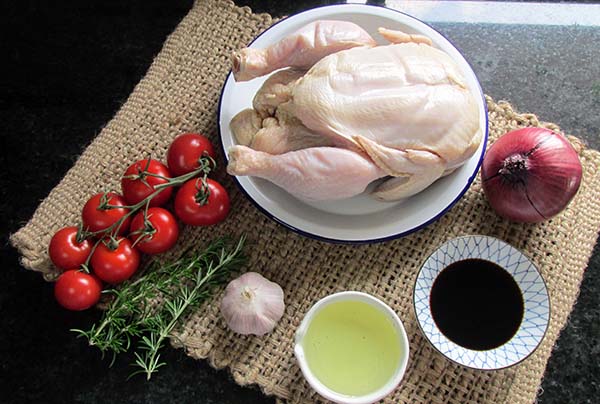
Italian roast chicken ingredients
Ingredients
2 large tomatoes thickly sliced
250g cherry tomatoes
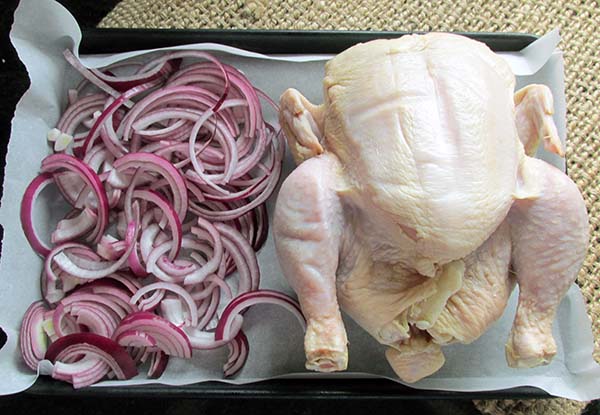
1 red onion thinly sliced
1 garlic bulb peeled and bruised
1/3 cup flat-leaf parsley chopped
1/3 cup red wine vinegar
1/4 cup olive oil
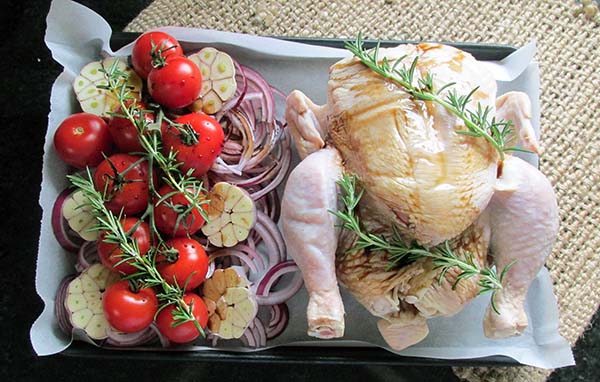
3 sprigs rosemary
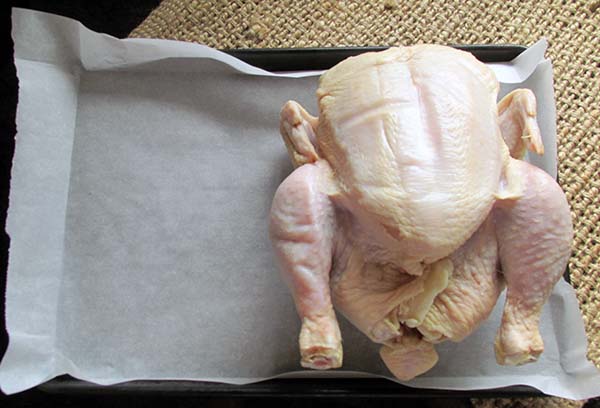
1.6 kg chicken
Large chicken
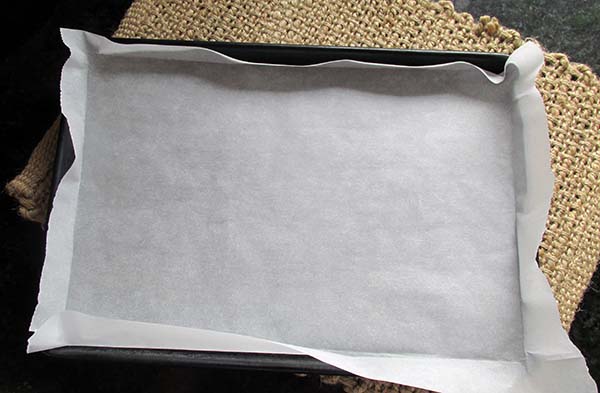
Take a large baking tray.
Take a large baking tray.
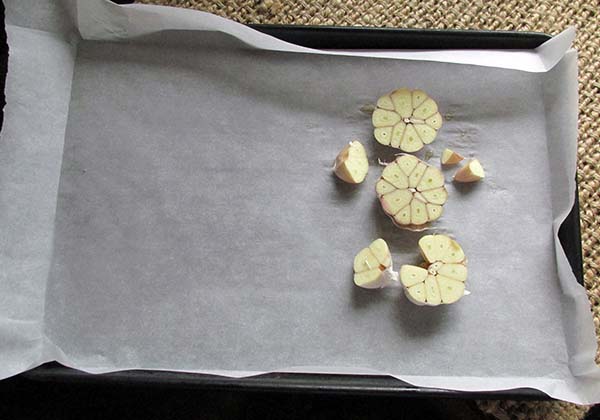
Place one garlic bulb on the baking tray.
Place one garlic bulb on the baking tray.
Lay the chicken on top of the garlic.
Lay the chicken on top of the garlic.
Spread out the onion next to the chicken.
Spread out the onion next to the chicken.
Add the remaining garlic bulbs on top of the onions.
Add the remaining garlic bulbs on top of the onions.
Add the tomatoes on top of the garlic.
Add the tomatoes on top of the garlic.
Drizzle the vinegar and olive oil over the chicken and vegetables.
Drizzle the vinegar and olive oil over the chicken and vegetables.
Place the rosemary sprigs on top of the chicken and the vegetables.
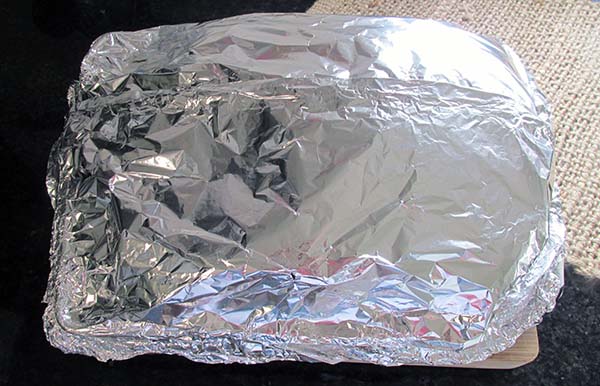
Cover the baking tray with baking paper.
Cover the baking tray with baking paper.
Cover the baking paper with foil.
Cover the baking paper with foil.
Bake for 1 hour.
Check the chicken to make sure the meat is cooked and the juices are running clear before removing the baking paper and foil, this will depend on the size of the chicken.
Check the chicken to make sure the meat is cooked and the juices are running clear
Return the chicken to the oven uncovered for another 20 minutes or until the skin is golden brown.
Return the chicken to the oven uncovered for another 20 minutes
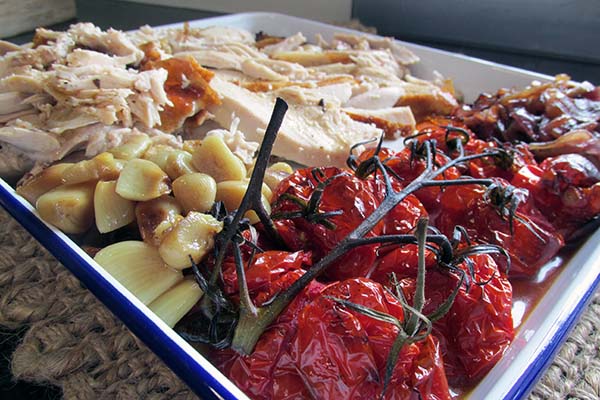
Slice the chicken, squeeze out the garlic and serve while hot.
Slice the chicken, squeeze out the garlic and serve while hot.
This one tray meal a great option for busy week nights or an action packed weekend.
Credit: Cath @ easycleaneats
Ingredients
2 tomatoes thickly sliced
250g cherry tomatoes
1 red onion thinly sliced
1 garlic bulb peeled and bruised
1/3 cup flat leaf parsley chopped
1/3 cup red wine vinegar
1/4 cup olive oil
3 sprigs rosemary
1.6 kg chicken
Directions
Preheat the oven to 200 degrees C/ 400 degrees F.
Take a large baking tray.
Place one garlic bulb on the baking tray.
Lay the chicken on top of the garlic.
Spread out the onion next to the chicken.
Add the remaining garlic bulbs on top of the onions.
Add the tomatoes on top of the garlic.
Drizzle the vinegar and olive oil over the chicken and vegetables.
Place the rosemary sprigs on top of the chicken and the vegetables.
Cover the baking tray with baking paper.
Cover the baking paper with foil.
Bake for 1 hour.
Check the chicken to make sure the meat is cooked and the juices are running clear before removing the baking paper and foil, this will depend on the size of the chicken.
Return the chicken to the oven uncovered for another 20 minutes or until the skin is golden brown.
Slice the chicken, squeeze out the garlic and serve while hot.
Nutrition
Per Serving: 349 calories; 14 g fat; 9 g carbohydrates; 53 g protein
Equipment
Roasting tin
Baking paper
Aluminium foil
Measuring cups
Scales
Nutritionaldisclaimer
Nutrition information is provided as an estimate based on the ingredients used and available in my area (New Zealand). The nutritional information is here to help you understand the recipe; I use MyFitnessPal to generate my estimates. For more accurate nutritional information, please use a nutritional calculator with the ingredients in your area.
I have been on a mission to make simple and tasty meals. I aim to create recipes that can be prepared and cooked quickly on a busy weeknight. We all struggle to make healthy and delicious meals while keeping on top of everything else in life. So this recipe is designed to be healthy, delicious and easy to make. You can cook this meal on a single pot, and the preparation takes no more than 20 minutes and is portioned to feed four adults.
Scraping the bottom of the freezer
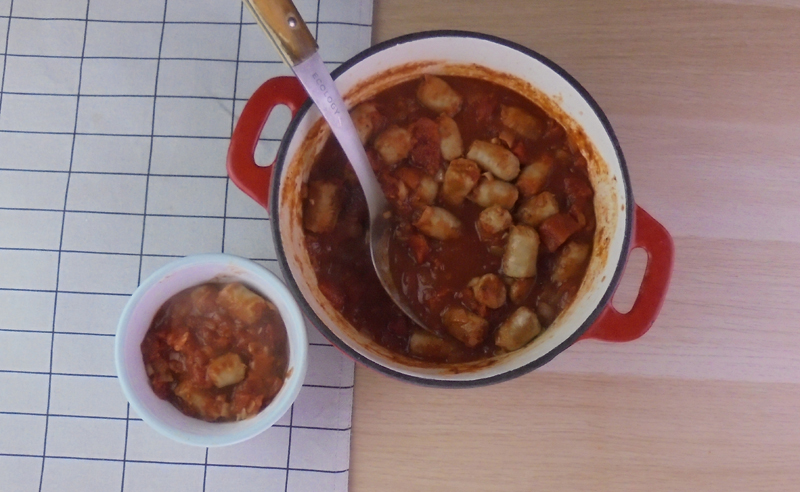
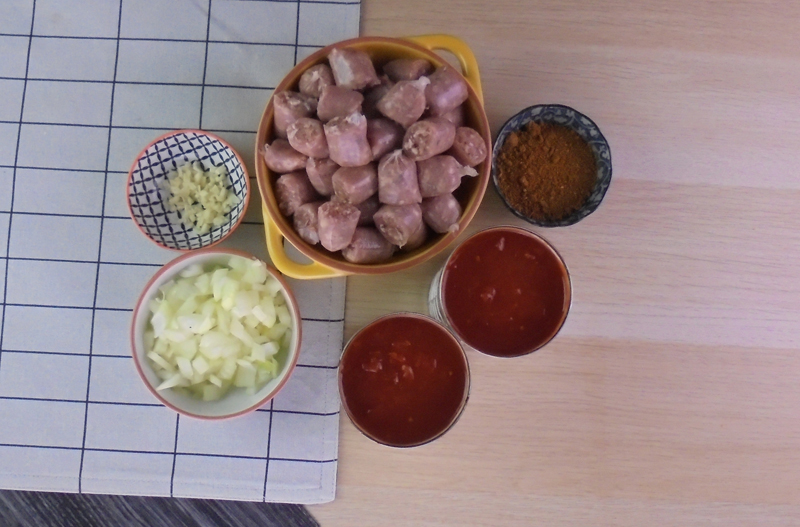
It has been a crazy week; I’ve been bouncing around all over the place with no time to sort out my life. After a frantic week with no desire to eat another portion of chilli and even less desire to go shopping, it was time to get creative. I knew there would be treasure hiding in the kitchen; I just had to find it. A quick rummage around in the freezer, I discovered a pack of pork sausages that would be a perfect dinner after some thawing. Another rummage around the fridge and the cupboards, and I had the garlic, onion, barbeque sauce and tomatoes.
Simple but tasty
With my ingredients sorted in the morning, I knew I had a leisurely evening to get dinner made and on the table. With less than 10 minutes of chopping and preparation, I had dinner underway and a chance to sit down and enjoy some time talking with Jay. A perfect end to a busy week.
1.Heat half the oil in a large, heavy-based saucepan over medium-high heat.
2.Cook sausages, in batches, turning, for 5 to 6 minutes or until browned all over.
3.Transfer the cooked sausages to a plate.
4.Heat remaining oil in a large saucepan; add the onion and garlic to the pan.
5.Cook the onion and garlic until it begins to soften.
6.Add the tomatoes, barbeque sauce to the onions, and return sausages to pan.
7.Bring to the boil then reduce heat to medium-low, let the stew simmer, for 30 minutes.
8.When the sausages are cooked through, and the sauce has thickened, it is ready to serve.
Nutrition
Per Serving: 274 calories; 21.9g fat; 9.4g carbohydrates; 10g protein
Equipment
Saucepan
Tongs
Plate
Knife
Chopping board
Wooden spoon
Measuring cups
Measuring spoons
Scales
Nutritional disclaimer
Nutrition information is provided as an estimate based on the ingredients used and available in my area (New Zealand). The nutritional information is here to help you understand the recipe; I use MyFitnessPal to generate my estimates. For more accurate nutritional information, please use a nutritional calculator with the ingredients in your area.
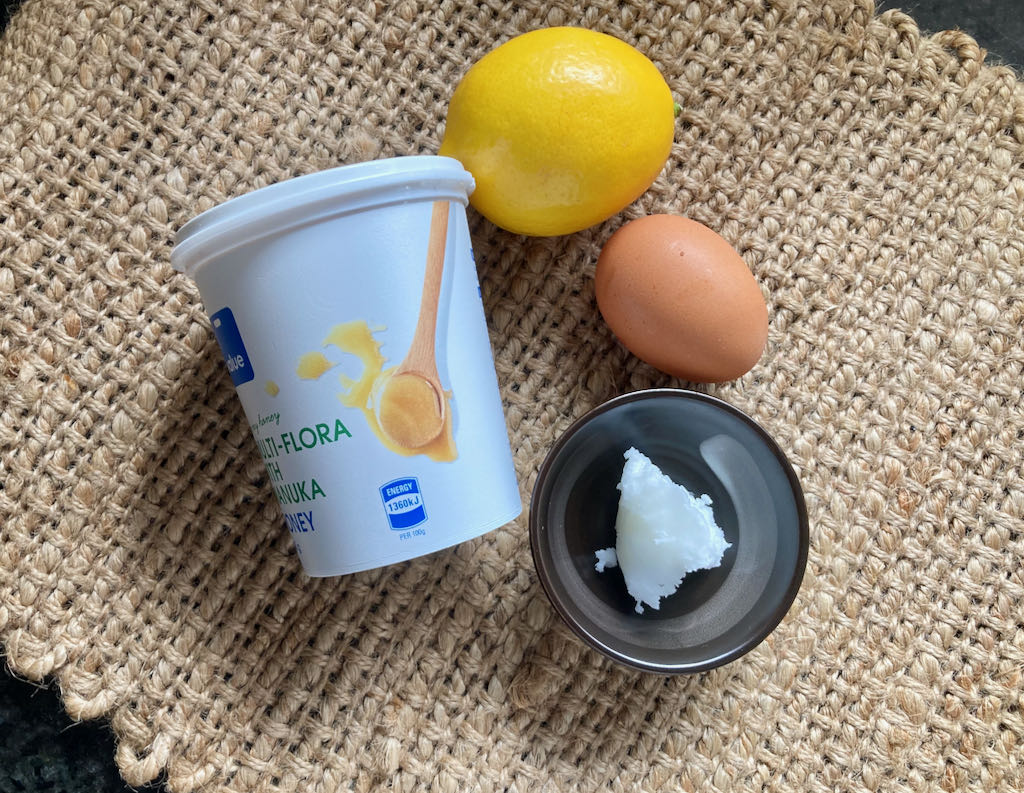
I got my hands on some beautiful lemons that are locally grown and perfectly ripe. There were so many I thought it would be rude not to make something absolutely delicious.
Sugar-free lemon curd
I love lemon curd, it is sweet, smooth, and if you do it right, it is also zingy. My only complaint with lemon curd is how much sugar you find in the store-bought kind. I’ve been working on my sourdough lately, so what better treat to spread over my toast than homemade sugar-free lemon curd.
easycleaneatsnz
How to make good lemon curd
There are a few simple tips for making the perfect lemon curd. First, keep stirring to prevent lumps and secondly, don’t overcook it, or it will curdle. If you follow those simple rules, you will have amazing.
Lemon curd recipe
Lemon curd ingredients
Ingredients
1 tbsp lemon zest
3 eggs
1/4 cup honey
1/2 cup lemon juice
6 tbsp coconut oil
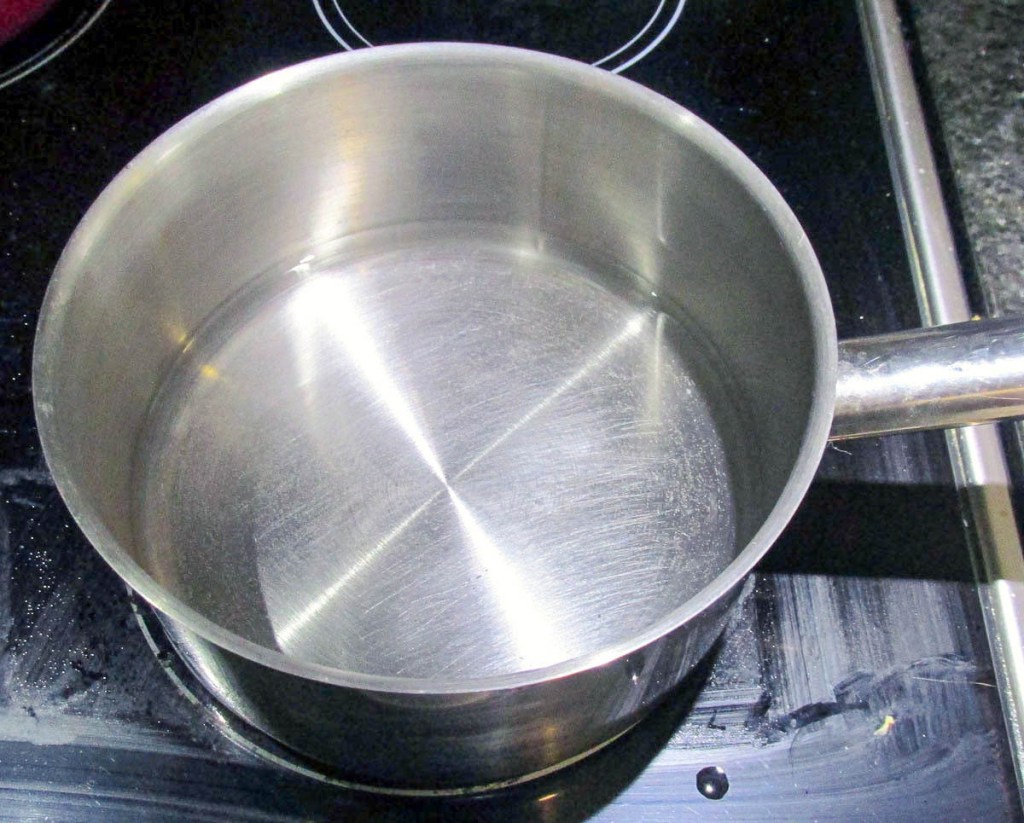
Take a large saucepan
Take a heavy bottom saucepan.
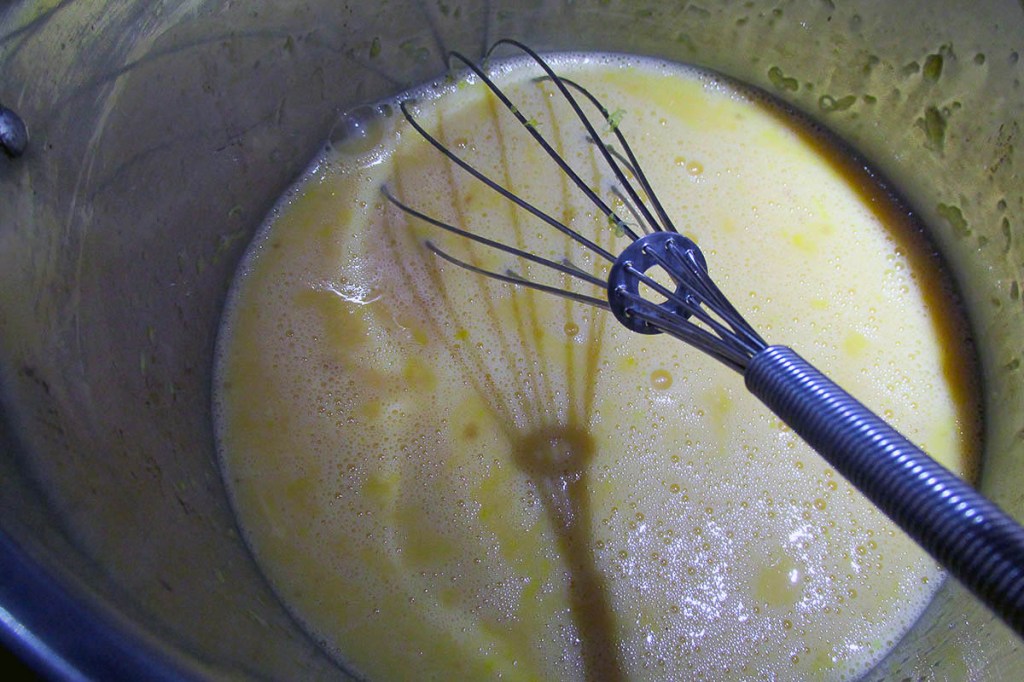
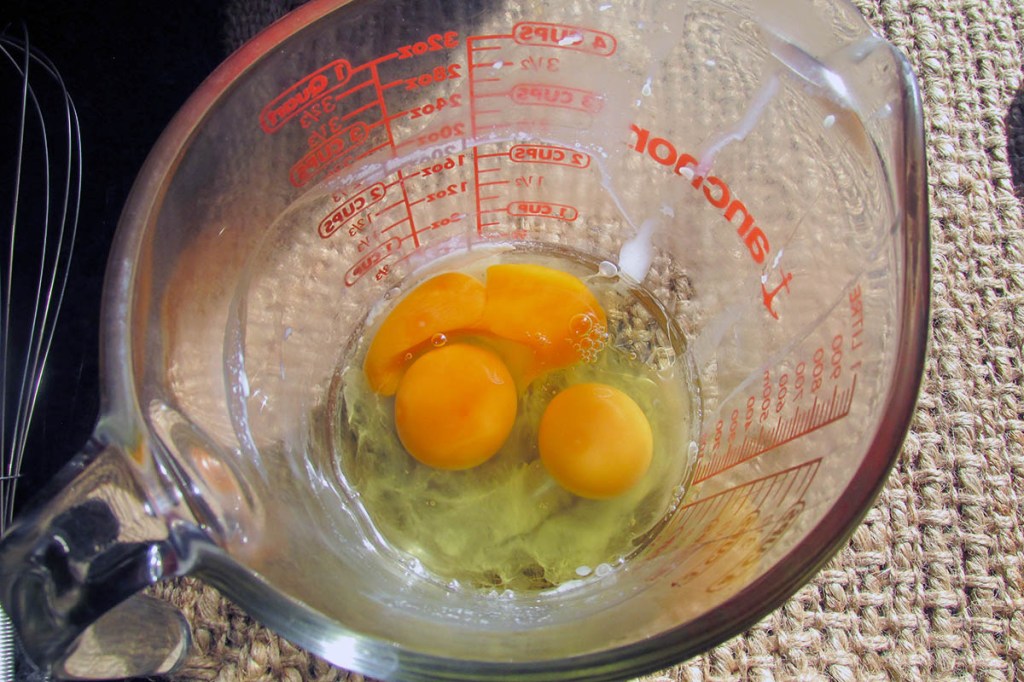
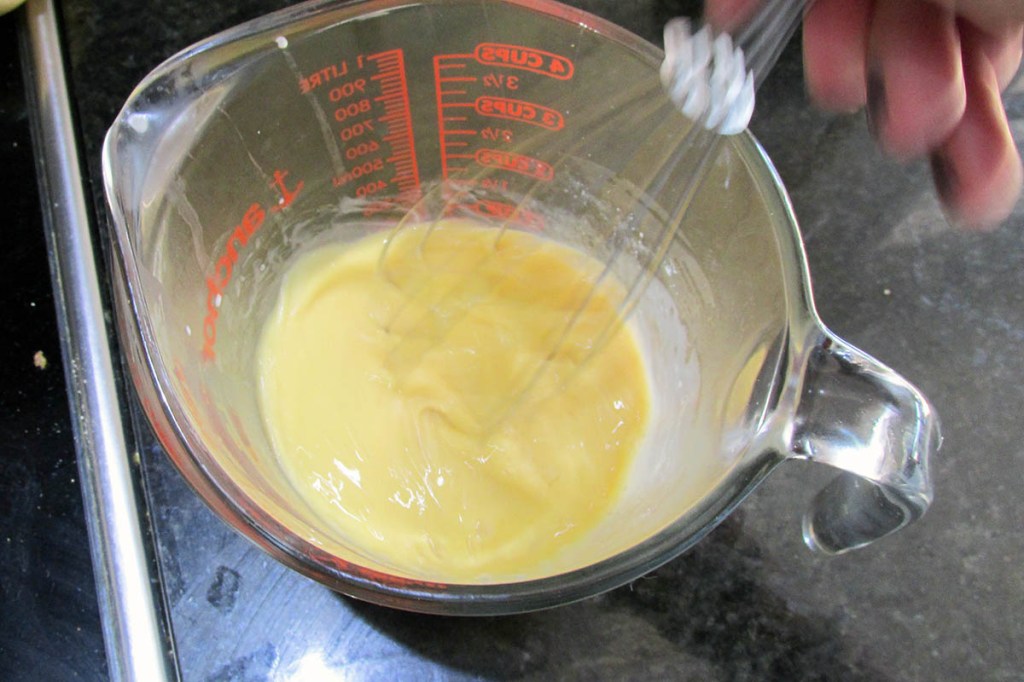
Put the eggs in the saucepan and whisk them.
Put the eggs in the saucepan and whisk them.
Add the honey and lemon zest to the eggs and whisk.
Add the honey and lemon zest to the eggs and whisk.
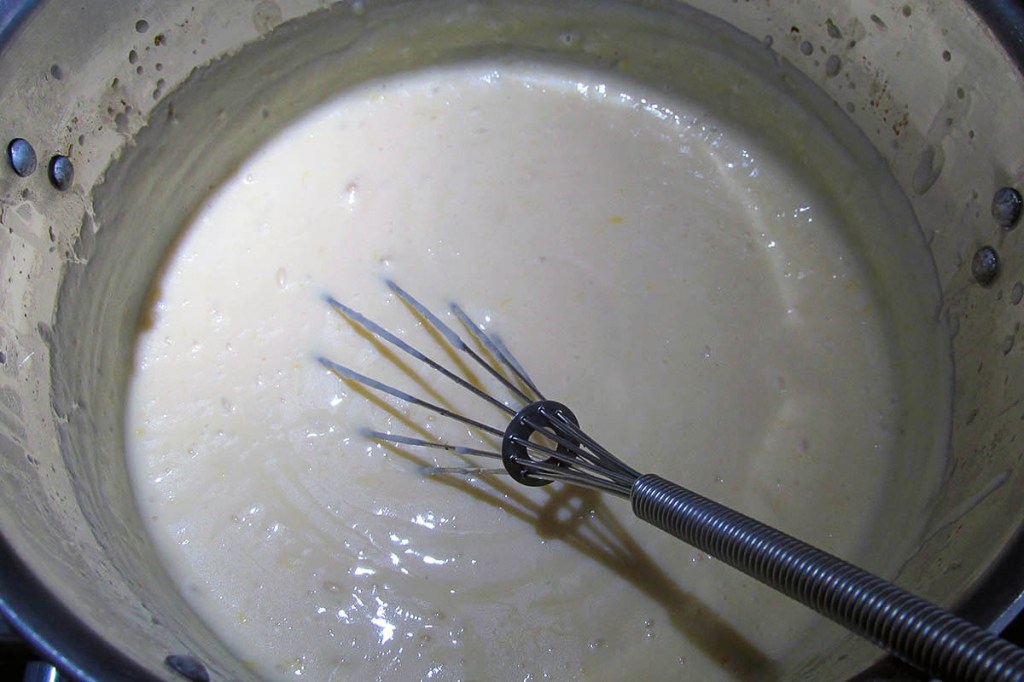
Put the pan over low heat.
Keep whisking the mixture while it is over the heat.
Be patient and keep whisking; the mix will thicken and become pale.
Be patient and keep whisking; the mix will thicken and become pale.
Whisk in the lemon juice and coconut oil a tablespoon at a time.
Whisk in the lemon juice and coconut oil a tablespoon at a time.
Keep whisking.
Remove the pan from the heat when the mix starts to bubble.
Keep stirring for a few minutes before letting the curd sit to cool.
Keep whisking the mixture while it is over the heat.
Be patient and keep whisking; the mix will thicken and become pale.
Whisk in the lemon juice and coconut oil a tablespoon at a time.
Keep whisking.
Remove the pan from the heat when the mix starts to bubble.
Keep stirring for a few minutes before letting the curd sit to cool.
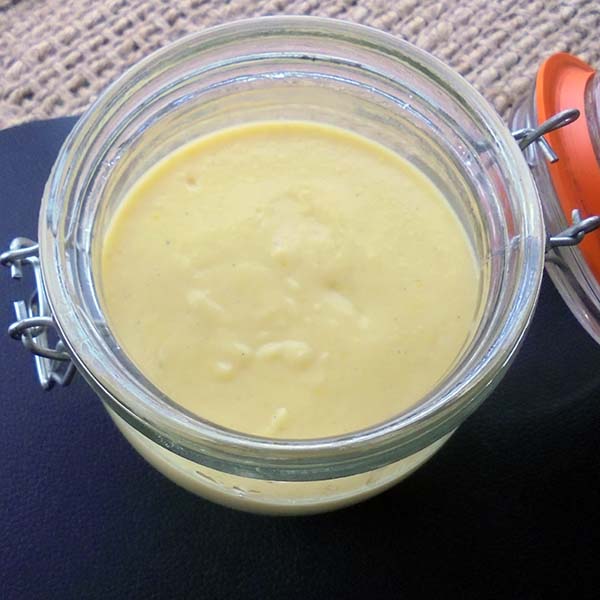
Strain the curd before serving.
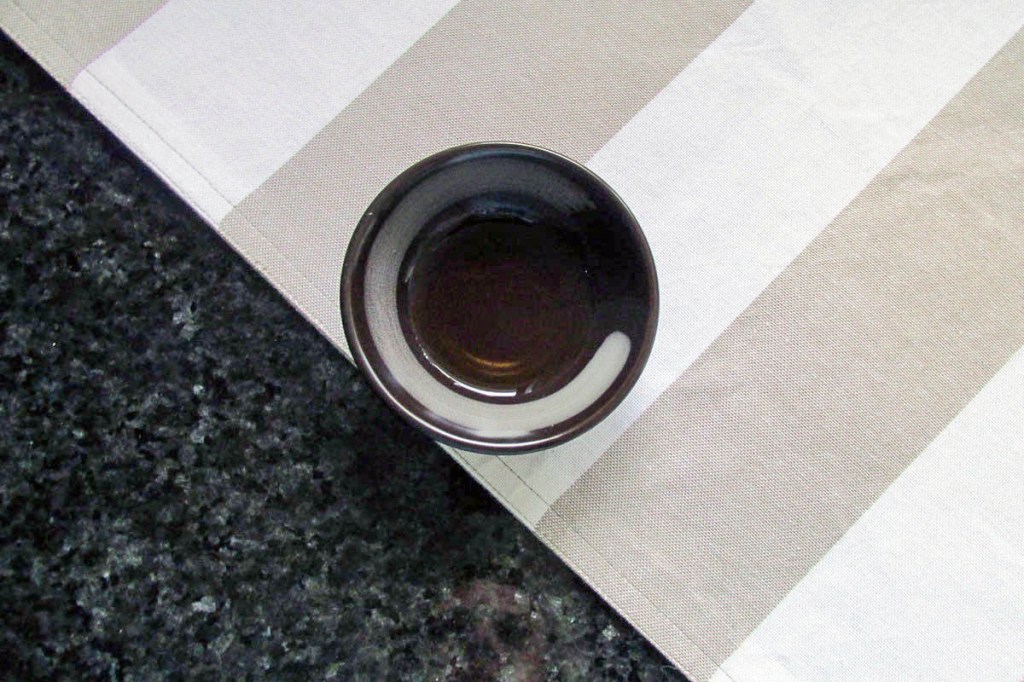
Store in the fridge and enjoy.
Nutrition
Per Serving: 61 calories; 5g fat; 4g carbohydrates; 1g protein
Equipment
Measuring cup
Measuring spoons
Saucepan
Whisk
Zester/ microplane
Nutritional disclaimer
Nutrition information is provided as an estimate based on the ingredients used and available in my area (New Zealand). The nutritional information is here to help you understand the recipe; I use MyFitnessPal to generate my estimates. For more accurate nutritional information, please use a nutritional calculator with the ingredients in your area.
Custard was a strong feature in the desserts of my childhood, apple crumble and custard was one of my favourites when i was growing up. There is nothing better on a cold night than a warm dessert with a generous helping of custard. Full disclosure, when I was younger I was a big fan of tinned custard, I wasn’t so fond of the packet powder custard that was always lumpy and watery. While I do miss custard, l don’t miss the massive amount of sugar that you get in store bought custard.
Thick and creamy custard
All the flavour with much less sugar
As with most of my clean eating versions of traditional recipes, it isn’t always the easiest process to find alternative ingredients that deliver the same flavours and in this case the right texture. All new recipes take time to get right, this one was no exception. I tired making custard with coconut sugar, maple syrup and with honey. Finding the balance between sweet enough and too sweet was the greatest challenge. After some trial and error
I found the honey gave the best flavour and the right amount of sweetness for me.
Smooth and silky
Smooth custard isn’t as easy as I thought it was going to be. When I’ve made custard with cane sugar in the past, it was reasonably easy to stop the eggs in the custard from scrambling in the custard. When making custard with honey, you have to watch the heat and take it slowly when heating the custard up. It is easy to overcook the eggs and end up with a lumpy mess.
Easy custard recipe
Easy custard ingredients
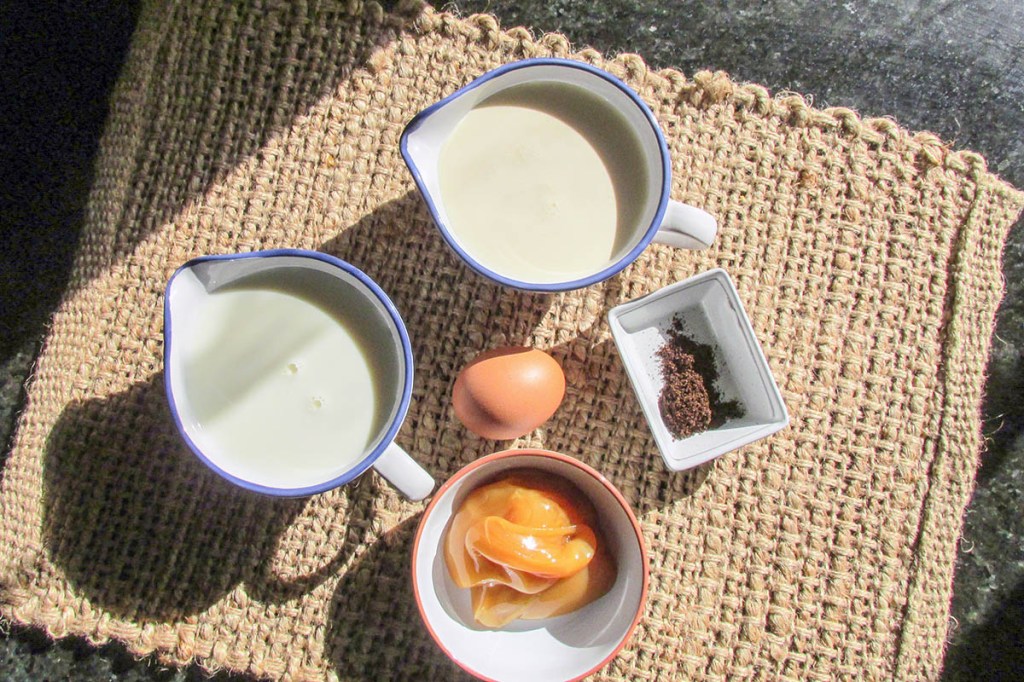
Ingredients
300ml milk
300ml double cream
3 eggs
1/2 tsp. vanilla
3 tbsp. honey
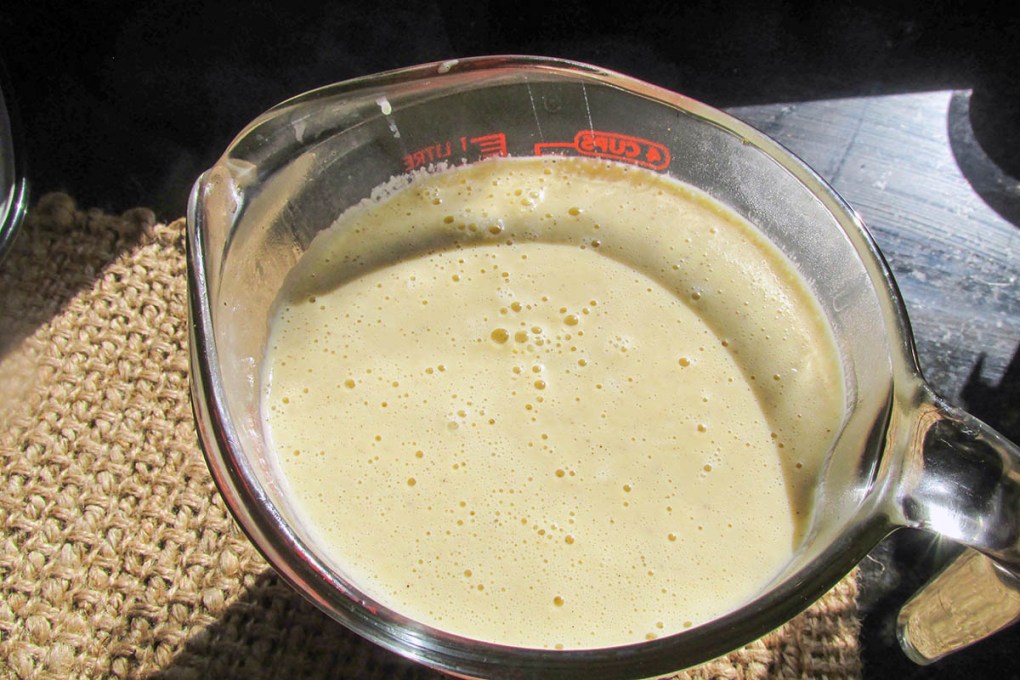
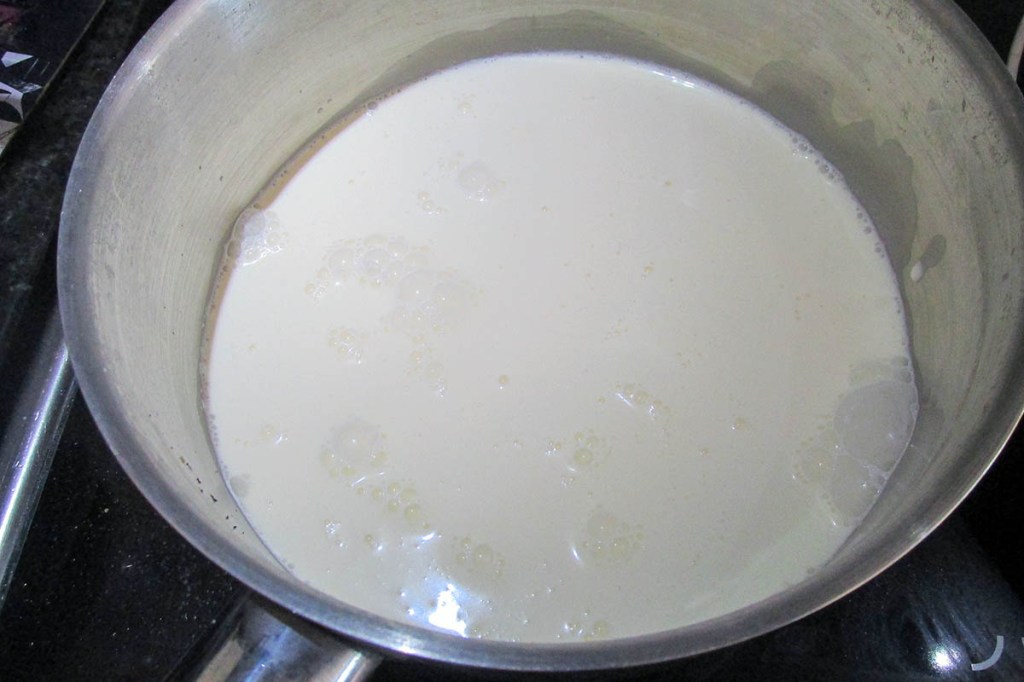
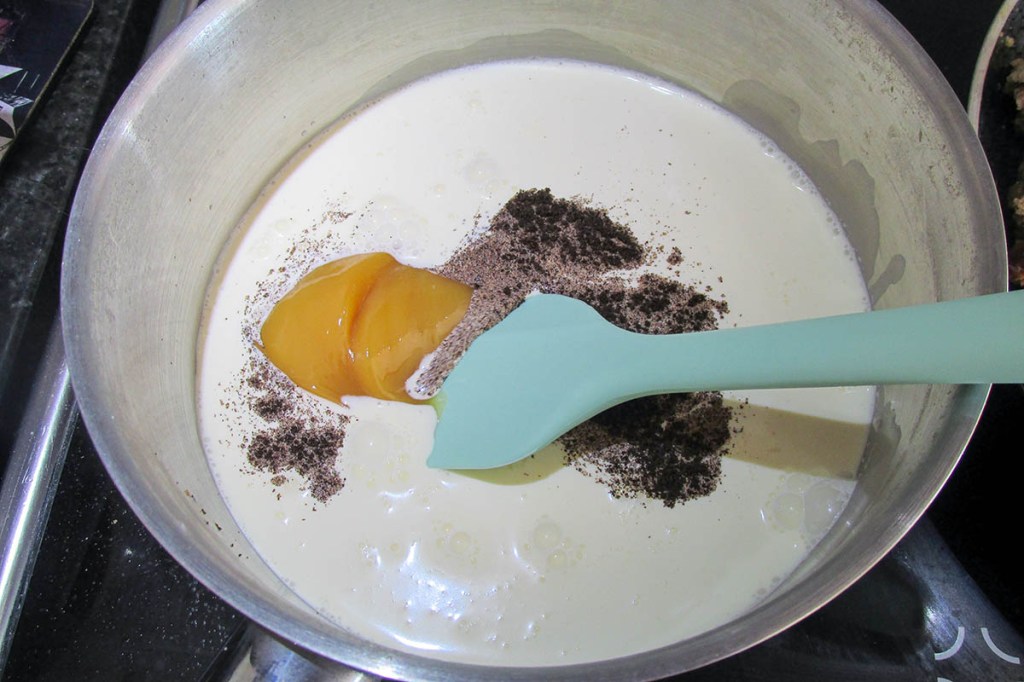
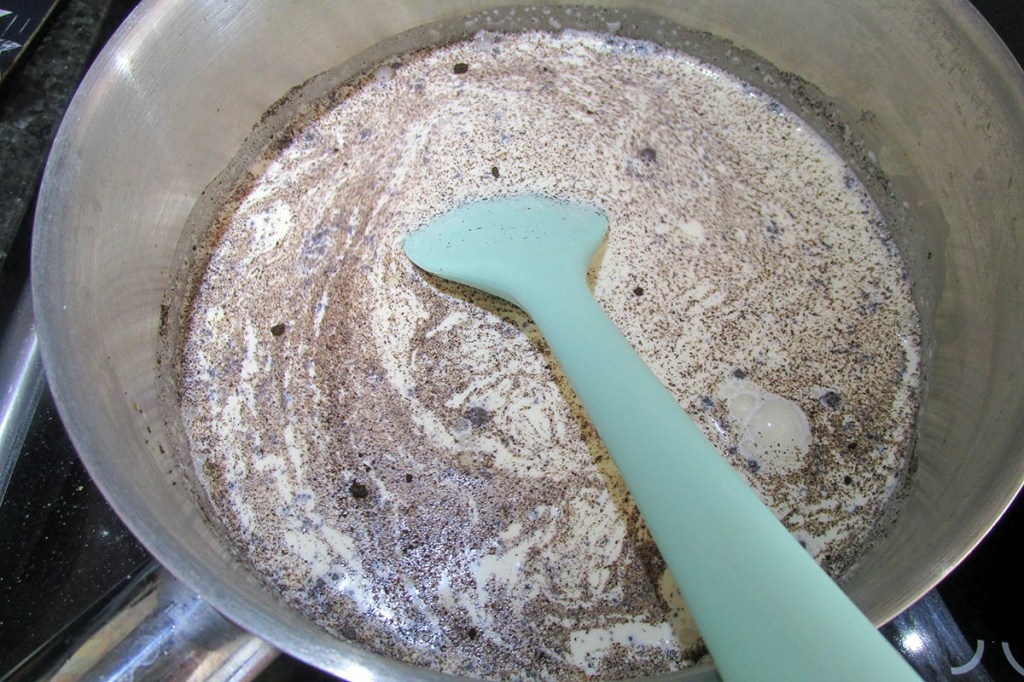
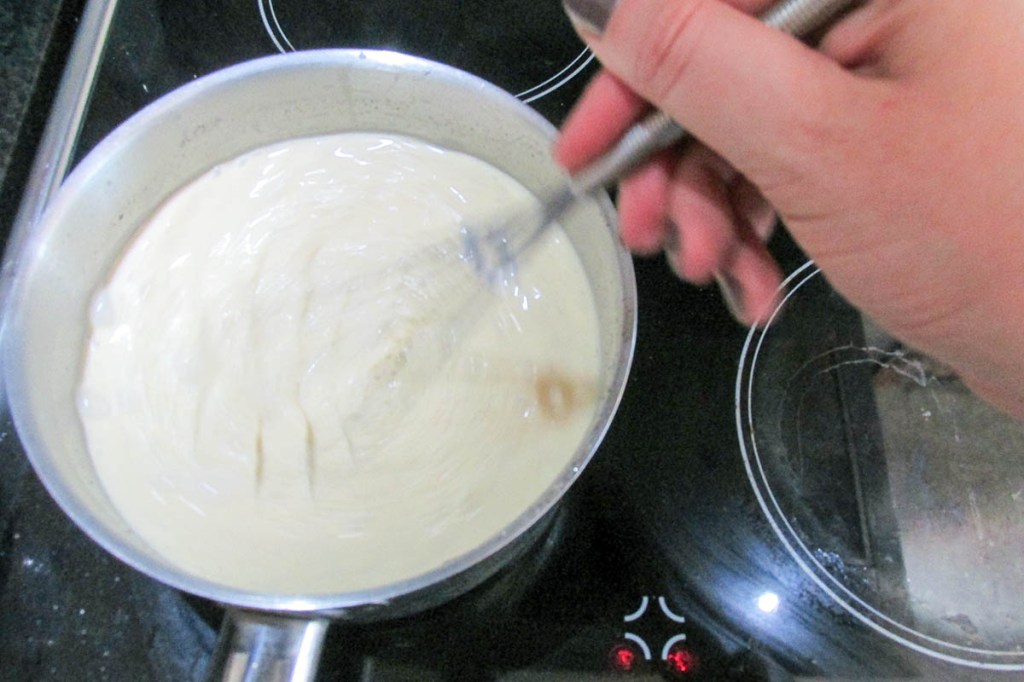
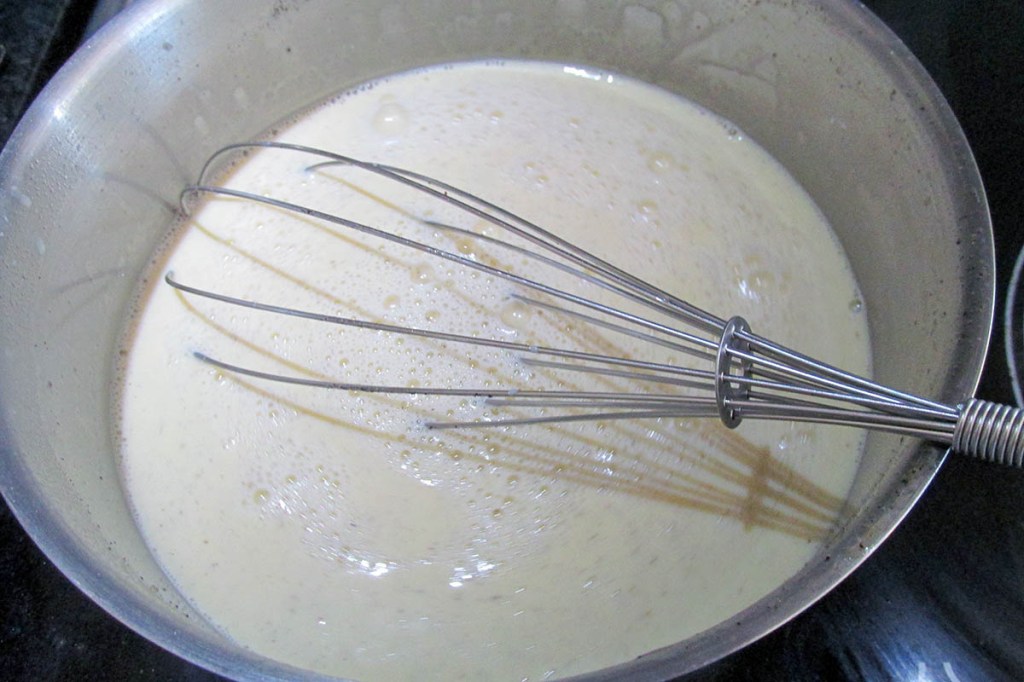
Take a large saucepan.Add the milk and cream to the pan.Add the vanilla.Add the honey.Stir until all of the honey is dissolved.In a bowl or jug beat the eggs until smooth.When the milk has started to steam it is ready to use.Add three tablespoons of the milk mix to the eggs and whisk.Slowly whisk the eggs into the remaining milk.When combined return to the heat to thicken.Watch the custard closely, keep stirring and remove it from the heat before it over cooks.Pour the custard into a bowl and set it in the fridge to cool completely.
This custard is lower in sugar without being lower in taste.
Credit: Cath @ easycleaneats
Ingredients
300ml milk
300ml double cream
3 eggs
1/2 tsp. vanilla
3 tbsp. honey
Directions
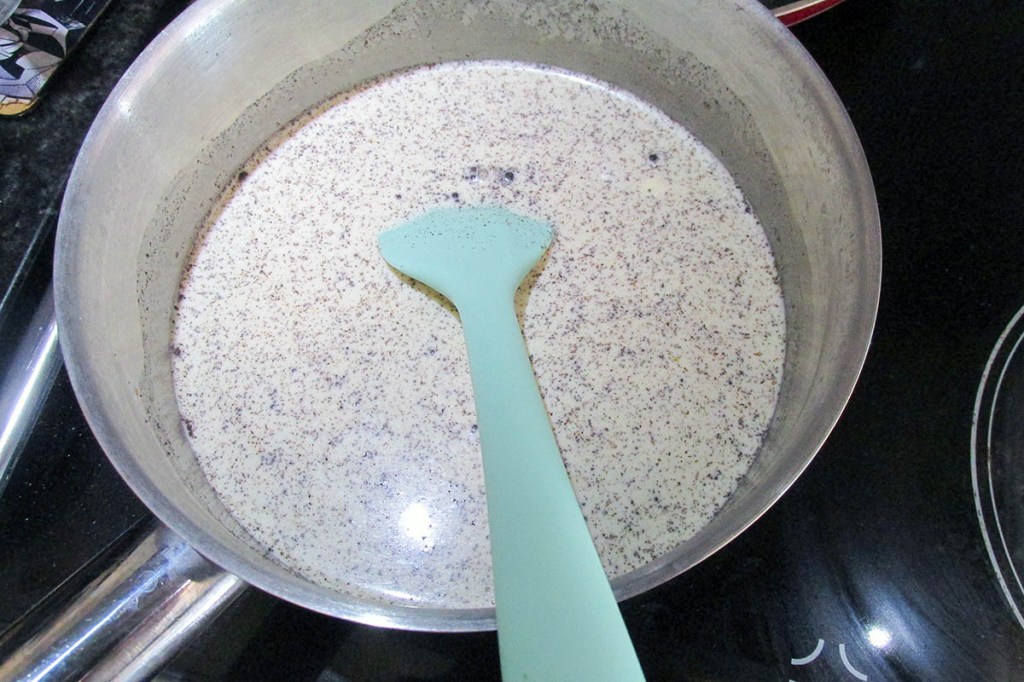
Take a large saucepan.
Add the milk and cream to the pan.
Stir in the honey and vanilla.
Stir until all of the honey is dissolved.
In a bowl or jug beat the eggs until smooth.
When the milk has started to steam it is ready to use.
Make sure the milk is warm not hot, it will cook the eggs if it is too hot.
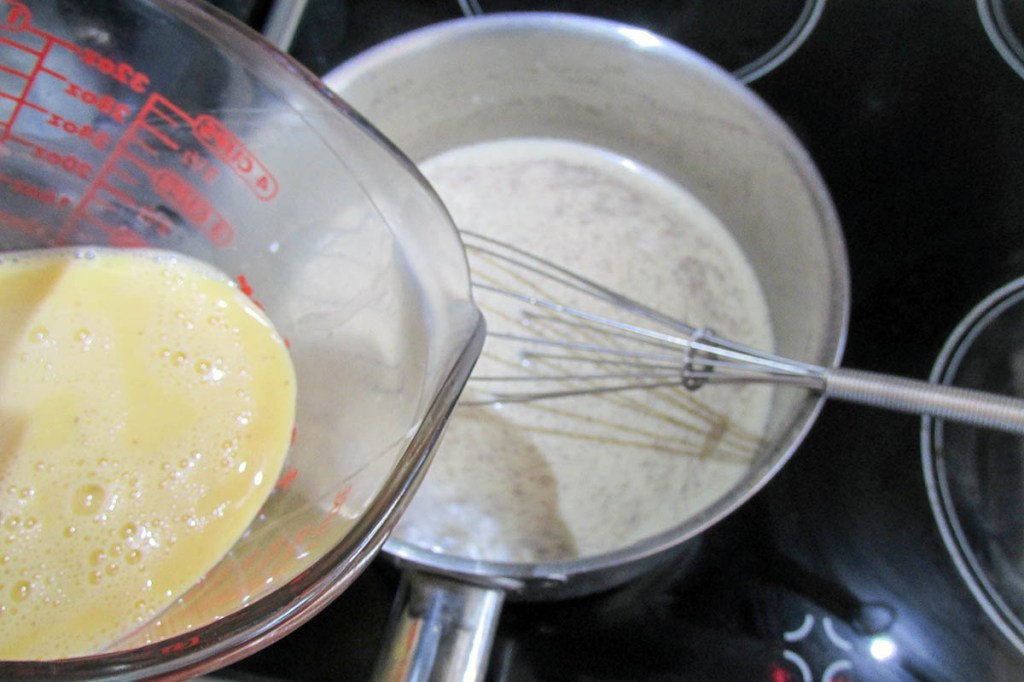
Add three tablespoons of the milk mix to the eggs and whisk.
Slowly whisk the eggs into the remaining milk .
When combined return to the heat to thicken.
Watch the custard closely, keep stirring and remove it from the heat before it over cooks.
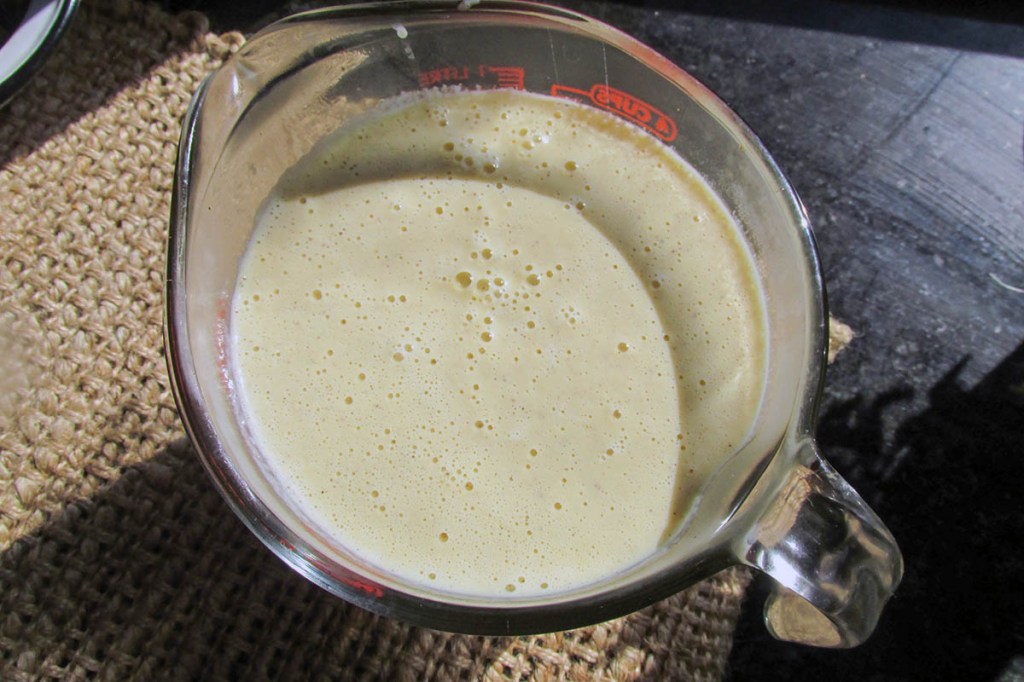
Pour the custard into a bowl and set it in the fridge to cool completely.
If you want warm custard reheat it gently in a saucepan.
Nutrition
Per Serving: 228 calories; 19 g fat; 9 g carbohydrates; 4 g protein
Equipment
Saucepan
Wooden spoon
Whisk
Measuring jug
Bowl
Nutritional disclaimer
Nutrition information is provided as an estimate based on the ingredients used and available in my area (New Zealand). The nutritional information is here to help you understand the recipe; I use MyFitnessPal to generate my estimates. For more accurate nutritional information, please use a nutritional calculator with the ingredients in your area.
It is feeling a lot more like winter here in the southern hemisphere. I’m feeling it a lot more thanks to some regular trips to Wellington because of my day job. While I’m a way off breaking out the winter coat, I am looking for warmer meals at night to make me feel warm and toasty.
Beef and onions
Slow cooker meal
This is quickly becoming one of my favourite slow cooker meals because it is so tasty. There is something so satisfying to put dinner in the slow cooker in the morning and come home to a perfectly cooked meal that just needs to be plated up. The bonus is having enough food to cover lunch for a few days; if Jaime doesn’t go back for seconds and thirds.
Sear in the flavour
I spent some time experimenting with this recipe to create a deeper flavour; I finally landed on the seared meat to make this recipe extra special. The extra step of searing the meat adds a beautiful caramelised flavour to the meat and, more importantly, to the gravy.
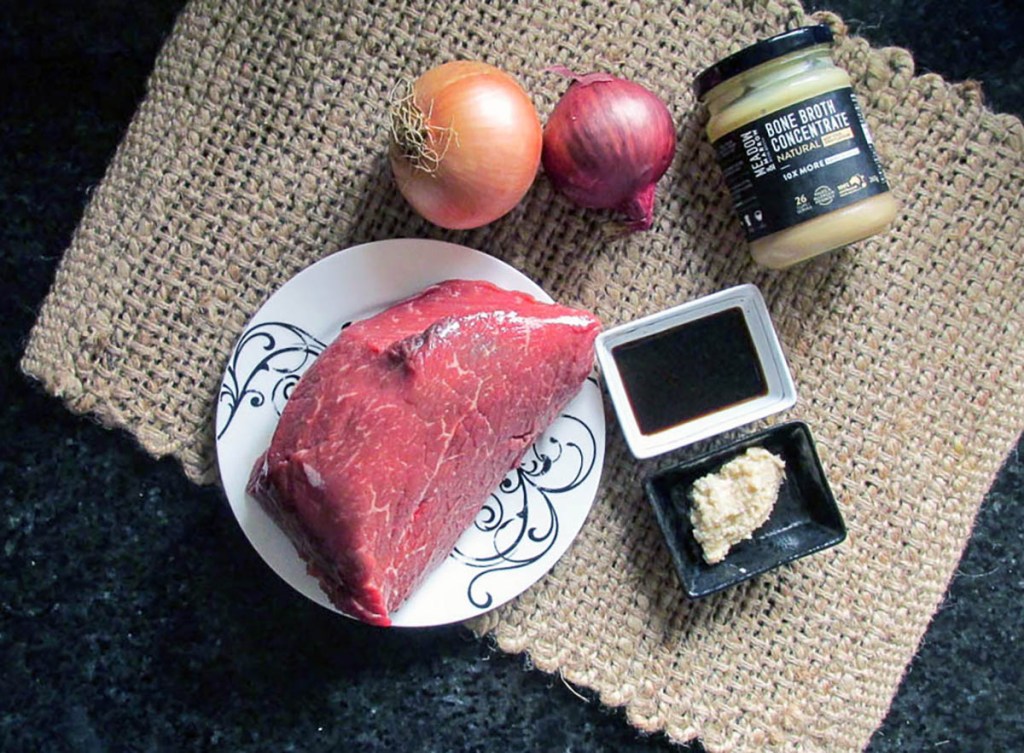
Brisket and onions Recipe
Ingredients
Beef and onions ingredients
1 tbsp. olive oil
4 onion, sliced
1.5kg beef roast
6 cloves garlic, minced
2 cups beef bone broth
2 tbsp. Worcestershire sauce
1 tbsp. coconut aminos
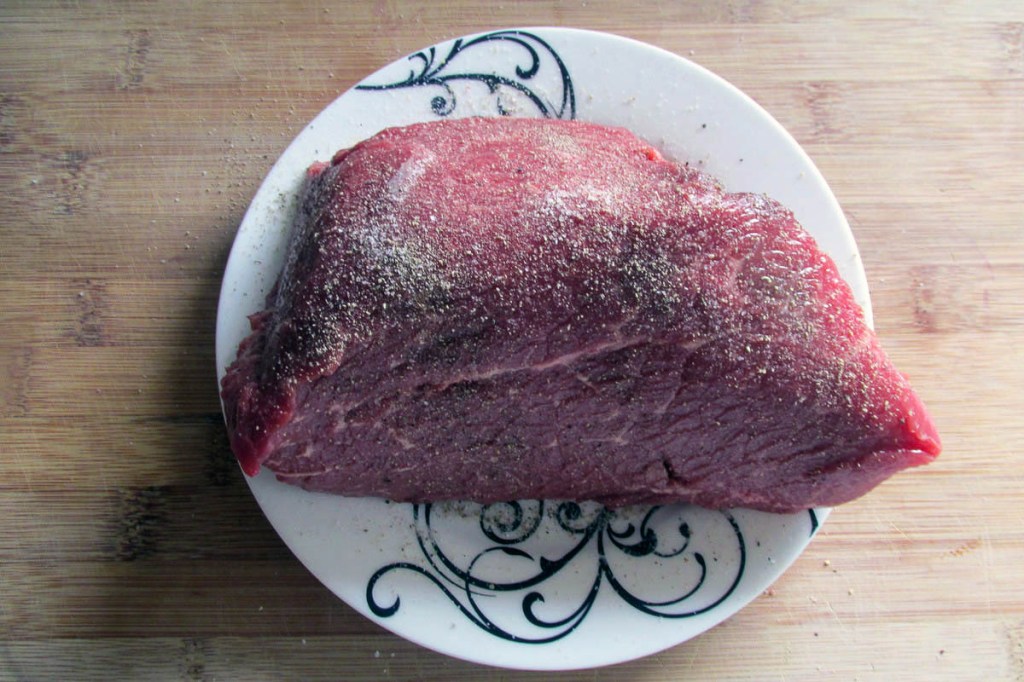
Salt and pepper
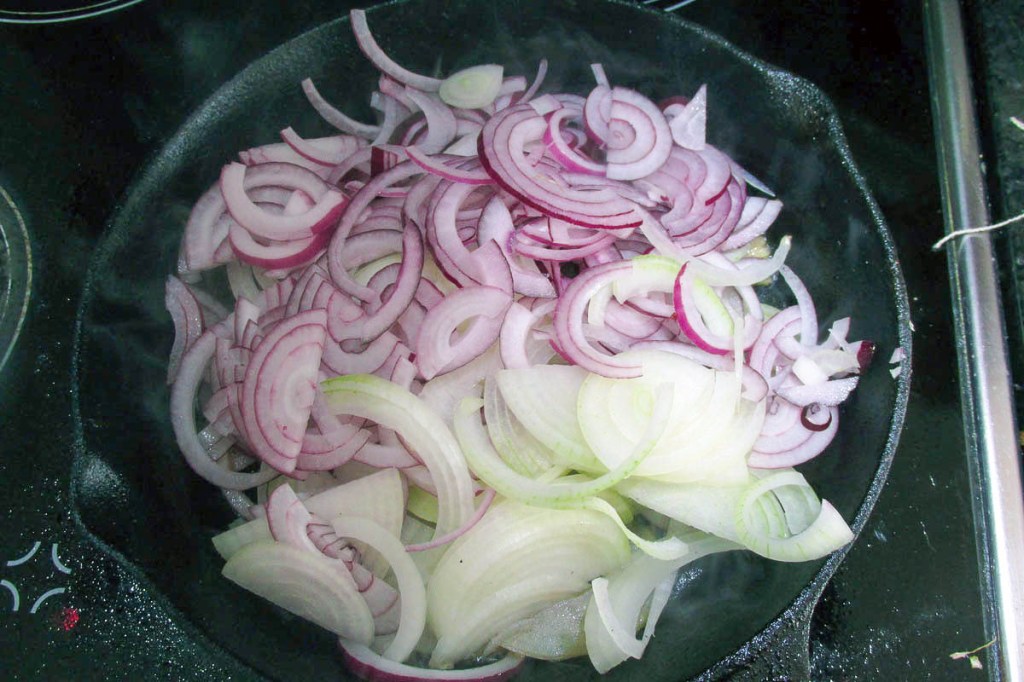
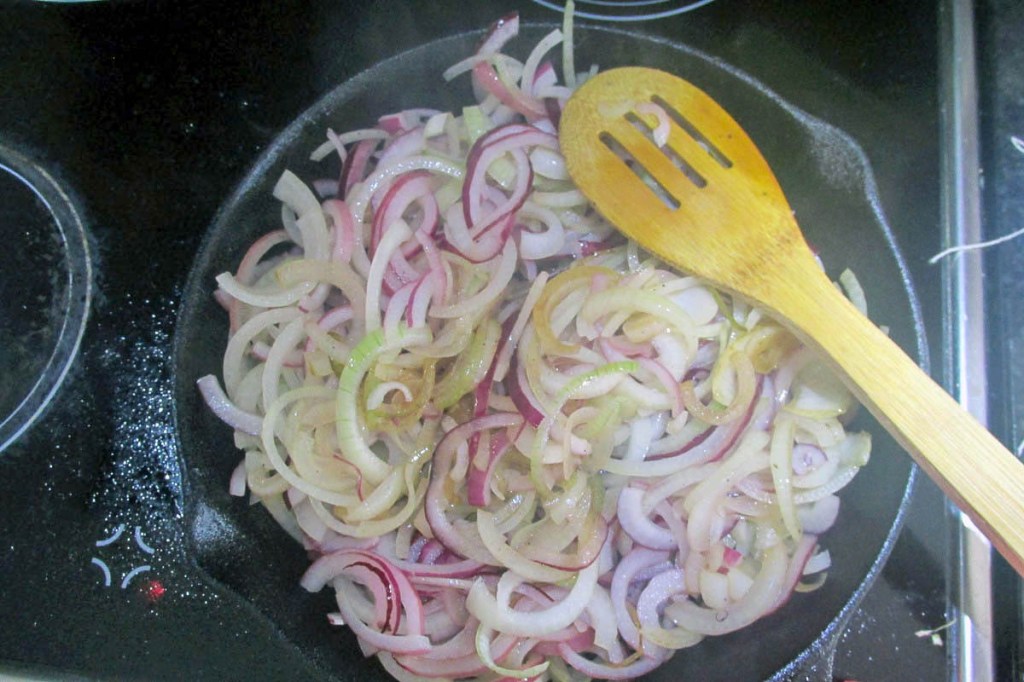
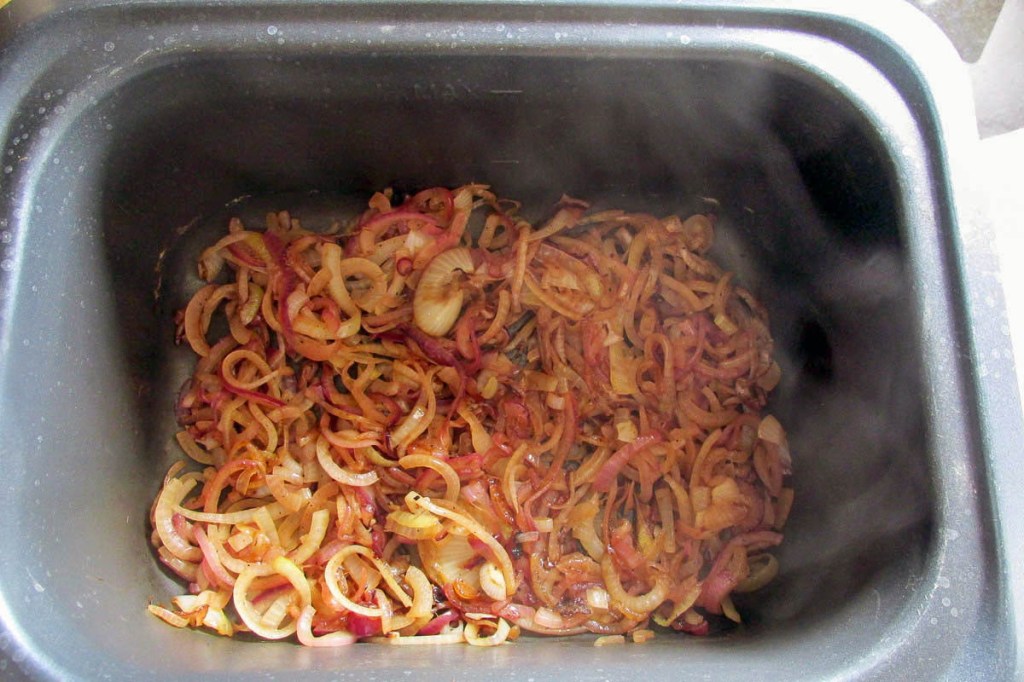
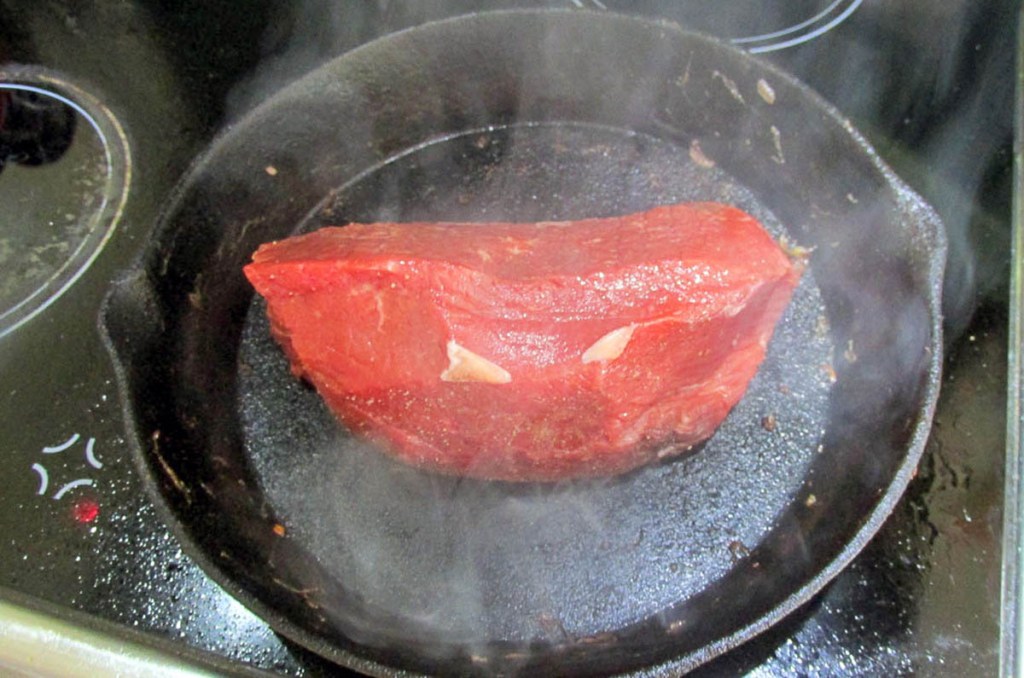
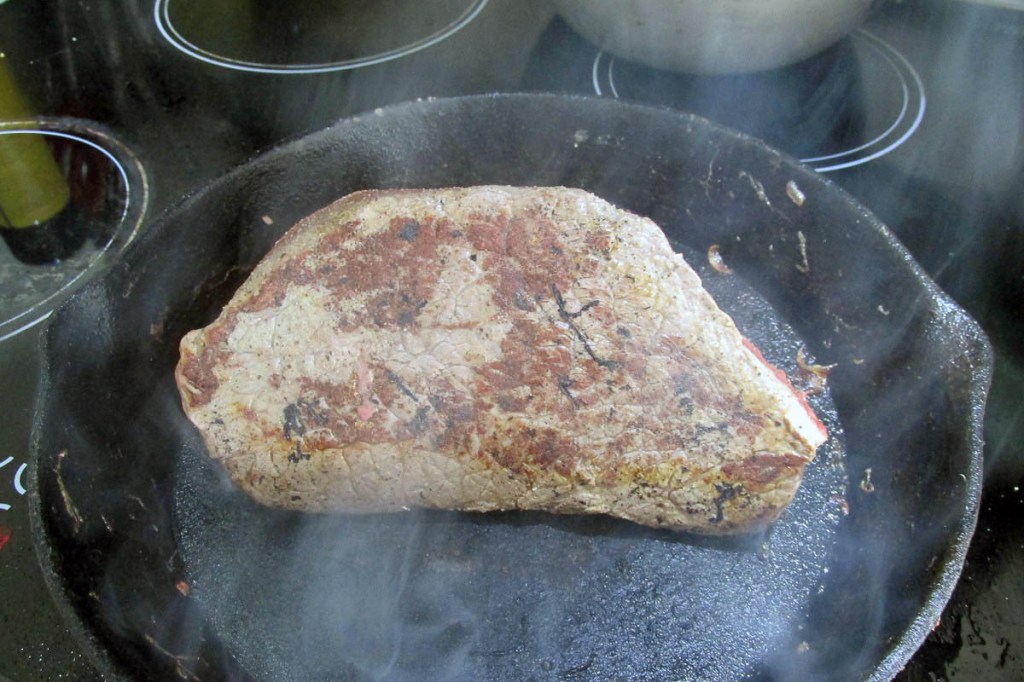
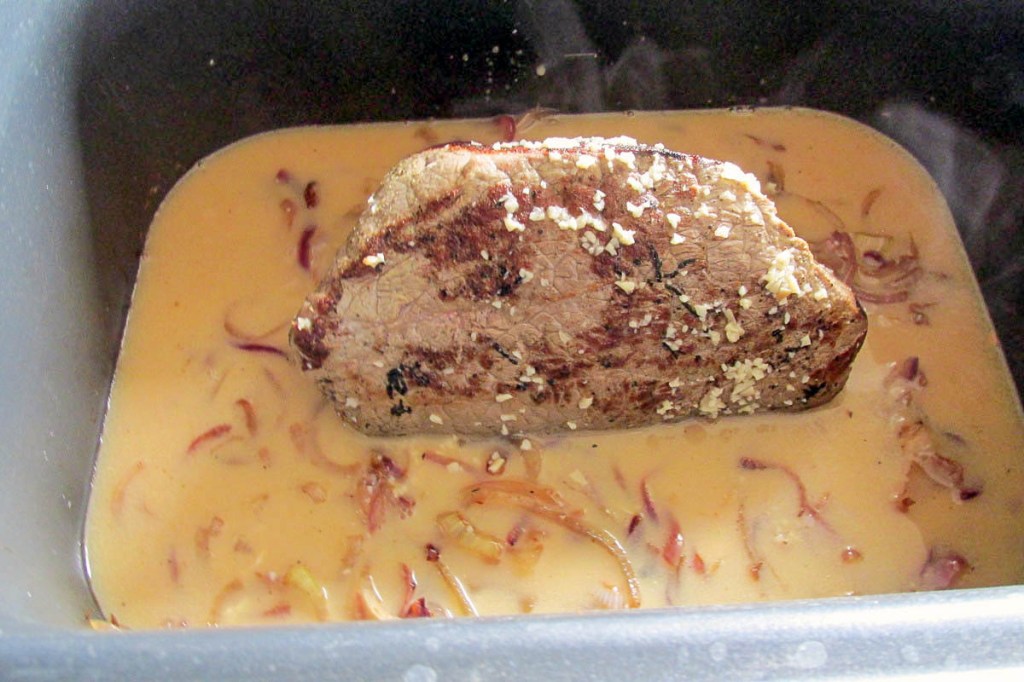
slice the onionsIn a large frying pan, heat the olive oil over a medium heat.Add the sliced onions to the pan and let them cook for about 15 minutesBe sure to stir the onion now and then.When the onions are caramelised, spread them out on the bottom of your slow cooker.Season the beef well.Sear the beef in the pan the onions were cooked in.Sear the beef on all slides.When the meat is browned all over, place it on top of the onions in the slow cooker.Pour the Worcestershire sauce, coconut aminos and broth over the meat.Cook the beef on a low heat setting for 6 to 8 hours.Serve on a bed of cauliflower rice.
This slow cooker meal is one of my favourites and delivers so much flavour.
Credit: Cath @ easycleaneats
Ingredients
1 tbsp. olive oil
4 onion, sliced
1.5kg beef brisket
6 cloves garlic, minced
2 cups beef bone broth
2 tbsp. Worcestershire sauce
1 tbsp. coconut aminos
Salt and pepper
Directions
In a large frying pan, heat the olive oil over a medium heat.
Add the sliced onions to the pan and let them cook for about 15 minutes, be sure to stir the onion now and then.
When the onions are caramelised, spread them out on the bottom of your slow cooker.
Return the frying pan to the heat.
Season the beef well.
Sear the beef in the pan the onions were cooked in.
When the meat is browned all over, place it on top of the onions in the slow cooker.
Put half of the onions on top of the brisket.
Pour the Worcestershire sauce, coconut aminos and broth over the meat.
Cook the beef on a low heat setting for 6 to 8 hours.
The meat should pull apart with a fork when it is ready.
Turn off the heat and let the meat rest for 20 minutes before serving.
Use two forks to pull the beef apart.
Using the forks mix the meat and onions together with the juices from cooking.
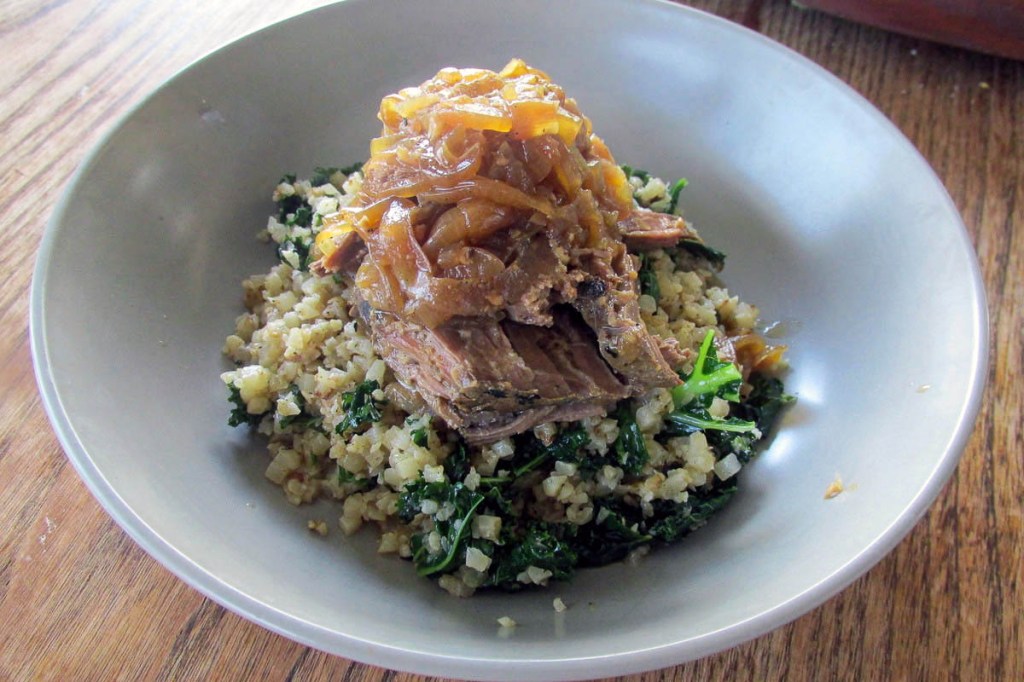
Serve on a bed of cauliflower rice.
Nutrition
Per Serving: 259 calories; 8 g fat; 6 g carbohydrates; 38 g protein
Equipment
Knife
Chopping board
Measuring jug
Measuring spoons
Frying pan
Wooden spoon
Tongs
Whisk
Nutritional disclaimer
Nutrition information is provided as an estimate based on the ingredients used and available in my area (New Zealand). The nutritional information is here to help you understand the recipe; I use MyFitnessPal to generate my estimates. For more accurate nutritional information, please use a nutritional calculator with the ingredients in your area.